
Crochet Pattern: Curly the Horse Appliqué
By Amy Yarbrough Р7 Comments| When I first accepted this project I had no idea how I was going to go about it but I knew the best way to start is to remember the basics. So I took some ideas and worked them out on paper before I took up my hook and started crocheting. As I worked I was thoroughly surprised at how well the horse was coming out. Now I am happy to present to you my very first horse appliqu̩, Curly the Horse! | 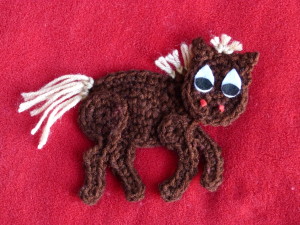 |
| Skill Level: |  |
Finished Size: 6″ (15 cm) wide, 4″ (10 cm) tall
| Materials: Medium Weight Yarn (approximately 25 yards of color A and a small amount of color B) Crochet Hook H (5.00 mm) Small amounts of felt in white, black, and red Fabric glue Scissors |
Gauge:
3 sc = 1″
3 rows = 1″
Gauge Swatch: 1″ w x 1″ h (2.5 cm x 2.5 cm) ch 4.
Row 1: sc in second ch from hook and in each ch across: 3 sc
Row 2 – 3: ch 1, turn, sc in each sc across: 3 sc
Finish off.
Need help understanding the abbreviations and symbols? Check out the crochet abbreviation chart.
Crochet Pattern: Curly the Horse Appliqué
Body and Neck
Round 1: with color A, ch 5, sc in second ch from hook and in next 2 ch, 3 sc in last ch, turn to work on opposite side of ch, skip 1 ch, sc in next 2 ch, 2 sc in last ch, sl st in first sc: 10 sc
Round 2: ch 1, (sc in next 4 sc, 3 sc in next sc) 2 times, sl st in first sc: 14 sc
Round 3: ch 1, sc in next 5 sc, 3 sc in next sc, sc in next 6 sc, 3 sc in next sc, sc in last sc, sl st in first sc: 18 sc
Round 4: ch 1, sc in next 6 sc, 3 sc in next sc, sc in next 7 sc, (sc, hdc) in next sc, hdc in next 3 sc, sl st in first sc: 21 sts
Do not finish off, continue with shaping the neck.
Shaping the neck
Row 1: ch 1, hdc in next st, hdc in next 2 sts, hdc2tog: 4 hdc
Row 2: ch 1, turn, sc in first st, hdc in next st, sc2tog: 3 sts
Finish off.
Head
Round 1: ch 4, sc in second ch from hook and in next ch, 3 sc in last ch, turn to work on opposite side of ch, skip 1 ch, sc in next ch, 2 sc in last ch, sl st in first sc: 8 sc
Round 2: ch 1, sc in next 2 sc, 2 sc in next each of next 3 sc, sc in next 2 sc, 3 sc in next sc, sl st in first sc: 13 sc
Round 3: ch 1, sc in next 3 sc, 2 hdc in each of next 4 sc, sc in next 4 sc, 3 sc in next sc, sc in next sc, sl st in first sc: 19 sts
Do not finish off, continue with ears.
Ears
Ch 3, sl st in second ch from hook, sc in next ch, working across top of head, skip 1 st, sl st in next 3 sts, ch 3, sl st in second ch from hook, sc in next ch, working across top of head, skip 1 st, sl st in next st, finish off. Sew head to neck.
Front Hind Leg
Round 1: ch 2, 6 sc in second ch from hook, sl st in first sc: 6 sc
Round 2: ch 1, 2 sc in each sc around, sl st in first sc: 12 sc
Do not finish off, continue with shaping front hind leg.
Shaping Front Hind Leg
Ch 9, 2 sc in second ch from hook, sc in next 3 ch, skip 2 ch, sc in next 2 ch, working on round 2 of leg, skip 1 st, sl st in next st
Finish off and sew leg to front of body, using picture as a guide.
Back Hind Leg
Repeat front hind leg and shaping front hind leg. Sew leg to back of body, using picture as a guide.
Front Foreleg
Round 1: ch 2, 6 sc in second ch from hook, sl st in first sc: 6 sc
Do not finish off, continue with shaping front foreleg.
Shaping Front Foreleg
Ch 7, 2 sc in second ch from hook, sc in next 2 ch, 2 sc in next ch, sc in next 2 ch, sl st in next st on round 1.
Finish off and sew leg to front of body, using picture as a guide.
Back Foreleg
Repeat front foreleg and shaping front foreleg. Sew leg to back of body, using picture as a guide.
Mane
With color B, cut 7 strands 2 1/2″ long. Attach 3 strands to center stitch of head like a tassel. Please see the How to Add Fringe or Tassels Using a Crochet Hook tutorial. Trim to desired length. With last 4 strands attach to neck.
Tail
Cut 4 strands 8″ long. Attach to back of body. Trim even.
Eyes and Nostrils
With white, black, and red felt, cut out eyes and nostrils and glue with fabric glue to face. Use picture as a guide.
I had a lot of fun making this and I hope you will too. If you run into any problems just leave me a comment and I’ll see what I can do.

Sorry, to me it looks like a cat! Cat eyes, cat ears.
Thanks for lovely news letter very informative wanted to learn tunisian stitch toutoril will help me learn it quickly seems quite easy
looks more like a cat with a horse tail
It says to use the picture as a guide. I don’t have a picture on the page. I’ll try refreshing the page. But I’ll try it even if I can’t get the pic. Thanks.
Now the picture is there.
Makes a beautiful cat. Face needs to be longer instead of round. The back is
round, needs to be slightly flat. I know I was raised on a farm and still live on
a farm.
Thank you for the good work you do.
Have a great day!.
Cute!!