
How to Crochet: Tunisian Simple Stitch (TSS)
By Rachel Choi – 127 CommentsThis tutorial is for both right and left handed people. For left handed pictures, roll your mouse over the image and it will change for you.
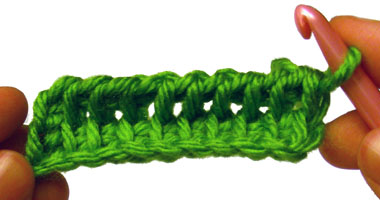
Tunisian stitches also known as afghan stitches, create a very elegant basket weaved look. Tunisian stitches are like a cross between crocheting and knitting because in crocheting these stitches it involves leaving loops on your hook when you are crocheting forward and then removing them when you crochet in reverse. Don’t let this confuse you! This tutorial will walk you through creating a small crocheted piece using Tunisian simple stitch.
Here is what Tunisian simple stitches look like:
Front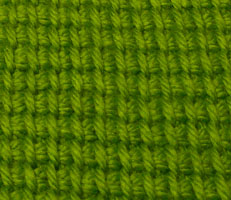 |
Back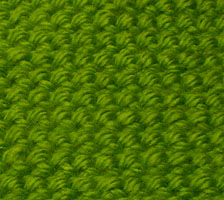 |
Below is a step by step tutorial that will slowly walk you through crocheting a few rows of Tunisian simple stitches. If you need help with any of the steps, don’t be afraid to ask by leaving a comment on this post!
Step 1: Chain 10 (How to Crochet a Chain)
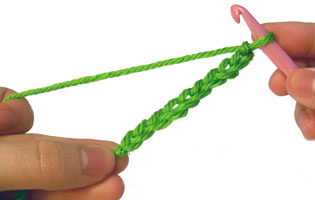
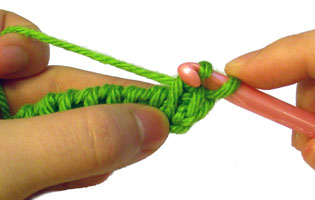
Step 2: Insert your hook into the second chain from your hook
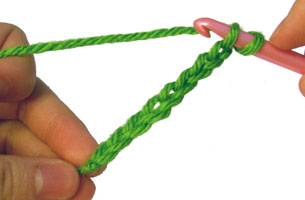
Step 3: Yarn over (wrap the yarn over your hook)
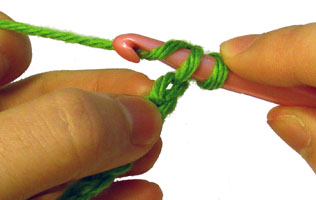
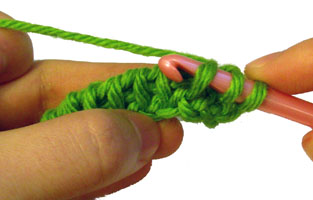
Step 4: Pull the strand of yarn through the first loop on your hook. (This adds one loop onto your hook)
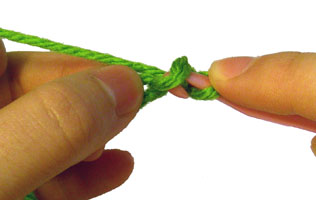
Step 5: Insert your hook into the next chain.

Step 6: Yarn over (wrap the yarn over your hook)
Step 7: Pull the strand of yarn through the first loop on your hook. (This adds one loop onto your hook)
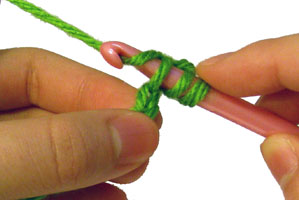
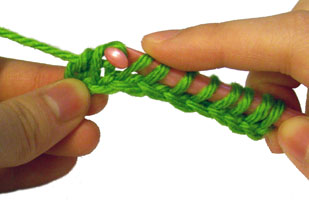
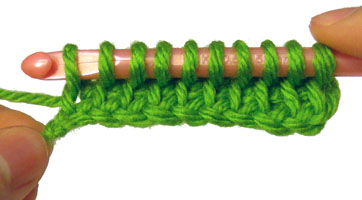
Step 8: Repeat steps 5 – 7 for each chain across. When you are done you should have 10 loops on your hook, since you started out with 10 chains.
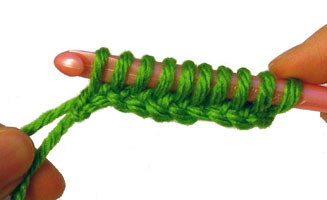
You just completed the first half. Now let’s finish this row of Tunisian simple stitches by working in the other direction. Just follow the steps below!
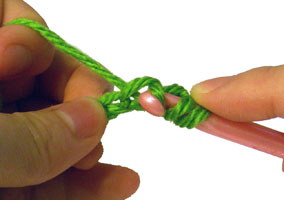
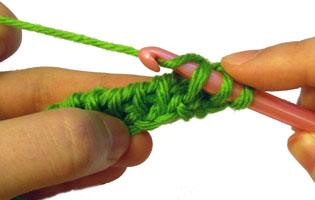
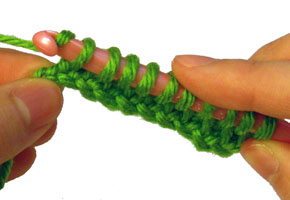
Step 9: Yarn over (wrap yarn over your hook)
Step 10: Pull strand of yarn through the first loop on your hook. (There should still be 10 loops on your hook)
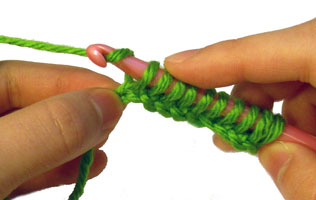
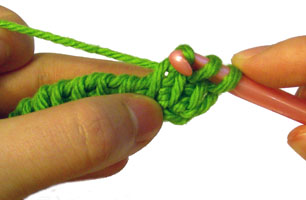
Step 11: Yarn over (wrap yarn over your hook)
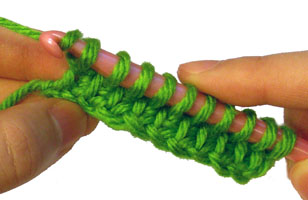
Step 12: Pull strand of yarn through the next 2 loops on your hook. (There should now be 1 less loop on your hook)
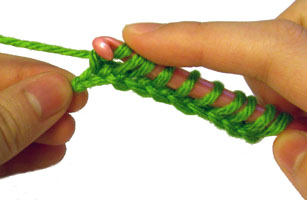
Step 13: Repeat steps 11 – 12 until there is only 1 loop left on your hook
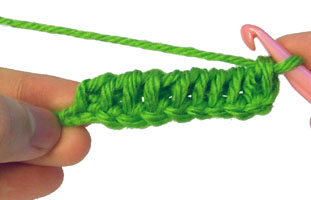
Congrats! You have just completed one row of Tunisian simple stitches! Let’s try another row.
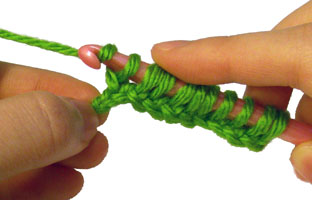
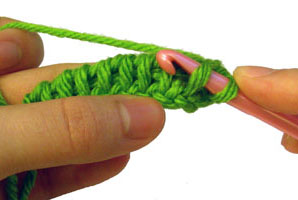
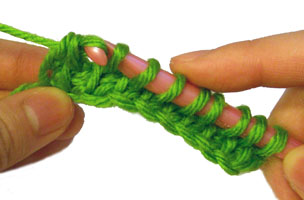
Step 14: Insert your hook into the second stitch (the stitch that looks somewhat like a vertical bar, it is located on the front of the work) Do not insert it into the first stitch; always insert it into the second stitch to make even rows. There are 10 “vertical bars” on the front of your work. These are the stitches that you will be inserting your hook into.
Step 15: Yarn over (wrap yarn over your hook)
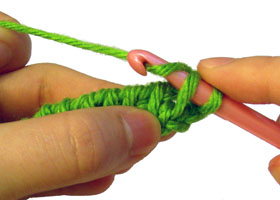
Step 16: Pull the strand of yarn through the first loop on your hook (This adds one loop onto your hook)
Step 17: Insert your hook into the next stitch (that looks somewhat like a bar)
Step 18: Yarn over (wrap yarn over your hook)
Step 19: Pull the strand of yarn through the first loop on your hook. (This adds one loop onto your hook)
Step 20: Repeat steps 17 – 19 for each stitch across. When you are done you should have 10 loops on your hook, since you started out with 10 chains.
Now it is time to work in the other direction, follow the next steps to do so!
Step 21: Yarn over (wrap yarn over your hook)
Step 22: Pull strand of yarn through the first loop on your hook.

Step 23: Yarn over (wrap yarn over your hook)
Step 24: Pull strand of yarn through the next 2 loops on your hook.
Step 25: Repeat steps 23 – 24 until there is only one loop left on your hook.
Congrats! You just completed another row of Tunisian simple stitches. To make more rows, simply repeat steps 14 – 25.
If you need help with any of the steps, don’t be afraid to ask by leaving a comment on this post!

[…] How to Crochet: Tunisian Simple Stitch (TSS) How To Crochet: Single Crochet with Beads How to Crochet: Double Crochet with Beads Perfecting Your Craft: Finishing the Project How to Read Crochet Patterns How to Crochet – Basics How to Crochet: Broomstick Lace Different Ways to Crochet in the Round […]
Not sure what I am doing wrong, but the left side of my swatch doesn’t look the same as yours. Mine has gaps on the left that can be clearly seen through. What am I doing wrong?
Hi Mariah,I’m not 100% sure why there’s a gap in your work, but try looking at the pics in step #12. Make sure you are actually pulling through 2 loops and not just one. If you do as instructed, your left side should look like step #12’s pic.
Why does my first row almost always curl? I have tried to change how loose/tight I make my stitches. It happens in regular crochet and now in TSS. I really don’t know what to do or what I should change. I am a South Paw as well. Please ADVISE as to what I need to do and how to go about it!!
Much thanks ahead of time!!
Hi Sandra! Please see this post: Why Tunisian Crochet Curls and How to Get Rid of It
Didn’t win the book, but definitely scored with this tutorial. Thanks for posting it again!
That is the coolest instruction option ever for left handers ever. I was hard teaching myself to knit and crochet. This web page is definately getting saved on my PC. I trying to learn Tunisian right now…. Thanks from a South Paw…
Hi Rachel!
Thanks for the tutorial! I do have a quick question. How would you change colors?
Hi Heather! You can change colors in the same fashion you’d normally change colors in crochet. For instance, when you’re ready for the new color you can drop the old color and start drawing up loops with the new color. Here’s a basic tutorial on changing colors if you need it: How to Change Colors in Crochet
Thanks Rachel!
Also, are increases and decreases for this stitch done in the normal fashion? Other than going through the bar, instead of the top of the stitch?
Yes, it is very similar to regular increasing and decreasing. To decrease you’ll insert you hook into 2 of the bars, instead of just one, then pull the yarn through both of the bars. To increase you’ll pull up and extra loop by inserting you hook between 2 bars.
Thanks so much for the tutorial — I’ve been interested in Tunisian crochet for a long time but had never seen anyone do it. Do you have tutorials for more advanced stitches??
Sorry, not at the moment Linda. But hopefully we can get put some more up in the future 🙂
There is a knit stitch tutorial if you are interested in that though: How to Crochet: Tunisian Knit Stitch (tks)
This is great. Thanks. Just wondering, what if you want to make a wider piece? If i wanted to start with something as long as a 50 chains for instance, obviously i can’t have that many loops on a hook at once, so is it possible to make a piece that wide?
Aubrey, there are special Tunisian crochet hooks that you can use. They are extra long hooks compared to regular hooks or have a cord at the end that holds all the stitches.
Hi, I’m using a hook with a ling plastic cord at the end, my new blanket (WIP) is over 1metre wide! So easy to do it like this.
long, not ling!
Wow! I’m impressed with your simple, easy-to-follow instructions! And the pics are fantastic. They don’t miss a beat. For somone who is reading-challenged when it comes to directions; the pics are vital. Your pics truly are step by step! Complete!
Almost every site or set of instructions I’ve tried to read/look at to learn how to crochet has left me wanting and making up my own steps in order to fill in the gaps the writer left behind. Not you. Terrific! Thank you.
I need a Tunisian fingerless mitten pattern, do you have one? I made a simular pair like these but want a thumb hole any suggestions?
Hi Belinda, I don’t have a Tunisian fingerless mitten pattern, but you can use this stitch tutorial to crochet a rectangle that you can sew into a fingerless mitten. Fingerless mittens are typically a rectangle made with whatever stitch you like, then folded lengthwise and sew together. When you sew it together you’ll leave a hole for the thumb.
HI! for a fingerless mitten pattern, you might want to look under “wrist warmers”,,, I found a pattern in a book for a knitted version, but crocheted should do fine.. a square that is folded in half and sewed up the side, leaving a hole for the thumb. My daughter loves hers!
Hi Rachel, I feel I am an experienced crocheter, but I am struggling with the Right Tunisian simple stitch. It is an awkward stitch in that you “twist” around and go from left-to-right on the vertical bars. This is a very, very slow process. Any ideas on how to make this stitch easier?? Thank you!
Hi Jennifer, is the Right Tunisian simple stitch the same as the Tunisian simple stitch shown in this tutorial? If so, let me know which step you get stuck on so that I can help you better. If it’s different, I might not be familiar with the stitch you’re trying.
No, Rachel ~ the Right TSS: Insert hook from left to right behind front vertical bar, yo, pull loop thru.
The pattern I am using (from Crochet! summer 2012) Baby Sunshine Blanket has a pattern stitch of (1) TSS then (1) Right TSS across row.I have been crocheting for 40+ years and can’t seem to get this to work comfortably.
Hmmm…that kind of reminds me of the reverse single crochet / crab stitch, but with the Tunisian crochet instead of the single crochet. Maybe if you take a look at that tutorial it may help you out with how to orient your crochet hook. Both are like working backwards and take a bit of getting used to to do. Here’s a link: How to Crochet: Reverse Single Crochet or Crab Stitch
Ok, so if I read this right when doing the second half of the stitch you do yarn over and pull througfh one stitch and then yarn over and through two stitches, then yarn over through one stitch and yarn overe and through two stitches and repeat for the whole thing? Or do you go through one stitch just at the begining and through two on the rest of the row?
Hi Karen, you’ll repeat steps 11 – 12 for the rest of the row. So at the beginning of the row you’ll do steps 9 – 10, which is the yarn over and pull through one loop. They you’ll do steps 11 – 12, which is the yarn over and pull through 2 loops. And you’ll repeat the yarn over and pull through 2 loops the rest of the way across.
hi,i made a blanket out of the tunisian stitch,but now i´ld like to make mittens,but i cant find any understandable patterns, got any pointers or ideas 4 me? and do i need to get a tunisian hook? only have the regular..
heers!
Just did a bing search and found these at Red Heart dot com. Link below. These mittens are made in the round, not sure if you have done tunisian in the round yet. Its pretty easy…
http://www.redheart.com/files/patterns/pdf/SN0164.pdf
I really like this stitch — but my sample piece keeps curling toward itself (the bottom curls up and the top curls down. What am I doing wrong? Thanks!
M, the curling is normal. Here’s a post about it if you’d like to learn more about it: Why Tunisian Crochet Curls and How to Get Rid of It
Hi! When you began crocheting into the chain of 10, did you crochet into the back stitch only? Thanks in advance!
Chyna, it’s like when you normally crochet into a chain. You can either use the stitch on the back or the stitch on top. It’s really just personal preference. You can try either way and see which one you like better 🙂
Hi..Im making arm warmers for Dialysis Patients and would like to know how to make an
opening for the thumb..I make them in the round Tunisian simple stitch. They like them fingerless
but opening for the thumb..
Would like the information if there is a way to do this..
Shirley
Hi Shirley, you can make a hole for the thumb by working back and forth in rows instead of rounds that join. You can start the arm warmer in rounds though, and work in rows instead when you get to where you want the thumb hole to be. Then work in rounds again when your thumb hole is big enough.
Thank you for the tutorial! I’ve never even heard of that stitch, but that’s so cool, I’m crazy happy 😀
Forgive me if I’m wrong, but this is what we call the afghan stitch. I’ve been doing this stitch since about 1983 for afghans and christmas stockings. This stitch makes a perfect background for cross-stitch using yarn, which is what I do with my stockings. It does take more yarn than regular crochet stitches so you have to make allowances in charts or you’ll run short.
I haven’t checked out your reverse Tunisian yet but am curious about that one. If I’m wrong, exactly what is the difference between the two?
Yes, this stitch is also called the afghan stitch.
I agree with Sheila, I know it as an afghan stitch. If you insert your hook in the back loop or the yarn that’s in between the stitches it will not curl. This includes the chain.
Hi, I am right-handed while my daughter is left-handed. I simply LOVE how you have made all your tutorials work for both of us! In Norwegian this method of crochet is called “hakking” and you can even get special hooks/needles. They look like crochet hooks, but are longer and there might be a hook at either end.
THANK YOU so much for this tutorial!! I love the Tunisian stitch, and actually made a lovely, long scarf with it. But I’m stumped on how to properly end it. So, I have one question:
How do you do the last row(s)??? Thanks, again!
We have a tutorial about finishing off that we are going to publish on the site next week! In a nut shell, after you’re done making your last row, you’re going to slip stitch in each of the stitches across the row. I’ll let you know when the photo tutorial is posted!
Here’s a link to the tutorial: http://www.crochetspot.com/how-to-crochet-finishing-off-tunisian-crochet/
Thank you for all the great instructional posts! They are so helpful & very much appreciated! ~Adriana
Thank you so very much for your amazing easy to follow tutorials!! I have been trying to learn to crochet for months with little success until today when I found this page! Thank you so much!!
Really appreciate Crochet Spot. I look forward to receiving it each Monday. Thanks for all your help with my crocheting.
Just getting back into crochet, especially Tunisian Crochet after almost 20 years and am totally delighted t have found this website!! Clear instructions, great photo image, what more could I ask for??
I’m not much for videos as you are constantly pausing & restarting, replaying, etc. I prefer to sit back, get comfortable, put my feet up, and then start. Much more relaxing, which is what I am hoping for
Thank you!!!
If you are doing a graphgan using Tunisan are you working graph left to right or right to left
Hi Tracey!
If you are right handed, you will work the forward pass from right to left. If you are left handed you will work the forward pass from left to right.
Thank you Rachel, I’ve never tried this till today, checked through directions from various sources and yours is the only one I understand. Using K hook, thick rubber band on end, using 20 stitches so I’ll end with a potholder. I suspected it would curl, and yes, I agree to iron when finished, using cotton yarn so will be easier. Have a good day
Hi Kathleen! I’m so glad you are learning the stitch. Using a rubber band on the end is genius, I would never have thought of that! Keep up the crocheting 🙂
I Can Do It! Going to try to make wash cloths.
Thank you very much for your step by step. While ive been crocheting for 35 yrs. Ive always wanted to knit. Having been taught how, I simply couldnt get the coordination down in holding the 2 needles. So i gave up, some 20 yrs ago. Now comes the dummy part of me. Lol. When I was taught to crochet it was only using single and double crochet. ive a catolog
‘The Harmony Guide to Crochet Stitches’. In it is how I learned to crochet. In it also at the back, last pages
Hi.
I’ve just started to learn Tunisian Crochet and am currently practicing the tunisian simple stitch. The front of the work looks lovely and very neat. However, the back of the work is very untidy with lots of bumps in the stitches. I am doing something wrong? If not, is there anything I can do to make it look nicer?
Thank you
Hi Lesley! The back should have some bumps. Check out the front and back photos that are show at the beginning of this post.