
Crochet Pattern: Absolutely Easy Neck Warmer
By Rachel Choi – 54 CommentsFor the blistering cold winters, crochet an absolutely easy neck warmer to wear! This neck warmer pattern uses super bulky weight yarn and a large crochet hook to make your project fast to complete. You can also adjust the size of the neck warmer by following the instructions within the pattern.
Finished Size: 12″ (30.5 cm) wide, 6 1/2″ (16.5 cm) tall |
 |
|
Materials: Super Bulky Weight Yarn (approximately 50 yards) Crochet Hook N (10.00 mm) |
|
Gauge: not really important, be sure to measure the neck warmer to create the size you desire.
Crochet Pattern: Neck Warmer
Round 1: ch 40 (or a chain that can fit over your head), sl st in first ch made forming a loop, be sure not to twist chain: 40 ch
Round 2: ch 3, dc in each ch around, sl st in top of beginning ch-3: 40 dc
Round 3: ch 3, dc in each dc around, sl st in top of beginning ch-3: 40 dc
Repeat round 3, five times or until the neck warmer is as tall as you desire.
If you need help crocheting this neck warmer, let me know and I’ll be glad to help!
How to Wear the Neck Warmer: This simple neck warmer can be worn in different ways! The pattern makes a loose cylindrical like shape that should fit over your head. If you would like to wear it the way it is photographed in the picture, simply fold part of your neck warmer over so that it lays flat and snug around your neck. You don’t need anything to hold it together when you fold it.
| Looking for another pattern? The Easy Slip-On Neck Warmer is designed so that no buttons and no sewing is required! The neck warmer is able to slide over your head, and still fit snugly around your neck. It is a great addition to your fall or winter accessories that will keep you toasty warm. Although the neck warmer will fit most adults, the instructions are written so that you can adjust the size if you see fit. You can even make it into a child sized neck warmer. Feel free to make it taller, shorter, looser or tighter if you prefer. Click here to see this pattern! | 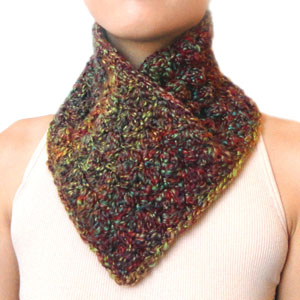
|

This looks great! I’ll definitely be trying it out within the next couple of days. Thanks, Rachel! 🙂
I used Lion Hometown USA – so silky!
Am I missing something? The pic looks like it folds over? I’ve been looking for a quick neck warmer for Christmas gifts.
Hey Cat, it’s a large ring that goes around your neck. When you wear it you can fold it over like in the picture to make it snug around your neck.
That’s a really cute design! Thanks so much, I’ll be linking.
I just discovered your site. I LOVE IT!! I haven’t crocheted in years, and I’m now getting back into it.
I really like this neck warmer and the pattern sounds very easy. Reading the pattern makes it sound like a ‘column’ but the picture makes it look like a “V” neck with a pretty fold.
Is it just how it is worn and styled in the picture, or did the pattern directions skip something?
Thanks for keeping this site up-to-date with modern patterns and styles.
Yup, it’s just how it’s worn in the pattern. A simple column can be worn in many ways!
how many strands of worsted weight yarn held together would i need to use because i don’t have bulky weight yarn. I want to make a bunch of these.
Hi Stacey, try holding 2 strands of worsted weight together.
Perfect timing! I just finished a hat with Lion Brand Chenille Thick & Quick and want to make a scarf with just one skein of yarn. I’m gonna try this one.
I love this. Don’t know how I missed it. I usually check your site daily.
I Rachel,
When you fold it, is it held together with something. I just made one without the yarn you suggested. I used a lighter weight worsted weight yarn ad i tried folding it and it does not look like yours. did you put something to make it stay in place?
It’s a great pattern…I love it.
Hi Jacqueline, nothing is holding the neck warmer in place. It probably doesn’t look exactly like the one in the picture because of the yarn you chose. The bulky yarn gives it a nice thickness.
Lion brand has a chenille “thick and quick” #6 yarn (1 skein, N hook) that works very nicely with this pattern. It folds and stays folded because of the weight of the yarn. I used a pretty wine color.
Hi Rachel, this is a great pattern! I can make one of these in an evening. I’ve made made 5, for daughters and DILs. I want to make some for my granddaughters. How many chains should I start with? Should I add a few chains larger that the girls’ head circumference? Thanks! Sally
Hi Sally, yes you should add a few chains longer than the head circumference. Make sure that the “ring” can fit over their head.
Dear Rachael,
I started my neck warmer and had to chain 70 instead of 40 to get it over my head. After forming my loop do I just chain 40 or do I do 70 ch? I am at a standstill not knowing how to proceed……………
Sandy
Sandy, after you make the chain on row 1 (for you it is 70 chains) you go on to row 2. If you made 70 chains then you will have a total of 70 double crochets on row 2 and each row throughout.
Hi Rachel,
Man I wish I had found you site before Christmas! Can’t wait to whip up a few of these!
Thanks for the pattern!
Becca
Hi Rachel,
I’ve been looking for a neck warmer for months and just discovered your pattern. I can’t wait to make one it’s absolutely lovely. Thanks
I think this would be cute with a pin or button to hold the flap down–for decoration! Thanks for sharing.
Do I sew this together to make a circle or what? does it just lap over or something? the pattern says its cynlindrical. Help!!!!!!!
Mine is flat, but i turned to do the rows
Hi Jean, in round 1 when you “sl st in first ch made forming a loop” this makes the neck warmer a circle. Also, when you “sl st in top of beginning ch-3” at the end of each round it connects each round so that it makes your finished scarf look like a cylinder. If you did not do these slip stitches you can sew the ends of your neck warmer together.
Thank you so much. I only had to rip it out 4 times before i finally got it. it really pays to study the directions first. I make a lot of afghans for project Linus and Its a habit to tun at the end of a row, and that is what i did wrong. Looking forward to wearing this because I don’t like it when the cold winds blow down the front of your coat. God Bless. Jean
I’ve been doing crochet for a few years now and I’m always looking online for ideas and tutorials on what to do next. I’m sure to give this a go, very cute design, thank you for sharing.
This is my 1st crochet project. I’m using 2 skeins of worsted yarn, both #4, and an H hook, just because that’s what I had. The scarf is very dense, not soft and uncomfortable. Do I need a better quality yarn, a larger hook, or both? Or is there something else I could be doing wrong, like crocheting too tight?
Hi Patty, this pattern calls for an N hook (much bigger than the H hook you’re using). Your stitches are probably too tight if you’re using the 2 strands of worst weight yarn. Try using only 1 strand or use the N hook. Also, the item is only going to be as soft as the yarn, so if you find a really nice soft yarn maybe you can try crocheting with that.
i love this pattern. would you please send it to my email so i can print off the instructions ?
Thank you for sharing.
Hi Carla, you should be able to use the print the pattern out right from the website. In your internet browser’s menu, go to “file” then “print”. Each page on Crochet Spot is coded to be printer friendly so it should print out nice and neatly. Let me know if you need more help printing.
Hi. I a confused, is it really six chains, 3 at end of row and 3 at beginning of next row? Thanks, laura
Laura, there are 3 chains at the beginning of the row. At the end of the row, you don’t ch 3 again, you make a slip stitch into the top of the ch 3 that you made at the beginning of the round to join the end of the round to the beginning.
I would like to know about festive looking yarn for Christmas to make this.
I’ve made several with yarn bee soft illusion yarn in various neutral colors, and everyone seems to absolutely love it.
Just wanted to let you know that I made one last night and it looks great! I plan to make several for family members for Christmas. Thanks
Hi!
What an exciting website you have! I just found it via Linkden. I read everything and you say it more than once. That “v” is created simply by folding the piece over. I just can’t get it but am going to try it anyway.
Wish me luck.
Thank you for all the great info!
Linda
Do you connect it at the beginning or end? Also, where can I find out what the abv.terminology means? “sl st” in top of beginning ch-3: 40 dc
Is there a video to watch anywhere?
Hi Norah, yes you are going to connect it at the end of each row, that’s what the “sl st in top of beginning ch-3” means. You’re going to make a slip stitch into the top of the beginning chain 3 (the chain 3 is the 3 chains that you made at the beginning of the round). Here’s the link to the abbreviations page for future references: Crochet Abbreviations
I am looking for a simply pattern that can warm the neck, but as it gets dark and colder, I want to be able to button or pull up over my face – at the same time as not to mess the hair.
any help would be greatly appreciated
Hi Cathy, you can actually use this pattern to create what you want. If you’d like to make it longer so that it can go over your face, you can repeat round 3 until it is as long as you desire. If you’d like a part of the neck warmer to be open where you can button it, try leaving out the slip stitch at the end of the rounds, then when you’re done you can add buttons to it!
You could try this alternative pattern
http://www.crochetspot.com/crochet-pattern-simple-and-modern-scarfcowl-with-buttons/
I just found this site (and pattern) today. I’ve had this super bulky brownish yarn that I’ve wanted to try. This was my first project ever, and it came out wonderfully. My only issue which really wasn’t was I lost the ‘end’ of the row by row 5, but I was able to make the last row even. I chained 60 so the neck is a little bigger, but now I can wear it both as a scarf around my neck, twisted in back, then hooded on my head (with the back out). Awesome!
Thanks for this pattern that a true beginner like me could figure out. Now to make a few Christmas gifts 🙂
Could you please send me a picture of how you made yours? It sounds interesting and warm. My 9 year old daughter actually crochets quicker than I do and I’m always looking for new pretends to keep her interested.
Thank you
April
[email protected]
I love it, so easy and fast! Thank you Rachel, for sharing the is pattern!
Hi Rachel, I just found your site , joined the news letter & received this free pattern.
I’ve made one up tonight using Wendy Thor super chunky ( I’m in the UK) & it’s come out beautiful. The yarn was thick enough to use one strand for a cord so I threaded that through 2 rows down from the neck. It pulls up nice & tight without puckering the rest of the cowl & gives you the option to loosen when needed.
I’m going to join your premium monthly thing & make a beanie to match.
Thank you so much!
Ijust bought some soft and chunky yarn and was looking for a cowl pattern. Thanks, this looks super easy, I will probably add a few rows of shell stitches to add some detail 🙂
how do you print the pattern
You can use the print function in your internet browser. For most browsers you can go to “File” then “Print”.
Hello, how can I print patterns from your website without all the surrounding comments etc.
Hi Sue! You should be able to use the print function in your internet browser. Each page on Crochet Spot is coded to be printer friendly so all the extras should not print with the pattern.
I love the look of this cowl because it looks like it drops down and covers the higher part of the chest without piling up on the shoulders.
But when I look at the pattern it is just a straight tube.
How do you suggest I modify the pattern to get that drop or widening that appears in the photo?
Hi Sandy! You don’t need to make any modifications. The pattern makes a loose cylindrical like shape that should fit over your head. If you would like to wear it the way it is photographed in the picture, simply fold part of your neck warmer over so that it lays flat and snug around your neck.
how many millimeters is a H crochet hook
5 mm