
How to Crochet: Foundation Single Crochet (fsc)
By Rachel Choi – 118 CommentsThe foundation single crochet (fsc) is a stitch that can replace the foundation chain and the first row of single crochets in your work by completing them at the same time! This is also known as chain free crocheting!!!
But what’s the point?
- Often times crochet foundation chains are tighter than the rest of the work, but with fsc it will have the same tension without having to use a larger hook.
- With some yarns (such as boucle) it is hard to see the stitches in a traditional foundation chain, but with fsc you don’t have to crochet on a chain.
- Even if you prefer making a traditional foundation chain. You can use fsc to add extra stitches to your work without having to take the whole thing apart if you accidentally miss count the number of chains.
- It’s faster if you do it right! Being able to complete a chain and a row of single crochets at one time can save you time.
Here is a picture tutorial for making the foundation single crochet. This tutorial is for both right and left handed people. For left handed pictures, roll your mouse over the image and it will change for you.
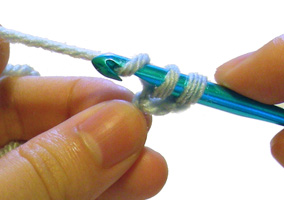
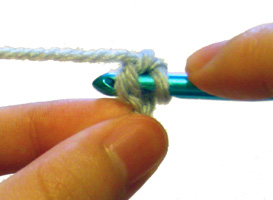
Step 1: Start with a slip knot on your hook and chain 2.
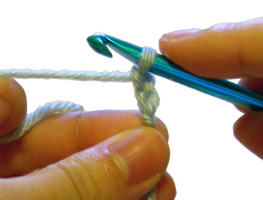
Step 2: Insert your hook into the second chain from your hook (which is also the first chain that was made)
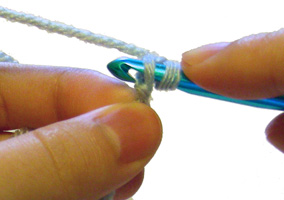
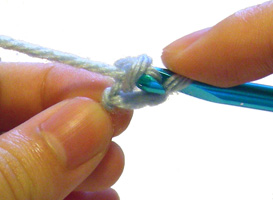
Step 3: yarn over (wrap the yarn around your hook)
Step 4: pull the strand of yarn though one loop on your hook (you should now have 2 loops on your hook)
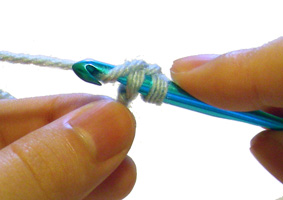
Step 5: yarn over (wrap the yarn around your hook)
Step 6: pull the strand of yarn though one loop on your hook (you should now have 2 loops on your hook) Note that you just completed the chain portion of the stitch.
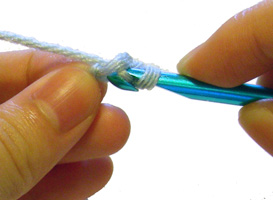
Step 7: yarn over (wrap the yarn around your hook)
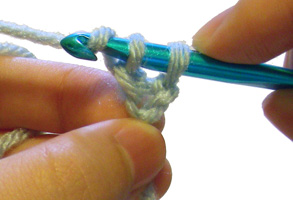
Step 8: pull the strand of yarn though the final 2 loops on your hook (you should now have 1 loop on your hook) Note that you just completed the single crochet portion of the stitch.
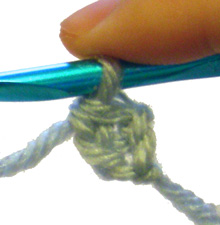
There you have it, your first foundation single crochet stitch! Take a good look at it, the chain is on the bottom and the single crochet is on top of it. This is important to see for knowing where to insert your hook next. Here is how to add more stitches:
Step 9: Insert your hook under the 2 loops of the “chain” portion that was made in the previous stitch. It should seem like your hook is between the chain and the single crochet. It may be easier to see where to insert your hook if you hold your work sideways or upside down.
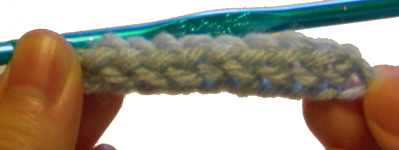
Repeat steps 3 – 8 to complete the stitch. You can make a row as long as you desire. This will replace the foundation chain and first row of single crochets in a piece of work.
Here is what a row of fsc looks like!
If you need help with making a foundation single crochet, let me know and I’ll love to help!

I am working on a patern that is the traditional foundation chain that is joined the a first row of half double and continues in a tube how would you join the Fsc or Fhdc to stich a tube like for fingerless gloves. Thanks
Hi Lila, you can work the fhdc until you reach the number that you need. Then on the last fhdc, make a slip stitch into the bottom of the first fhdc you make, then work the fhdc, then make another slip stitch into the top of the first fhdc.
Rachel, I was looking for information about how to count the stitches in a foundation single crochet, and I found this blog.
Like the original commenter, Lila (Oct.27, 2013), I am making fingerless gloves, and wondered how to join the foundation chain back to the beginning. I LOVE you idea about making the connection using a slip stitch at the bottom and again at the top, with a regular stitch in the middle, but I’m not sure where to start the regular stitch: in the same place as the bottom slip stitch, IN the bottom slip stitch, or someplace else entirely? How are all of these stitches counted in the pattern? Thank you SO much for your help.
Hi Cathy!
You will start the last stitch just like the other foundation stitches. If you are using fsc like in this tutorial, they you will work step 9 to start your next fsc. Then work step 3 – 6. Then make your slip stitch into the bottom of the beginning stitch. Then finish your fsc with steps 7 and 8. Then make a slip stitch into the top of the beginning stitch.
When a pattern calls for “chain 124. Then dc in fourth chain from hook…” do you fdc 121? The pattern has no multiple listed.
Yes, the 121 fdc would be equivalent.
Rachel,
I was working on a pattern that is worked in multiples of 5. I like using chainless foundation. the pattern called for ch 100, in 4th ch from hook dc, this counted as the 1st 2 dc sts… It did not look right. Question… can I do chainless foundation st to 96, ch 4 & put that dc st in the 96th chainless foundation stitch?? Thanking you in advance for your attention to this inquiry and any help you may give me.
Liz Gonzalez
[email protected]
Hi Liz,
If the beginning ch counts as a stitch you would do 100 – 3 + 1 = 98 fdc (the one extra fdc would replace the chain that counts as a dc)
I’m not sure what your second row is, but if it starts with a ch 3 and it counts/acts as a dc, you would skip the first fdc.
Rachel,
THANK YOU SO MUCH!!! Now I’m going see if I can make that work for me…
Happily hooking in South Jersey 🙂
Liz
Thank you very much for this, I have been crocheting for 60 years and did not know this until I found your site. I saw several and yours was so clear to follow.
Thank You.
I’ve already made a tank top for my daughter and the original chain is too tight on her rib cage. is there a way to remove/replace the chain without undoing everything? I started from the chain and went up, switched colors and went back to the chain and went down ( so it’s a 2 part tank with the chain in the middle). If you have any solutions I would be in your debt
Hi Tina, sorry I don’t think there’s a way to redo the chain without undoing it. If there was a way, I wish I knew too!
You could undo the slipknot and pick out each chain, but it would be pretty tedious. You would also need another piece of yarn or something like a circular knitting needle or a crochet hook on a flexible cable to hold your stitches until you work them back into the rest of your project.
Yes, thank you. i knew i’d need to support everything else with yarn or something , but what stitch should i use to reconnect it all back together?
I would slip stitch in the base of each stitch.
thank you, thank you so very much!
i have been a knitter all my life and only ventured into crocheting last year… my 66th!
now because of your so helpful tutorial, i shall go forth and multiply— those foundation stitches.
and maybe tackle bigger projects, which i used to look at enviously.
so happy to have met you thru your blog.
Hi,
I am trying to make a ribbing…fsc…but, I need to change colors as the ribbing will have a stripe.
I have had several false starts….the combination of the the colors is fsc in A (4) B (2) A(3) (Combo of 9) I am having a time switching the colors…the yarn is either too taut or two loose..any pointers?
Thanks
Tina
Im trying to make a baby blanket. After i single foundation 45 chains do i turn my work? Do i single crochet the top or the bottom? This is first time doing a single crochet foundation and making a baby blanket out of the single crochet foundation.
Hi Alicia!
You will turn your work and work the next row on top of your foundation, as if you were making a row of single crochets on top of another row of single crochets.
Thanks
Hi Liz,
I am really having a hard time with this foundation stitch. I can get as far as the first stitch and its completion. Then I have no idea where to insert the hook to make the next one. All videos I have watched go so fast that I cannot see where to make the second stitch. They then show a series of stitches and mine does not look like yours. Help please.
Thanks
Theresa
Theresa, insert your hook into the second chain from your hook
I’m in the middle of a pattern, row 26 and it says make 24 fsc. Do I use the previous row as my chain? Working the stitch into it? I’m confused as to how I would connect to the previous rows. Any help would be appreciated.
Hi Shannon! From your description it sounds like the fsc is going to stick out next to the row you already made. It will look like an extension of the row you are working on. To start the fsc, you can use the side of the last stitch you made, but it may vary depending on the pattern.
Ok! Thank you so much! The pattern itself is a little confusing and this spot was something I couldn’t figure out.
I think I have the stitch correct, but my fsc row is coming out curved and not at all straight. That seems to defeat the purpose. What am I doing wrong?
Hi Jen! It’s hard to say what’s going wrong since I’m not there with you to see your work, but here are some ideas…
Try making the chain part (step 4) of the stitch slightly looser. Also you can try and double check that you are inserting your hook into the correct spot (step 9) when you are starting each stitch.
Thank you for your very helpful tutorial. I tried the FSC with a scarf, and it wasn’t until I was done with the scarf that I realized that after making the FSC, for the next row, I had worked into the chain instead of the single crochet. This produced a raised edge at the start of the scarf, so I ended the scarf with one single crochet row to match the start, and it turned out OK. I usually do a slip stitch around my scarf edges to “neaten” up the edges, but starting it wrong meant I didn’t have to do that as I had a very neat single crochet on each side. I may do it wrong intentionally next time jus to get that nice edge. 🙂
Sure am glad I have your site to turn to for answers to my crocheting questions!
Hi Rachel.
I found a pattern for a shawl that I really want to make. Is it basically a fsc?
The Kaftan does not begin with a traditional
foundation chain. Instead, a series of ch-2
spaces are created. The stitches of the next
row are worked into the ch-2 spaces
Row 1: [Ch 3, esc in 3rd ch from hook (the 2
skipped chains count as 1 ch-2 space)] 56
times—56 ch-2 spaces
Hi Nanci,
It is a bit different than a fsc. The fsc is like a row of chains with a row of single crochets on top. For the pattern that you are looking at you’ll be creating a long row of chain spaces.
Ok if I need a multiple of 3 plus 2 chain what do I fsc? First row is sc into second chain from hook. Next row chain 3 for dc.
Hi Cara! You will make a fsc that is a multiple of 3, then add 1 more fsc at the end. The “plus 2” is the beginning chain plus 1 more single crochet, if your first row is “sc in second ch from hook and in each ch across”
Since I am doing a project in all single crochet, after I finish my fsc beginning is my next row Row 2 or Row 3? Does the sc portion of the fsc count as an actual row? If I count it as row 2, am I not working Row 3 in the wrong direction from what the pattern calls for/
The fsc will count as the beginning chain and the first row of single crochets. So you will work row 2 next.
I did the fsc and it looks great. The problem is its is twisted in a spiral. When I continue with several sc rows it’s ending up curved…like the lower edge is tight. I did a small swatch and crochet about 5 rows and the curvature is less but still there. Help!
Hi Jane! It sounds like the chain portion of the fsc is too tight. Try making that part of the stitch looser so that the tension in the stitch is more even.
What a great, clear tutorial! thanks so much:)
I thought this looked familiar. I use this stitch to make lanyard necklaces. This stitch was recommended for the first wrist row for fingerless gloves. Easy directions to follow. Thanks Rachel.
I’m learning this crochet technique and I wonder how to count the stitches?
Hi Libby!
You can count them in the same way you count other stitches. At the top of each stitch you should see a “v” shape. You can count those v’s to see how many stitches you have. Try counting as you crochet, make 10 or so stitches and see if you can count the 10 v’s.
Hi! Quick very specific question here. Could you use this in a pattern that makes use of linen stitch? Can fsc always be substituted in patterns that begin with a first row of single crochet? Thanks so much for compiling such a great crochet resource 🙂
Hi Cara! Yes, it can be used to replace any first row of all single crochet stitches. For the linen stitch it usually has chains in the first row (sc, ch, sc, ch, etc.) so it would be tricky to use the fsc for that, unless you plan to do the first row as all sc without the chains.
I am just learning this type crocheting. Thank you! There definitely less roll. I thought I was doing something wrong. Now I know that it happens to other people too.
Great tutorial! I really like using the foundation chain to begin projects. It keeps them from pulling and puckering. Thanks so much for sharing!
This is the clearest, best tutorial on this stitch I found…and I tried 3 or 4 before I read yours. Thank you for making it easy to understand!
After completing the foundation chain, how can you tell which is the front of the chain?
The hook will be towards the top side when you are done.
Best instructions ever!! So easy