
Crochet Pattern: Cappuccino Cuff Bracelet
By Amy Yarbrough – 2 Comments| If you are a big bracelet person, have you ever tried crocheting your own? It’s easy and oh, so much fun! Choose a favorite yarn and follow the pattern’s simple instructions. The border on this bracelet is textured with a very ordinary stitch while the middle sports shells and clusters. Here’s an idea: for a lacier bracelet, try a smaller weight yarn while still using the same hook. Let me know what you think! | 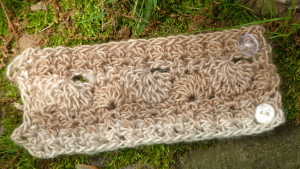 |
| Skill Level: |  |
Finished Size: 7 1/2†(19 cm) long, 3†wide (7.5 cm)
| Materials: Medium Weight Yarn (approximately 30 yards) Crochet Hook K (6.50 mm) 2 buttons 5/8†is diameter Sewing needle and thread |
Gauge:
6 sc = 2’’
8 rows = 2’’
Gauge Swatch: 2’’w x 2’’h (5 cm x 5 cm) ch 7.
Row 1: sc in second ch from hook and in each ch across: 6 sc
Row 2 – 8: ch 1, turn, sc in each sc across: 6 sc
Finish off.
Need help understanding the abbreviations and symbols? Check out the crochet abbreviation chart.
Crochet Pattern: Cappuccino Cuff Bracelet
Row 1: ch 26, sc2tog in second and third ch from hook, ch 1, *sc2tog, ch 1, repeat from * across, sc in last ch: 25 sts
Row 2 – 3: ch 1, turn, *sc2tog, ch 1, repeat from * across, sc in last st: 25 sts
Row 4: ch 3 (counts as 1 dc), turn, 3 dc in first sc, skip 2 sts, *sc in next 3 sts, skip 2 sts, 8 dc in next st, skip 2 sts, repeat from * 1 more time, sc in next 3 sts, skip 2 sts, 4 dc in last st: 33 sts
Row 5: ch 1, turn, 2 sc in first st, *ch 1, dc8tog, ch 3, sc in next 3 sts, repeat from * 1 more time, ch 1, dc8tog, ch 3, sc in last 2 sts: 25 sts
Row 6: ch 1, turn, *sc2tog, ch 1, repeat from * across, sc in last st: 25 sts
Row 7 – 8: repeat Rows 2 – 3
Finish off.
Designate which side is the wrong side and the right side. Sew buttons on the side with right side facing.
Button Loops
With right side facing, join yarn on the opposite side from buttons, ch 1, sc on side of first row, (sc, ch 3, sc) on side of next row, sc along next 4 rows, (sc, ch 3, sc) on side of next row, (sc, sl st) on side of last row, finish off.
If you run into any problems just let me know in the comments below and I’ll do what I can to help you out!

Such a pretty stitch pattern. Thank you!
Gorgeous!!