Crochet Pattern: Turkey Applique
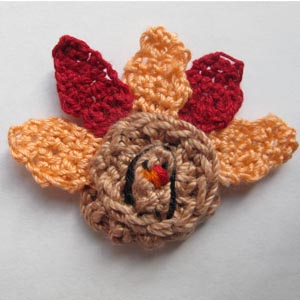
By Emilee Gettle – 2 Comments| It’s hard to believe the holidays are knocking on our door! I love Thanksgiving! It is one of the only days of the year when I get to see most all of my family. I love recalling childhood days and sharing those memories with those dear to my heart. This week my crochet project is a turkey applique in honor of Turkey Day! This little applique can be used in many ways for clothes, kitchen or dining room linens, cards or even as a pin to wear. I used a finer crochet thread for the feathers and a bit chunkier fingering yarn for the body to add definition. |  |
| Skill Level: |  |
Finished Size: 2″ (6 cm) long, 2 1/2″ (2.5 cm) wide
|
Materials: Red 10-Count Crochet Thread (approximately 3 yards) Apricot 10-Count Crochet Thread (approximately 5 yards) Brown Fingering Yarn (approximately 10 yards) Crochet Hook 7 (1.50 mm) Crochet Hook E (3.50 mm) Needle Black, Orange and Red Embroidery Floss |
  |
Gauge:
Round 1 in pattern measures 1″ (3 cm) in diameter.
Need help understanding the crochet abbreviations and symbols? Check out the crochet abbreviation chart.
Crochet Pattern: Turkey Applique
Turkey Back: Crochet 1
Round 1: with brown and hook E, ch 5, sl st in first chain made to form a ring, ch 3, 12 dc into ring, sl st in top of beginning ch-3: 12 dc
Finish off.
Turkey Front: Crochet 1
Round 1: with brown and hook E, ch 5, sl st in first chain made to form a ring, ch 3, 12 dc into ring, sl st in top of beginning ch-3: 12 dc
Round 2: ch 3, dc in each dc around, sl st in top of beginning ch-3: 12 dc.
Finish off.
Turkey Neck and Head: Crochet 1
Row 1: with brown and hook E, ch 4, sc in second ch from hook and in each sc across: 3 sc
Finish off.
Feathers: Crochet 3 Apricot and 2 Red
Row 1: with apricot (or red) and hook 7, ch 3, sc in second ch from hook, 2 sc in next ch, ch 1, turn: 3 sc

Row 2-3: sc in each sc across until 1 sc remains, 2 sc in last sc, ch 1, turn
Row 4-7: skip first sc, sc in next sc and in each sc across, ch 1, turn
Finish off.
Assembly
Using 2 strands of black embroidery floss and a needle sew the 5 feathers to the turkey’s back. Then, sew the turkey’s front on top of the feathers. Now, sew on the turkey’s neck/head and finish off. I then used 4 strands of embroidery floss to backstitch around the turkey’s head to give it more definition.
Facial Features
Use 6 strands of black embroidery floss to stitch on eyes. Then use 6 stands of orange embroidery floss to stitch on a triangular beak. To finish, take 6 strands of red embroidery floss to stitch on the turkey’s snood (in laymen’s terms: the red thing that hangs over their beak).
If you need help, feel free to ask a question and I’ll respond as soon as possible! Have fun and happy crocheting!


thanks rachel the turkey it´s beautiful!!!!!!!!!!!!!!!!!
awesome turkey! Will look great pinned to a sweater.