
Expanding Geometric Motif Crochet Tutorial
By Amy Yarbrough – 5 CommentsI’ve designed quite a few patterns using granny squares because I like how simple and easy they are to make. It’s easy to create something remarkable by using granny squares as a base. But it’s not the only easy motif to choose from.
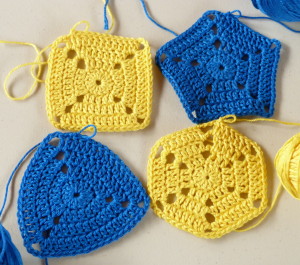
After crocheting the Expanding Pentagon Motif a few weeks back, we received requests for the same design but in different shapes. So today I’m going to give you a tutorial explaining how to make the motif in any geometric shape you desire.
Materials
I started with a ball of Patons Grace 100% mercerized cotton yarn and a size 2.25mm crochet hook, but what material you use is completely up to you. It won’t make any difference to the pattern.
Making Expanding Geometric Motifs
Round 1: Always begin with an adjustable ring and then ch 3, which counts as a dc.
Now how many dc you crochet into this ring depends upon the shape you want to crochet. To figure this out you need to multiply the number of sides with a number so that the solution will be somewhere in the teens.
For example, let’s say I decide to make a square. 4 sides multiplied by 3 or 4 stitches per side will give me 12 and 16 stitches total. Any less or more will put us at 8 and 24 which will be too little or too much to start with for round 1. You’ll know if it’s too many stitches or too little stitches, because your work will curl and not lay flat. I’ll choose 16, and crochet 15 more dc into the adjustable ring (remember the beginning ch-3 counts as 1 dc). To end this round, and all rounds in this pattern, sl st in top of beginning ch-3.
Round 2 is where you begin creating your shape. Still using the square as an example, you have 4 sides with 4 dc on each side. What defines your corners will be an increase (dc, ch 3, dc). The increase will be made into 1 stitch on each side.
For side one, start off with an increase. Since this is the beginning of a round we will start by chaining 6, which counts as 1 dc and 3 chains, then you will dc in the same st (the first increase is now complete). Dc in next 3 dc and you have completed side one.
For side two, you continue in the same manner. (dc, ch 3, dc) in next dc, dc in next 3 dc. Repeat this for all remaining sides and then end round 2 with a sl st in top of beginning ch-3.
Round 3 and all following rounds build out the same way. Always begin the round with a beginning increase (ch 6, dc), then dc in each dc across until next ch-3 space is reached. The remaining sides are worked as *increase (dc, ch 3, dc) in next ch-3 space, dc in each dc across until next ch-3 space is reached, repeat from * around.
Follow these instructions for as many rounds as you wish.
One Exception
There is one exception though. If you decide to make a triangle, the pattern will change slightly.
Since there are only 3 sides to a triangle, this presents only 3 opportunities to increase, which is not enough to keep the motif flat. So instead of the original increase, you will need to use a larger increase of (2 dc, ch 3, 2 dc). Therefore, a beginning increase will be (ch 3, dc, ch 3, 2 dc). Follow the instructions as usual and it’s as simple as that.
Now that you know how to make your own, what will you do with your motifs? We’d love to hear your ideas! Be sure and share them in the comments below, and tell me if you have any questions. Thanks for reading!

Wonderful! I think I get it now! Going to have to do some experimenting, but that’s fun!
I thought at last! But it did not work for the shape I am using. O.K., what do you do about a rhombus? I figured out that it’s similar to two triangles base-to-base. But not really. Because the 2 sides are longer than the bases. It looks like a diamond.This is why the formula does not work when I try to turn it into a square. I tried to adapt the heart motif because it too has a variant outline, also to no avail . Please, can you help?
Hello Barbara,
As I’m sure you know, the rhombus has four sides like a square. This tutorial is all about the amount of sides a shape has and not the length of the sides so I’m afraid this won’t work without making some changes to the method. But making a rhombus is a great idea. If you’d like to check back in a week or so I should have a pattern for you by then.
Amy
So glad to see this in print! Any of these motifs can be used to make purses–vary colors , add textured yarns and bling–the variations are unlimited!!
you can also design shawls, lap robes, etc with these handy building blocks!
I immediately thought of baby blankets when I saw this! I think I’ll also try making motif scarves and a scrap yarn rug for the laundry room. :). Thanks for the tutorial!!