
How to Crochet: Bullion Stitch
By Robin Beers – 59 Comments| The bullion stitch is a special stitch formed by wrapping the yarn several times around the crochet hook (usually 7 to 10 times), and then pulling a loop through. It can be used as a decorative stitch for jewelry, flower making or as a pretty edging. There are several methods for accomplishing this stitch, but I chose the following method because it was the easiest for me. | 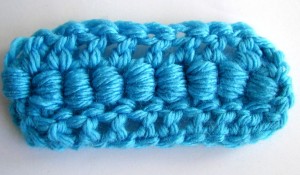
|
Start with a test swatch of single or double crochets. I used crochet hook size G in this example. You will also need a knitting needle. If you don’t have a knitting needle, you can use another crochet hook or a tapestry needle. The whole idea is to wrap the yarn around both the crochet hook and the knitting needle to give it more space so you can pull the crochet hook through without getting stuck!
Note: If you are left handed, just put your mouse over the photo for a left-handed view.

Place the knitting needle flush against the crochet hook.
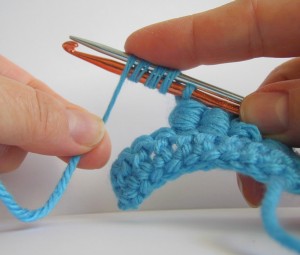
Wrap the yarn 7 times around both the needle and the hook from back to front.
Move the knitting needle down a bit, holding the loops in place with your finger.
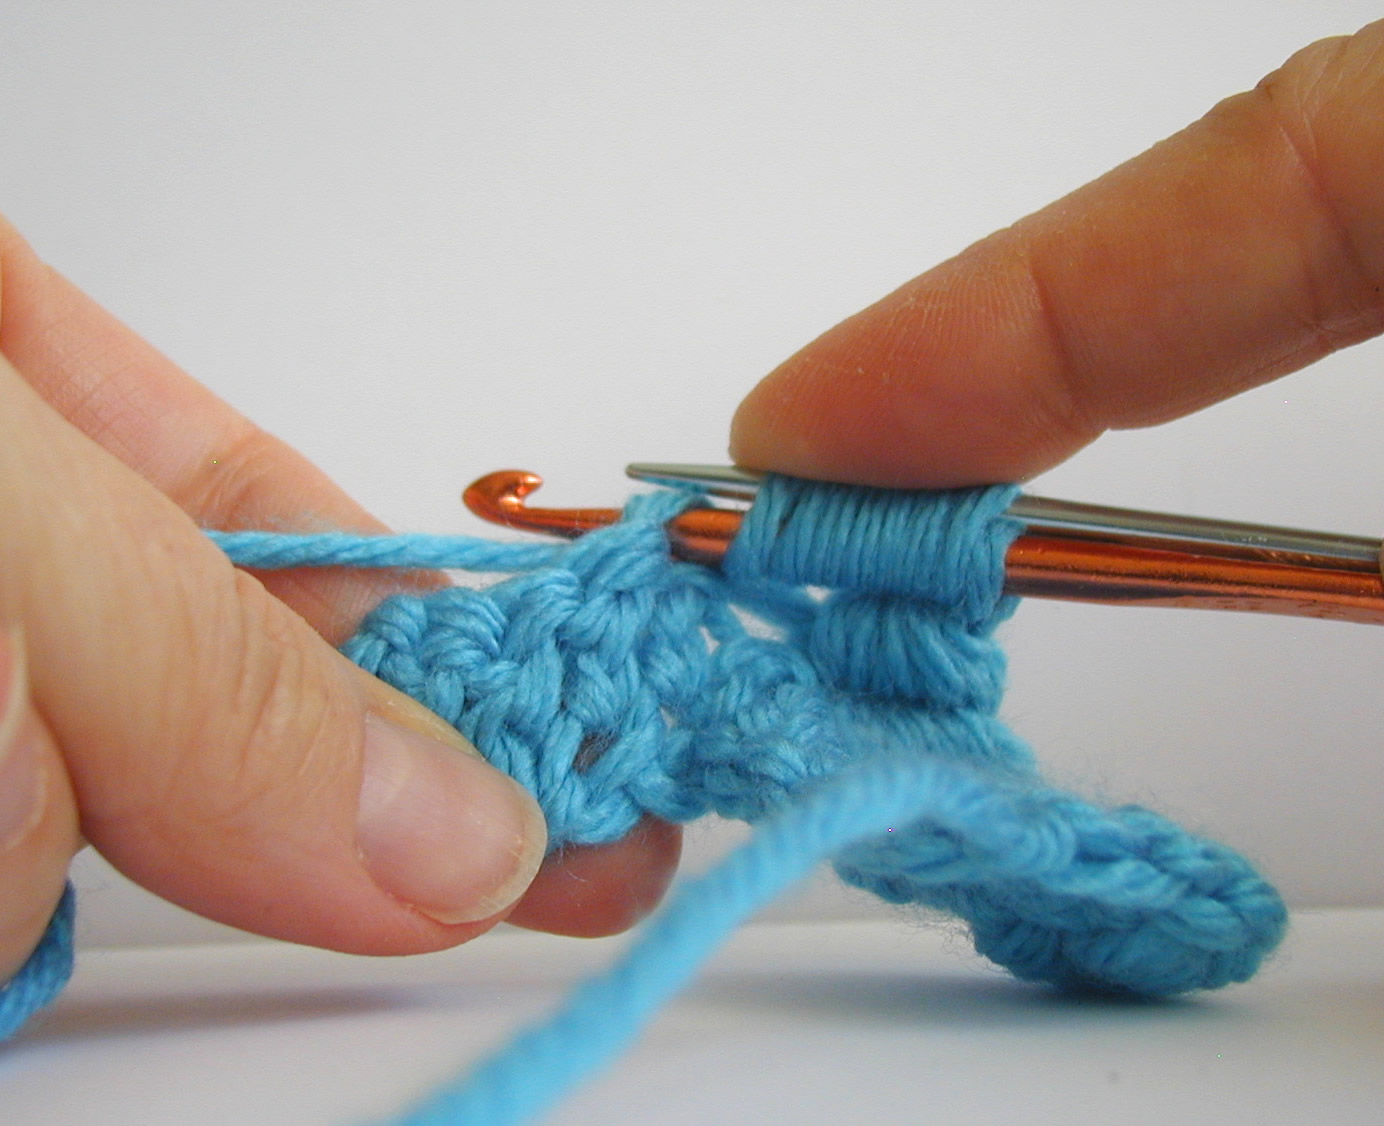
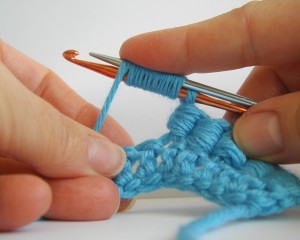
Take the crochet hook and insert into the next stitch, still keeping the loops intact around the hook and needle.
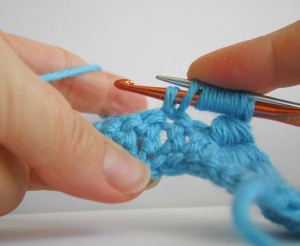
Pull through a loop.
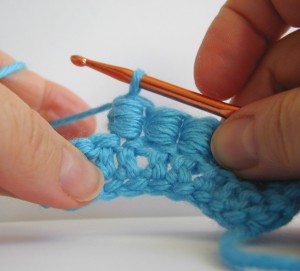
Then – the moment of truth! – Yarn over, and pull both the crochet hook and the needle together through all the loops.
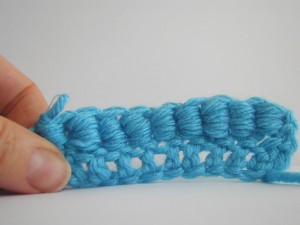
This is what a row of bullion stitches looks like:
If you want, you can make a few bullion stitches in the same stitch for a pretty look. Maybe use it for a crocheted necklace with crochet thread.
Or just continue across for a bobble type of effect. You can even crochet around a circle for a cute flower.
Good luck!
If you have any questions, don’t hesitate to ask. I know it took me a while to master this stitch. But it was worth it!

That is a very cool stitch indeed! Thanks for the tutorial!
You’re welcome!
I don’t like this, but that’s me. This swatch would be pretty as a curtain bracelet though 🙂
Very pretty! Thanks so much, Robin!
I love this and will definitely find a use for it! Thanks for sending this stitch, I can’t wait to try it!
Hello Rachel, I learned this stitch in embroidery a long time ago. However, I have seen it in many posts/blogs/comments recently as a crochet stitch. Yours is the best by far! The knitting needle or other needle-type instrument held between the crochet hook and the loops of yarn is the easiest and nicest boullion stitch I’ve seen so far (in 31 years of soft arts)!! Thank you for the free stitch tutorials and patterns, Rachel. If it weren’t for good people like you, I would never get new patterns and instructions–I’m disabled and on a fixed income, so I rely on your web site more than you can know. Thank you!! Dawn
I like how this stitch looks! Thank you for showing us how to do it.
Rachel–
Wonderful stitch! I am eager to use it in my next project.
Thanks a bunch.
Hugs– Barbara
Clever to use the knitting needle to get the hook through the stitch! I came up with my own solution. I took a plastic drinking straw and cut it the length of my hook between the hook and the thumb grip. Then I split it down the side and rounded off the corners. I would have this on the shaft of the hook while making the rolls… then draw the loop through the straw. voila! the hook doesn’t get caught on the loops! I’m planning on dong a video on this technique soon. I’m gonna give your technique a try too. Knitting needles are bit more convenient than cutting apart drinking straws!
I would love to see this video as well, Beth. Have you had the time to do one yet?
I would love to see a video of your technique with the drinking straw, Beth. It took me a while to get this stitch right. I tried a crochet hook and a yarn needle too, but the knitting needle was the most comfortable for me. Some people can do this without any props – now that takes talent! 🙂
Hi,
On your bullion stitch,what did you do for a foundtion,to start the bullion stitch?
Thank, Margaret
Hi Margaret,
I used a double crochet foundation. But you could use anything – single, double, whatever you like.
Thanks for the ability to see the stitches done for a left hander. Makes it so much easier for me!
Thank you so much for another technique. I have been trying to make this stitch for a couple of weeks and still not having much success. Can’t wait to try your method! I will do it, I will do it……..
Thanks so much for share can’t wait to try it nice VERY NICE
Hi Everyone…
I’m very new at this. I really like the looks of the bullion stitch. I might even try it myself and I can share this with our crochet class. However, does ANY one know or have heard of the Raven Foot stitch? If so, please e-mail it to me. Thank you.
Pauline
Hi Pauline,
I never heard of the raven foot stitch. When I googled it, I found a raven foot binding stitch for book bindings. It looks like a bird foot with the 3 talons.
Pauline – I just stumbled cross a Crow’s Foot Stitch in the book Crochet Borders by Eckman – pattern #118. If you are still looking for the stitch you might want o check out her book.
Hi Pauline,
I’ve used a crow’s foot stitch in embroidery, cross stitch, and needlepoint that could be adapted to crochet, I think. Wiki-pedia has info on it. One of the sites I found is: Rittenhouse Needlepoint Stitch of the Week Crow’s Foot
I hope this helps.
Dawn
Dawn…
Thank you for the info. I’ll look into it.
Pauline
Pauline…
You are so welcome–it will be great if I could be of help. Will you let us know what you find?
Dawn
I cannot get this no matter how hard I try! When I pull the crochet hook thru all the loops, I end up with 2 loops instead of three. Do you have to pull the needle and hook out together, or can you do one at a time…. Thanks for your help, hopefully you can make me fix my mistakes.
Hi Robbie, the needle is just there to help loosen the stitches so that it’s easier to pull the crochet hook through. So you can pull the needle and hook out in whatever order is easiest for you. As long as you get your crochet hook though all the loops, you’re good to go!
Very nice, will have to try this for sure!
I’m sure it will work for me now!
Thanks
Thanks for the instruction and such a pretty stitch. It will take a little effort to perfect it but so exciting to use once I do!
Very special stitch! Would made a beautifull stitch for bags. Thanks so much to share it, really inspirred me.
Thank you for thinking of us lefties! Beautiful stitch – can’t wait to try it.
I have been crocheting for 47 years and I have always known this stitch as the popcorn stitch. But never used the knitting needle in the process. I never found a need for it.
Hi Batley,
I hope you don’t mind me addressing your post. The boullion stitch is an embroidery stitch that has been modified slightly for crochet. The popcorn stitch is a crochet stitch that has several loops left on the hook depending on the number of dcs or tcs etc. called for, and the hook is pulled through all at the end, very similar to the boullion stitch. One big difference; the popcorn stitch is made vertically while the boullion stitch is made horizontally. If you hold a swatch of each stitch up for comparison, you can really see the difference. I learned it many years ago in embroidery and was very surprised to see it in crochet. Either way though, they’re beautiful stitches. Thanks!
Dawn
I have been sitting here trying to make this stitch for an hour now and no matter what I do I never end up with 3 loops on my hook unless I purposfully don’t draw 3 loops though. Your directions say “the moment of truth! – Yarn over, and pull both the crochet hook and the needle together through all the loops.” If I am pulling through all of the loops then how am I left with 3 loops? This doesn’t make sense to me. What am I doing wrong?
Thanks
Hi Grace, I think Robin (who wrote the tutorial) was pulling 2 loops through all the loops, so it resulted in 3 loops on the hook. I edited the tutorial to simplify it, you should basically pull through all the loops and only end up with 1 loop on your hook. There are different variances of the bullion stitch, but the new edited version is the traditional way to do it.
Thanks Rachel! I appreciate it! I like the stitch well enough to use it I was just so stinkin confused! 😉
Thank you so much for this fab tutorial!! I have never seen this stitch, but it is a beautiful one! I will give it a try…and may have to come back to ask questions if I get stuck. Thanks for sharing and Happy New Year to you!!
I love the Bullion stitch. Do you have any projects using this stitch?
Thanks for the tutorial! Also, I just have to say that the way yuo showed the lefty version is clever!
I love it. Have to go try it now. Thank you for sharing.
I have crocheted for years and today is the first time I heard or seen this stitch. The other used small straw with the tip cut on one side so the hook of the needle could fit into it and then slide it all through with ease.
You are an ANGEL for showing a left-handed view….no one ever does that. And being a leftie, I am always confused. Did I just admit that 😉 ?
the best part of this stitch is u presented it in a simple manner i got it right at the first try itself although am just a beginner with crochet.
Hi Robin, what a great stitch, very effective and looks very nice when completed. Being a “molly dooker” as us aussies say, (left handed) I find a lot of things take me awhile to come to grips with, but I will not give in, so many late knights coming up I see. Loved the tutorial, what a brilliant idea.
From us cack handers, many many thanks
cheryle
Rachel, Thank you so much. This is the only time that I have seen it so detailed that I could actually do the stitch.
Thank you again.
Samantha Calcutt
thanks for this tutorial!!! I have been struggling with this stitch and although they turned out ok with just a crochet hook the time it took to get them done was just off-putting!
I really like that stitch it looks really cool 🙂
Love this stitch. It is new to me.
I have tried, the front look the same, but the back looks different, not nice(i think) a thread is cross over, or do I it wrong?
Great tutorial! And I really love the left-handed -view option, makes it much more easier for me, thanks 🙂
I will try this stitch as I like learning new things. I did this in embroidery years ago. I think it might make a cute cuff bracelet with sport yarn or thread. I do have a question. Do you chain one between stitches like the puff stitch? I was thinking it would close it up. Great tutorial and thanks!
You don’t chain 1, but you sure can if you’d like!
Thank you so much for the detailed tutorial. Very easy to follow. My imagination is now in overdrive. Love love crocheting.
I also love crochet. I have been rather stale in the things I do and am thrilled with the update on an old stitch. Thanks for the inspiration.
I want to say you really taught me something new today sis never did it this way and it’s beautiful. It’ll take some getting use to holding the other needle but it’s beautiful. I would also like to know if you could do a tutorial on the circle in the middle starting like maybe a puff stitch not sure what it’s called. You do it in Freeform crocheting in the center of flower. I also want to say if it wasn’t for you doing these generously free wonderful tutorials I would never get to learn the new things as I am on a fixed income and I appreciate your generosity…Thank you very much…..
thanks a lot
Thank you Robin, it’s a beautiful stitch, thanks again. – margaretanne
There are some patterns out there that are slot of bubbles. Do you think this stitch could replace them?
Hi Barbara! Sure! Try it out and see how it works for you. One thing you may have to consider is the stitch count per row if you are going to use the bullion stitch in place of another stitch. Different stitch patterns may require a different number of stitches to complete them.
I think this would be a perfect stitch for a border to an afghan….
This is a beautiful stitch! When using an inline crochet hook, we don’t need a knitting needle at all. We just wrap the yarn, go into the next stitch and pull up a loop, yarn over, turn the hook downward toward the row below and get the hook right at the point where you’re about to start pulling through, release all tension from the working yarn, place the flat of your left thumb and forefinger (for right-handed crocheters) around the crochet hook and loops to stabilize them, then wiggle the hook while pulling through gently. This may sound complicated, but it isn’t. It just takes a little practice. Your reward is a lovely stitch that looks different from all others. It appears particularly attractive, to me, when made in the round. It’s nice for making flowers, as Robin said above.