
Crochet Pattern: Mrs. Tiggy-Winkle Pillow
By Amy Yarbrough – 9 Comments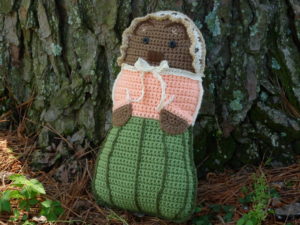
“At the table, with an iron in her hand, stood a very stout short person… Her little black nose went sniffle, sniffle, sniffle, and her eyes went twinkle, twinkle; underneath her cap — where Lucie had yellow curls — that little person had PRICKLES!”
— From Beatrix Potter’s story, The Tale of Mrs. Tiggy-Winkle
Though I adore many of her other characters, I think Mrs. Tiggy-Winkle must be my favorite Beatrix Potter character of them all. She is just a simple washerwoman/hedgehog leading a simple life, and her simplicity is just what makes her adorable. However, my love of the little creatures themselves might have something to do with it.
I was so pleased with how well the Bridgette Bunny Pillow turned out that I wanted to make another vintage-inspired pillow. Lately, pillows have been a fad with me and since moving on to shaped pillows, you might say the possibilities are endless!
Mrs. Tiggy-Winkle is made up of two pillow panels with 4 separate colors. Both panels are shaped using simple increases and decreases, embellished with techniques like surface crochet and easy embroidery, and then buttons, and ribbon. My tip: stuff generously for a huggable, squeezable little woodland friend!
| Skill Level: |
Finished Size: 16†(41 cm) tall, 20†(51 cm) circumference at widest point
| Materials: Medium Weight Yarn (approximately 130 yards of color A/light green, 70 yards of color B/pink, 30 yards of color C/light brown, 40 yards of color D/cream, 10 yards each of colors E/dark brown and F/beige, 15 yards of color G/dark green) Crochet Hook 7 (4.50 mm) Embroidery floss – Pink and black Fabric Glue Yarn needle Polyester Fiberfill 2 buttons 24†of lace ribbon |
Gauge:
7 sc = 2’’
7 rows = 2’’
Gauge Swatch: 2’’w x 2’’h (5 cm x 5 cm) ch 8.
Row 1: sc in second ch from hook and in each ch across: 7 sc
Row 2 – 7: ch 1, turn, sc in each sc across: 7 sc
Finish off.
Need help understanding the abbreviations and symbols? Check out the crochet abbreviation chart.

Crochet Pattern: Mrs. Tiggy-Winkle Pillow
Front Panel
Row 1: with color A, ch 27, sc in second ch from hook and in each ch across: 26 sc
Row 2: ch 1, turn, 2 sc in first sc, sc in each sc across until 1 sc remains, 2 sc in last sc: 28 sc
Row 3: ch 1, turn, sc in each sc across: 28 sc
Row 4: ch 1, turn, 2 sc in first sc, sc in each sc across until 1 sc remains, 2 sc in last sc: 30 sc
Row 5: ch 1, turn, sc in each sc across: 30 sc
Row 6: ch 1, turn, 2 sc in first sc, sc in each sc across until 1 sc remains, 2 sc in last sc: 32 sc
Row 7 – 18: ch 1, turn, sc in each sc across: 32 sc
Row 19: ch 1, turn, sc2tog, sc in each sc across until 2 sc remain, sc2tog: 30 sc
Row 20 – 21: ch 1, turn, sc in each sc across: 30 sc
Row 22: ch 1, turn, sc2tog, sc in each sc across until 2 sc remain, sc2tog: 28 sc
Row 23 – 24: ch 1, turn, sc in each sc across: 28 sc
Row 25: ch 1, turn, sc2tog, sc in each sc across until 2 sc remain, sc2tog: 26 sc
Row 26 – 27: ch 1, turn, sc in each sc across: 26 sc
Row 28: ch 1, turn, sc2tog, sc in each sc across until 2 sc remain, sc2tog: 24 sc
Row 29 – 30: ch 1, turn, sc in each sc across: 24 sc
Row 31: change to color B, ch 1, turn, 2 sc in first sc, sc in each sc across until 1 sc remains, 2 sc in last sc: 26 sc
Row 32 – 33: ch 1, turn, sc in each sc across: 26 sc
Row 34: ch 1, turn, 2 sc in first sc, sc in each sc across until 1 sc remains, 2 sc in last sc: 28 sc
Row 35 – 40: ch 1, turn, sc in each sc across: 28 sc
Row 41: ch 1, turn, sc2tog, sc in each sc across until 2 sc remain, sc2tog: 26 sc
Row 42 – 43: ch 1, turn, sc in each sc across: 26 sc
Row 44: ch 1, turn, sc2tog, sc in each sc across until 2 sc remain, sc2tog: 24 sc
Row 45: change to color C, ch 1, turn, sc in each sc across: 24 sc
Row 46: ch 1, turn, sc2tog, sc in each sc across until 2 sc remain, sc2tog: 22 sc
Row 47 – 48: ch 1, turn, sc in each sc across: 22 sc
Row 49: ch 1, turn, sc2tog, sc in each sc across until 2 sc remain, sc2tog: 20 sc
Row 50 – 51: ch 1, turn, sc in each sc across: 18 sc
Row 52: ch 1, turn, sc2tog, sc in each sc across until 2 sc remain, sc2tog: 16 sc
Row 53 – 54: ch 1, turn, sc in each sc across: 16 sc
Row 55: ch 1, turn, sc2tog, sc in each sc across until 2 sc remain, sc2tog: 14 sc
Row 56: ch 1, turn, sc in each sc across: 14 sc
Row 57 – 60: ch 1, turn, sc2tog, sc in each sc across until 2 sc remain, sc2tog: 6 sc
Finish off.
Bonnet
Row 1: join color D at the right side of Row 44, sc in same st and across to other side of Row 44: 42 sc
Row 2 – 3: ch 2, turn, skip 2 sc, sc in next 4 sc, hdc to last 6 sc, sc in next 4 sc, ch 1, skip 1 sc, sl st in last sc: 34 sc
Finish off.

Back Panel
Repeat Rows 1 – 44 of Front Panel
Row 45: join color D, ch 1, turn, 2 sc in first sc, sc in each sc across until 1 sc remains, 2 sc in last sc: 26 sc
Row 46 – 51: ch 1, turn, sc in each sc across: 26 sc
Row 52: ch 1, turn, sc2tog, sc in each sc across until 2 sc remain, sc2tog: 24 sc
Row 53 – 54: ch 1, turn, sc in each sc across: 24 sc
Row 55: ch 1, turn, sc2tog, sc in each sc across until 2 sc remain, sc2tog: 22 sc
Row 56: ch 1, turn, sc in each sc across: 22 sc
Row 57: ch 1, turn, sc2tog, sc in each sc across until 2 sc remain, sc2tog: 20 sc
Row 58: ch 1, turn, sc in each sc across: 20 sc
Row 59 – 60: ch 1, turn, sc2tog, sc in each sc across until 2 sc remain, sc2tog: 16 sc
Row 61 – 62: ch 1, turn, sc2tog across: 4 sc
Finish off.
Paws (make 2)
Row 1: with color C, make an adjustable ring, 4 sc in ring (do not join or tighten ring): 4 sc
Row 2: ch 1, turn, 2 sc in each sc across: 8 sc
Row 3: ch 1, turn, sc in next 2 sc, (2 sc in next sc, sc in next sc) 3 times: 11 sc
Row 4: ch 1, turn, sc in next 3 sc, (2 sc in next sc, sc in next 2 sc) 2 times, 2 sc in next sc, sc in last sc: 14 sc
Do not finish off. Tighten ring, work 9 sc evenly across bottom of half circle, join color B.
Row 5 – 6: ch 1, turn, sc in each sc across: 9 sc
Finish off.
Sew paws with like colors to front panel. Surface crochet 3 sts on inside of each paw for arm.

Details
On front panel, with color E, surface crochet ears, embroider nose, stitch prickles onto bonnet. Stitch prickles onto bonnet of back panel.
Bonnet Ruffles
With color F, surface crochet ruffle line of cap around face. Join yarn in first surface crochet st on the right of bonnet and ch 1, (sc, ch 2) in each surface crochet st around face. Finish off.
Sew buttons for eyes with black floss. Embroider pink of ears with 3 small stitches of pink floss.

Skirt Detail
With color G, surface crochet 3 stripes on skirt front and 3 stripes on skirt back.

Joining and Stuffing
With color G, sc both panels together with front facing, starting on bottom of right side, and sc up to color B (pink), change to color D (cream) and sc up to bonnet, change to color F (beige) and sc around bonnet. Stuff head generously and continue joining and stuffing in the same manner until you have completely joined both panels.
Cut about 24†of lace ribbon and tie around the neck. Use fabric glue to secure ribbon to pillow and to secure bow.
Crocheting is a lot of fun, but we all run into problems sometime, so let me know if you need any help while crocheting this pattern! I hope you enjoy this pattern as much as I do!

Really cute!
I dont understand the directions for the bonnet on miss twiggy
Hello Sharon,
What part of the bonnet do you not understand?
Amy
do I start at row 44 on the front side? do I go all the way around to row 44 on the left side? if so there will be more then 42 sc.and then dont understand row 2&3
Yes, start at row 44 and crochet around to row 44 on the other side. Try to check the stitch count carefully but the important thing is to follow the method. There may be a discrepancy in the stitch count. For rows 2 and 3, just crochet as suggested.
ok thank you so much
My pleasure, Sharon! Let me know if you have anymore questions!
I am making Mrs. Tiggy-Winkle Pillow and have finished bonnet Row 1. Row 2-3 are confusing. Can you explain more specifically. SC in 4, HDC in 6, SC in 4 — is not enough stitches to go to the end of the round.
Thank you in advance.
PS – very cute pillow
Hello Mary,
So glad you like the pattern!
I’m sorry, my mistake. It should read, “hdc TO last 6 sc”. I will make the corrections. So what you are instructed to do is hdc around the head and then work the next written stitches in the last 6 sts. Let me know if you still need some help!
Amy