
Free Crochet Pattern: Amigurumi Pigeon or Dove
By Claire Golden – 7 Comments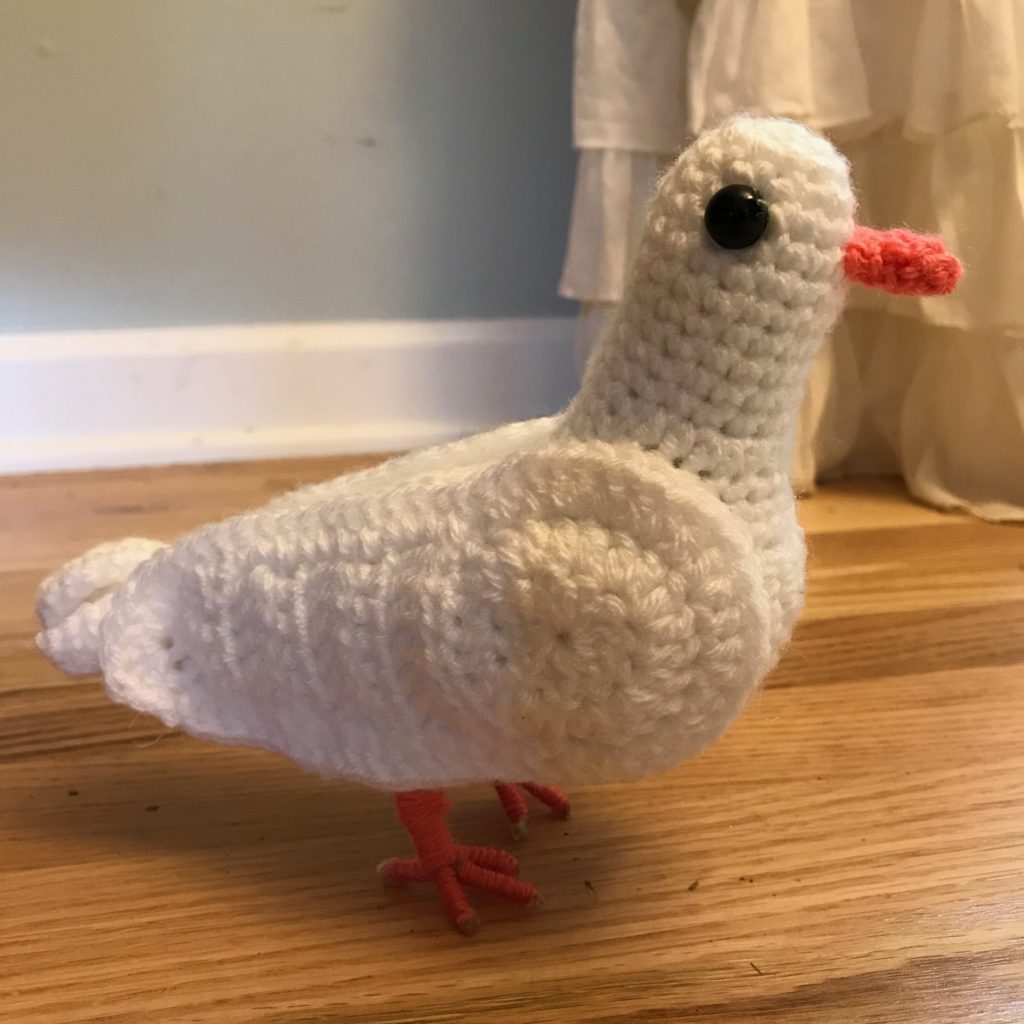
I absolutely love watching pigeons and I’ve wanted to crochet one for what seems like forever. But the colorwork is tricky, so I went with a solid color to start, and the finished bird ended up looking like a dove. While researching for this pattern, I learned that doves and pigeons are both part of the Columbidae family, which explains why they look so similar. So this pattern is really a two-in-one, depending on the colors you choose. The bird can stand on its own and is about the size of a real dove or pigeon, but much more cuddly. I hope you have as much fun with this pattern as I did designing it.
| Skill Level: |  |
Finished Size: Approximately 8″ (20 cm) long from beak to tail, 6″ (15 cm) tall
| Materials: Medium Weight Yarn (approximately 50 yards for bird color and 5 yards for beak/leg color) Crochet Hook G (4.00 mm) Polyfil stuffing Plastic safety eyes (around 8 mm works best) 2 pipe cleaners (chenille stems) Hot glue or craft glue |
Gauge:
Rounds 1 – 2 of wing measure approximately 1.75″ (4.5 cm).
Notes:
Pattern is worked mainly in unjoined rounds. Use a stitch marker to mark the first stitch of each round to keep your place.
Due to the pipe cleaner feet and safety eyes, dove is not suitable for small children.
A Magic Ring is used to start each piece. Alternatively, you may substitute (ch 2, 6 sc in second chain from hook) if that’s easier for you.
Need help understanding the abbreviations and symbols? Check out the crochet abbreviation chart.
Crochet Pattern: Amigurumi Pigeon or Dove
Body:
Round 1: with main color, make a magic ring, ch 1, 6 sc in ring, place marker: 6 sc
Round 2: 2 sc in each sc around: 12 sc
Round 3: (sc in next sc, 2 sc in next sc) around: 18 sc
Round 4: (sc in next 2 sc, 2 sc in next sc) around: 24 sc
Round 5: sc in each sc around
Round 6: (sc in next 3 sc, 2 sc in next sc) around: 30 sc
Round 7: (sc in next 4 sc, 2 sc in next sc) around: 36 sc
Round 8-14: sc in each sc around
Round 15: (sc in next sc, sc2tog) 6 times, these decreases form the top of the dove’s body, place a marker for reference, sc in remaining 18 sc: 30 sc
Round 16-21: sc in each sc around
Round 22: (sc in next 3 sc, sc2tog) around: 24 sc
Round 23-28: sc in each sc around
Round 29: (sc in next 2 sc, sc2tog) around: 18 sc
Round 30: sc in each sc around
Firmly stuff body. Add more stuffing as you finish the last two rounds.
Round 31: (sc in next sc, sc2tog) around: 12 sc
Round 32: sc in each sc around
Tail
Do not finish off. Sc in next 2 sc. Then fold the open edge of Round 32 together. We’ll be crocheting the two sides together by inserting the hook through both layers. Ensure that your crochet hook is at the edge of the tail before starting (look at the marker from Round 15).
Row 1: sc closed with 6 sc
Row 2: Turn. The wrong side of the feathers will be facing up. (ch 8, dc in fourth ch from hook and in next 3 ch, hdc in next ch, skip first sc of join, sl st into next sc): first feather made. (ch 9, dc in fourth ch from hook and in next 4 ch, hdc in next ch, sl st into next sc): second feather made. (ch 10, dc in fourth ch from hook and in next 5 ch, hdc in next ch, sl st into next sc): third feather made. Repeat second feather and first feather, which brings you to the end of the row. Finish off: 5 feathers.
Beak:
A dove’s beak is usually a light pink-orange color, while a pigeon’s is usually darker.
Round 1: with contrasting color, make a magic ring, ch 1, 4 sc in ring: 4 sc
Round 2: (2 sc in next sc, sc in next sc) around: 6 sc
Round 3: sc in each sc around: 6 sc
Round 4: (2 sc in next sc, sc in next 2 sc) around: 8 sc
Sl st to next sc and finish off, leaving a long tail for sewing.
Head:
Round 1: with main color, make a magic ring, ch 1, 6 sc in ring: 6 sc
Round 2: 2 sc in each sc around: 12 sc
Round 3: sc in each sc around
Round 4: (sc in next sc, 2 sc in next sc) around: 18 sc
Round 5-12: sc in each sc around
Round 13: (hdc in next 2 sc, 2 hdc in next sc) 3 times, sc in remaining 9 sc: 12 hdc, 9 sc. (These hdc form the front of the neck. Place a marker for reference.)
Round 14: sc in each st around: 21 sc
Round 15: (sc in next 3 sc, 2 sc in next sc) 3 times, sc in remaining 9 sc: 24 sc
Sl st in next sc and finish off, leaving long tail for sewing.
Attach beak and safety eyes using the marker from Round 13 for guidance. I found it easiest to attach the eyes, stuff the head, and then sew on the beak. They should be attached between Rounds 5 and 6.
With a yarn needle, sew head to body. The front of the neck should touch Round 2 of the body, and the back of the neck should touch about Round 11-12.
Wings (make 2):
Round 1: with main color, make a magic ring, ch 2, 12 dc in ring: 12 dc
Alternatively, ch 3 and make 12 dc in third chain from hook.
Round 2: ch 2, turn, (2 dc in each of next 9 dc, (2 hdc in each of next 2 dc, 2 dc in last st, sl st to first dc: 20 dc, 4 hdc
Row 3: ch 2, turn, dc in first dc, hdc in next 6 sts, dc in next st, Leave the rest of the stitches unworked: 8 stitches
Row 4: ch 2, turn, dc in next 6 sts, dc2tog: 7 dc
Row 5: ch 2, turn, dc in each dc across
Row 6: ch 2, turn, dc in next 5 dc, dc2tog: 6 dc
Row 7: ch 2, turn, dc in each dc across
Row 8: ch 2, turn, dc in next 4 dc, dc2tog: 5 dc
Row 9: ch 2, turn, dc in next 3 dc, dc2tog: 4 dc
Row 10: ch 2, turn, dc in next 2 dc, dc2tog: 3 dc
The right wing and left wing have a different final round. It creates a wing that points ever-so-slightly up. If you’re making a pigeon, you may wish to switch the left and right wings so they point slightly downward instead, which seems to be more accurate to pigeons.
Right Wing
Ch 2, do not turn. Rotate to work along side of wing. Make 2 dc into the end of each row. When you reach the beginning circle, work into the unused stitches (there are 16 of them) as follows: (dc in next dc, 2 dc in next dc) across. When you reach the other side of the wing, continue making 2 dc into the end of each row. At the end, you’ll have 3 stitches left from Row 10. Skip 1, make 5 dc into next dc, skip 1, and sl st into first dc. Finish off, leaving a long tail for sewing.
Left Wing
Ch 2, turn. Working across Row 10, skip 1, 5 dc in next dc, skip 1. Now you’ll work along the side of the wing. Make 2 dc into the end of each row. When you reach the beginning circle, work into the unused stitches (there are 16 of them) as follows: (dc in next dc, 2 dc in next dc) across. When you reach the other wide of the wing, continue making 2 dc into the end of each row. Sl st into first dc. Finish off, leaving a long tail for sewing.
The last round is the Right Side of the wing. Sew the wings to the dove, leaving the final round loose to provide some texture. You may find it easier to attach the wings after making the legs.
Legs
Pantaloons (make 2)
These are the feathered part at the top of the feet.
Round 1: with main color, make a Magic Ring, but don’t pull it tight. Ch 1, 6 sc in ring: 6 sc
Round 2: 2 sc in each sc around: 12 sc
Round 3: sc in each sc around
Sl st to next sc and finish off, leaving long tail for sewing. There’s no need to stuff these.
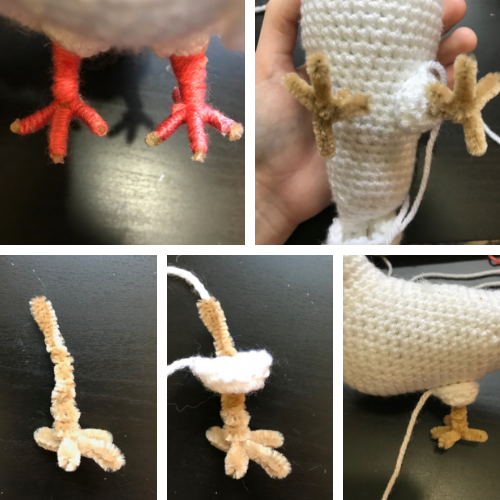
Feet (make 2)
Please see photos for reference.
Bend a pipe cleaner/chenille stem in half. Use the non-folded end to form three toes pointing forward and one pointing backward. It’s not a scientific process; just do what looks right to you.
Insert the folded end through the hole at the bottom of a pantaloon. Then, insert the pipe cleaner into the bottom of the dove. It should be able to stand on its own. I found this easiest with the pipe cleaners inserted at approximately Round 18 on the body with about 6 stitches between them.
Carefully sew the pantaloon to the dove. Use craft glue to secure the leg in place so it doesn’t slip out. There will only be about one stitch visible between the two legs after the pantaloons are sewn down.
Use beak-colored yarn to wrap around the pipe cleaner, hiding it from view. It helps to place a small amount of glue on the end of the toes so the yarn doesn’t slip off. Hide the yarn ends in the pantaloons.
Need help while crocheting? Feel free to leave a comment below and I’ll help you out!

Wow, so genius, beautifully made.
Thank you for your kind words, Ilse, I’m so happy you like the pattern!
This pattern is just what i was looking for, thankyou!
I just finished making this Dove. It was fun , easy to follow, and came out Soooooo Cute!! Thank you for the pattern.
Which sides are the back and front of the neck? Maybe I’m being thick, but I just can’t tell.
Hi Barber! In Round 13, you’ll make 12 hdc and 9 sc. The hdc form the front of the neck. So you’ll find the middle of those 12 stitches and put that at the front. Hope that helps!
This is a beautiful pattern .The dove can be given as a religious gift too.Many thanks.