
Free Crochet Pattern: Kawaii Pineapple Amigurumi
By Amy Yarbrough – 2 Comments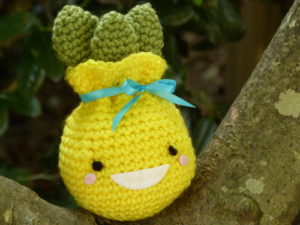
Two of the most popular themes this summer has been pineapples, and of course, kawaii!
Though a little late to the pineapple bandwagon, I couldn’t help jumping on after seeing so many adorable designs from fellow crafters. One in particular I saw was a pineapple pot cover with the plants aloe vera leaves making the top of the pineapple. This intrigued me and got me to thinking of an open amigurumi with the leaves poking out of the top, like a drawstring bag with leaves popping out the top.
I wasn’t at all sure how it would turn out, but then whoever is?
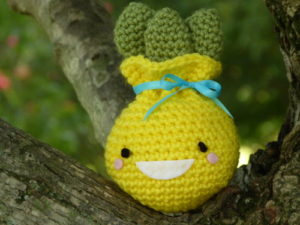
The pineapple body is made like a simple drawstring bag and stuffed. The three leaves are crocheted separately, sewn together, and then sewn into the bag. For the kawaii features, meaning “cute” in Japanese, I used simple french knots and a few scraps of felt. I topped it off with a contrasting colored ribbon and am now proud to present my Kawaii Pineapple!
I hope you enjoy this pattern! Let me know what you think!
| Skill Level: |  |
Finished Size: 4†(10 cm) wide x 7†(18 cm) tall
| Materials: Medium Weight Yarn (approximately 40 yards of yellow, 15 yards of green, a small amount of black) Crochet Hook 7 (4.50 mm) Felt – white and pink Fabric Glue Yarn Needle Polyester Fiberfill + dried northern beans for stuffing stitch markers |
Gauge:
4 sc = 1’’
4 rows = 1’’
Gauge Swatch: 1’’w x 1’’h (2.5 cm x 2.5 cm) ch 5.
Row 1: sc in second ch from hook and in each ch across: 4 sc
Row 2 – 4: ch 1, turn, sc in each sc across: 4 sc
Finish off.
Need help understanding the abbreviations and symbols? Check out the crochet abbreviation chart.
Crochet Pattern: Kawaii Pineapple Amigurumi
Pineapple
Round 1: make an adjustable ring, ch 1, 6 sc in ring, sl st in first sc: 6 sc
Round 2: ch 1, 2 sc in each sc around, sl st in first sc: 12 sc
Round 3: ch 1, (2 sc in next sc, sc in next sc) around, sl st in first sc: 18 sc
Round 4: ch 1, (2 sc in next sc, sc in next 2 sc) around, sl st in first sc: 24 sc
Round 5: ch 1, (2 sc in next sc, sc in next 3 sc) around, sl st in first sc: 30 sc
Round 6: ch 1, (2 sc in next sc, sc in next 9 sc) around, sl st in first sc: 33 sc
Round 7: ch 1, (2 sc in next sc, sc in next 10 sc) around, sl st in first sc: 36 sc
Round 8: ch 1, (2 sc in next sc, sc in next 11 sc) around, sl st in first sc: 39 sc
Round 9 – 12: ch 1, sc in each sc around, sl st in first sc: 39 sc
Round 13: ch 1, (sc2tog, sc in next 11 sc) around, sl st in first sc: 36 sc
Round 14: ch 1, (sc2tog, sc in next 10 sc) around, sl st in first sc: 33 sc
Round 15: ch 1, (sc2tog, sc in next 9 sc) around, sl st in first sc: 30 sc
Round 16 – 24: ch 1, sc in each sc around, sl st in first sc: 30 sc
Finish off.
Cut about 16†of yellow and string through Round 20, ending in back for tightening later.
Small Leaf (make 1)
Leaves are worked without joining. Use a stitch marker to mark first stitch.
Round 1: make an adjustable ring, ch 1, 4 sc in ring, place marker: 4 sc
Round 2: (2 sc in next sc, sc in next sc) around: 6 sc
Round 3: (2 sc in next sc, sc in next 2 sc) around: 8 sc
Round 4: (2 sc in next sc, sc in next 3 sc) around: 10 sc
Round 5: sc in each sc around: 10 sc
Round 6: (sc2tog, sc in next 3 sc) around: 8 sc
Round 7: (sc2tog, sc in next 2 sc) around: 6 sc
Round 8 – 9: sc in each sc around: 6 sc
Finish off.
Large Leaf (make 2)
Round 1: make an adjustable ring, ch 1, 4 sc in ring, place marker: 4 sc
Round 2: (2 sc in next sc, sc in next sc) around: 6 sc
Round 3: (2 sc in next sc, sc in next 2 sc) around: 8 sc
Round 4: (2 sc in next sc, sc in next 3 sc) around: 10 sc
Round 5: (2 sc in next sc, sc in next 4 sc) around: 12 sc
Round 6: sc in each sc around: 12 sc
Round 7: (sc2tog, sc in next 4 sc) around: 10 sc
Round 8: (sc2tog, sc in next 3 sc) around: 8 sc
Round 9: (sc2tog, sc in next 2 sc) around: 6 sc
Round 10 – 11: sc in each sc around: 6 sc
Finish off.
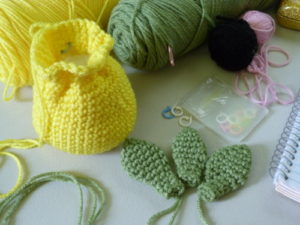
Sew Leaves
Hold both big leaves together side by side and place the small leaf on top. Sew all three together close to the base.
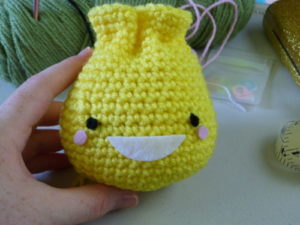
Face
With black yarn and a yarn needle, sew french knots for eyes between Rounds 12 and 13, referring to the picture. Or attach plastic eyes. Cut out a slender half moon of white felt and glue below the eyes. Cut out two small circles of pink felt and glue just below each eye.
Finishing
Add a handful of beans to pineapple then stuff with fiberfill up to drawstring. Place leaves in top of pineapple and tighten drawstring. With yellow, sew through pineapple and leaves to secure them. Tighten drawstring and knot. Secure all ends.
For added support, glue gaps between pineapple and leaves.
Let me know if you run into any problems! I’ll be glad to help!

Looks real cute … must try it !!
Thanks Varsha! Love to see how yours turns out.
Amy