
Free Crochet Pattern: Tiny Graduation Cap
By Claire Golden – Be the first to comment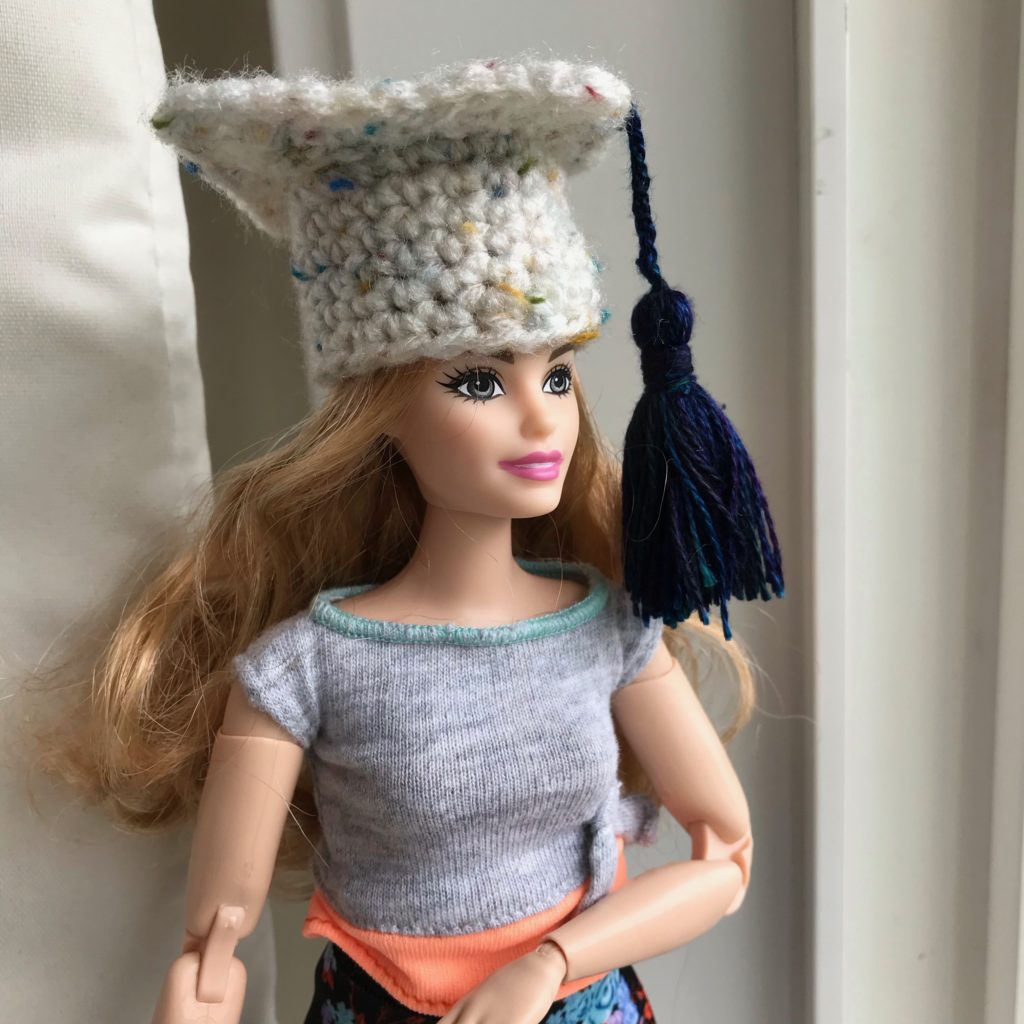
It’s graduation season! I just graduated college myself, and I wanted to celebrate the occasion with crochet, as always. This little graduation cap is what I came up with. You could make this hat in your grad’s school colors and include it with a graduation card, or stick it on a hair clip for a photo prop. Use your imagination and I bet you’ll come up with all sorts of awesome uses. It’s the perfect size for Barbies, so my helper Adele is modeling it for you. But it’s also the perfect size to perch atop a guinea pig or bunny. My sister just got an adorable bunny and I’ve been making lots of hats for it, so stay tuned for more miniature hats in the future if this is something you like. What sort of hat should I design next?
| Skill Level: |  |
Finished Size: 1.5″ (4 cm) tall, 3″ (7.5 cm) wide at widest part
| Materials: Medium Weight Yarn (approximately 20 yards) Small amount of thin yarn or embroidery floss to make tassel Crochet Hook G (4.00 mm) |
Gauge:
The flat part (mortarboard) of the cap is the perfect size for a gauge swatch. It should measure 2.5″ (6 cm) square.
Need help understanding the abbreviations and symbols? Check out the crochet abbreviation chart.
Crochet Pattern: Mini Graduation Cap
Cap
Round 1: leave a 12″ (30 cm) starting tail, ch 20, sl st to first ch to form a ring, ch 1, sc in each ch around, sl st to first sc: 20 sc
Round 2-5: ch 1, sc in each sc around, sl st to first sc: 20 sc
Round 6: ch 1, sc in next 8 sc, hdc in next sc, dc in next sc, hdc in next sc, sc in remaining 9 sc: 20 sts
Finish off.
Mortarboard
Row 1: ch 9, sc in second ch from hook and in each ch across: 8 sc
Row 2-8: ch 1, turn, sc in each sc across: 8 sc
Border: Turn to work along side, 2 sc in corner, sc along side of next 8 rows, 3 sc in corner, sc in opposite side of starting chains, 3 sc in corner, sc along side of next 8 rows, sl st in next sc and finish off.
Assembly
The (hdc, dc, hdc) in Round 6 forms the point at the front of the hat. Use the long starting tail from the start of the hat to sew the mortarboard on top, making sure one of the corners of the square points forward.
Make a tassel using thin yarn or embroidery floss. Attach to the center of the mortarboard.
Need help while crocheting? Feel free to leave a comment below and I’ll help you out!
