
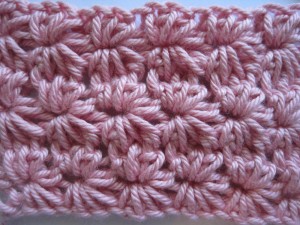
How to Crochet: Star Stitch
By Erin Burger – 98 CommentsOut there in Crochet Land there are many ‘special’ stitches that I call ‘YO Stitches’ (the abbreviation for yarn over is yo). These stitches include the popcorn stitch, the bobble stitch, the puff stitch etc…etc…
My favorite of these type of stitches is the star stitch.  A lot of ‘star stitch’ patterns have you break off at the end of each row…which leaves a lot of ends to weave in upon completion. The instructions I use and am including below use a turn and a row of hdc instead.
This tutorial is for both right and left handed people. For left handed pictures, roll your mouse over the image and it will change for you.
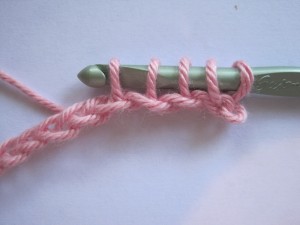
Start by chaining a multiple of 3, then add 1 more chain.
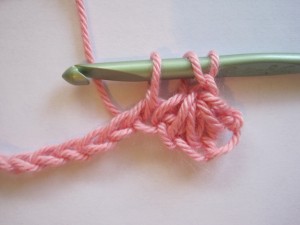
Row 1: pull up a loop in 2nd ch from hook and in each of the next 4 ch, yo and pull through all 6 stitches on hook (where will be a total of 6 loops, disregard error in this first photo which only shows 5), ch 1 to close star.
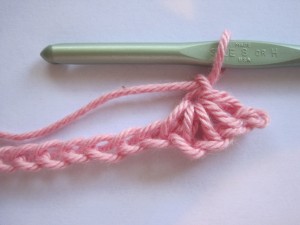
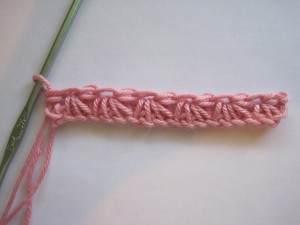
This is your first star and it should look like this (continue on with pattern)
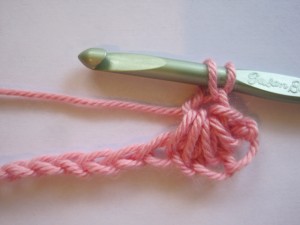
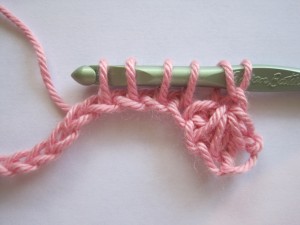
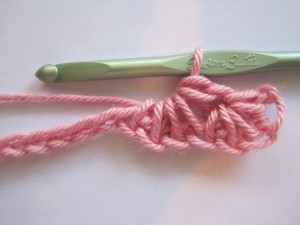
Here’s what your first row should look like
Row 2: ch 2, turn, 3 hdc in each ch-1 from the previous row, ch3 turn.
Row 3: pull up loops in the 2nd and 3rd ch of turning ch-3 and in the next 3 hdc, yarn over and pull through all 6 loops on hook, ch 1 to close star *pull up a loop in ch-1, pull up a loop in last ch of star just made, pull up a loop in each of the next 3 hdc, yarn over and pull through all 6 loops on hook, ch 1 to close star, repeat from * across. hdc in last hdc.
Repeat Rows 2 and 3 until appropriate length is reached.
Tips for working the star stitch:
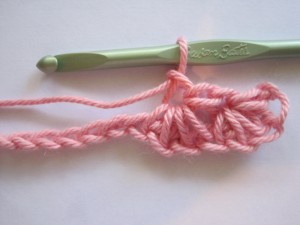
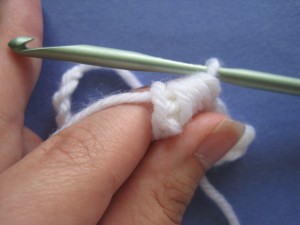
- Holding the previous star between your thumb and forefinger while working will help while working through these instructions. I do it like this:
- You don’t have to literally put the yarn over your hook. You can instead put the yarn under and have the same results. The main idea is to make a loop and keep those loops on the hook until it’s time to close the stitch.
Good luck and if you have any questions or comments don’t hesitate to comment here!

Hi! I love the star stitch. Thanks for the tutorial!!
This is the best, most detailed tutorial I’ve seen, Rachel, in quite a while. When I was first learning, there was nothing like this out there (of course there were no computers, either…lol). The star stitch was one the hardest stitches I learned all on my own, by looking in the back of the crochet magazines.
You are teaching an art form that is becoming more popular with younger people than it has been for a long time; that’s GREAT! You’re very talented, Rachel. Keep up the good work!
Dawn
Thanks for the tutorial. I’ve tried learning this one in the past on youtube but for some reason always got stuck. Great photographs and instructions. 🙂
It would help if a ‘print article’ button with your how-to instructions were added so one could easily print out the instructions. Just a thought. Thanks, Darlene
Hi Darlene, just to let you know, all the pages on Crochet Spot are coded to be printer friendly. You can use the print option in your internet browser and it will come out nice and neat. You can learn more about printing on Crochet Spot here http://www.crochetspot.com/new-printer-friendly-pages/
Rachel, do you have a large infinity scarf pattern made with the star stitch??? Thanks!
Me again — I think you may have made a mistake in Row 3 of the instructions as you refer to chains, but I believe you meant to say hdc. “… *pull up a loop in ch-2, pull up a loop in last ch of star just made, pull up a loop in each of the next 3 ch (shouldn’t it be next hdc?) …” and then at the end “… hdc in the last ch, repeat from* across.” is that correct? Also I think a picture(s) of the 2nd and 3rd rows here might help.
Hi Darlene,
Thanks for the heads up. I’m new to writing patterns in this style (which is very descriptive and modern) and a lot of times accidentally use ‘ch’ or ‘st’ instead of the correct and specific term. It takes a while to get used to! 😉
I had the ‘hdc in the last ch’ in the wrong place there as well so thanks! It’s nice to know that people are actually working the tutorial. I thought having the first row tutorial and then the photo of the finished product would be enough, but I’ll keep in mind using more photos in future tutorials. Thanks again.
Erin and/or Rachel,
Please, please, PLEASE Do the thingy that “flips the stitch pictures to show the left-handed version” of the Star Stitch instructions. Pretty please? You will officially be my new best friend if you do that.
As a lefty, that is my favorite feature of this site. You have helped me so much.
Ok, I’ll do it today, thanks for asking isonprize. Check back tomorrow (it’ll take me a while to edit all the pics).
Rachel,
You are such a sweetie… My new best friend, thanks so much! The lefties of the crochet world will thank you too. I just know they will! Peace, Sabra
Such a gorgeous stitch! I love it!! Thanks so much for showing us all how to do it, Rachel! I’ve *gotta* try this one! : )
Oops! Thanks also to Erin for posting this and for the demonstration. Beautiful work! : )
Indeed they are printer friendly. i never realized that before! lol, I always highlighted, copied and pasted into a Word document, then printed! Thank you so much, Rachel. I SHOULD have known that you would have had that under control!
Hi Erin,
Are these the new instructions based on the changes made on row 3? If not, is it possible to post the instructions with the corrections.
I’ve often tired this pattern and can never get it to come out right.
Thanks,
Hi Pat,
Yes, I changed Row 3 and I worked it out a couple times, so it should go swimmingly!
Row 3: hdc in last ch. [does this mean the top of the turning ch-2]?
Yay, for the left-handed instructions. Thanks so much. Lefties of the crochet world thank you!!
Hi Sara,
It should be hdc in last hdc. As I explained to Darlene in a comment above, I’m new to writing patterns in this style and really appreciate everyone’s patience!
Okay, got it. thanks for the reply, I knew I was doing something wrong.
In Row 1, should that be 5 stitches instead of 6 stitches? Just asking!
Oh wow THANK YOU! I have been trying to get this stitch for months and months now… I’ve gone through 800 tutorials and youtube videos but I never get it. I’m hopeful/optimistic about this one… you’re awesome!
Waahh. The lefty switcheroo stopped working. And it’s not my computer ‘cuz it works like a charm on the other stitches – single crochet, knot stitch, etc.
Please, please, can it come back? Thanks a zillion. The lefties of the world will worship you for it!! Peace
The post was being edited. All fixed again now.
Thanks so much also showing how to do it for those of us who are left handed!
I am fairly new to crochet and thought there was something wrong with row three but couldn’t figure it out. I’m going to try the new directions and see if I can do it. I ripped out all my rows so will start again. I love the look of the pattern.
Love the site. Learned a lot of things, but having trouble with second row of the star stitch, always end up with two or three(sometimes more) stars than suppose to have. What am I doing wrong? Any help would be good right now, ripped out tons of stitches. Thanks
Is there a pattern on this site that utilizes this stitch?? I have a gorgeous yarn I would like to use to make something nice for my mother this year for Christmas. Maybe a scarf or something else… Any ideas??
Sheila,
The instructions for the star stitch say to complete this stitch you have to chain an odd number of stitches. If you wanted to make a scarf or a blanket, just chain an odd number of stitches that’s long enough to be appropriate for your project.
Off the top of my head chaining 31 or so for a scarf would be about right, maybe 131 for a blanket? Oh! How about a wrap (a super wide scarf for over the shoulders?) I would chain around 67 or so for that.
Hi Erin,
It’s a beautiful stitch, and you’ve presented the instructions wonderfully. My question is, How do you keep the line of 1/2 stars from curling? Or, put another way, how do you maintain good tension in the star ‘rays’ to keep them looking like they’re ‘shining out,’ rather than imploding on themselves (and thus causing the project to begin the curling process)?
I hope I explained my question in an understandable way … not sure …
Hey!
Just tried this stitch…but for some reason, every row has less stitches. I’m pretty sure I’m following the pattern, but I can’t seem to make up the stitches I lose when I bring the star together. What am I doing wrong?!?
Hello Ace,
I’m not sure what you might be doing wrong. When I was first learning this stitch I didn’t understand the first stitches of the second row went into the 2nd and 3rd chains of the turning chain, maybe that’s what you’re doing incorrectly?
I had made some mistakes on the pattern when it was originally published, but I fixed them and then worked up a few rows of it just now and it worked out fine for me.
If my suggestion didn’t work, get back to me and we can try to work through it together.
Thanks,
Erin
I love this pattern but for some reason it keeps getting shorter at one end. help ! also I book marked the tutorial but not the pattern for the case for keeping crochet hooks.. sigh.. any help will be appriciated.
Hi Sue, if it’s getting shorter and shorter, it sounds like you maybe accidentally skipping stitches. After you crochet each row, try to count the number of stitches you made to make sure that it’s consistent. Also, here’s the link to the hook case pattern: Crochet Pattern: Crochet Hook Case Have fun crocheting it!
I am having trouble with the end of row 2. I do 3 hdc in each child from row 1,but at the end of the row I seem to have extra space and the rows seem to be unconnected. Should there be a sc or something at the very end of the row?
I would add one hdc at the end and beginning of each row. (http://www.youtube.com/watch?v=Voo3D3l_mpE)
I just want to thank you for this website, you give me such inspiration! And you are able to teach “an old dog, new tricks”, I have learned so much for your instructions.
I’m thinking I will try a few rows of the star-stitch with cotton thread and make some pillow case edgings to see what that will look like. It’s such a pretty stitch I want to use in something I will see daily.
Thanks so much!
Thank you for the tutorial!! it’s great and easy to understand. Like many, I have had problems with the end of the second row, but I solved this by adding a slip stitch at the end of row 2 (that is before chain3) and everything is going right!
Hi there,
Great tutorial and where it wasn’t clear I mainly figured it out! I tend to slip stich at the end of the second row before chain 3.
My one question is though – there is a definite back and front to my work. the front is pretty stars the back is well… a back and not pretty and starry… Am I doing something wrong or is this to be expected?
Thanks
Leonie
Thanks for sharing. Your pattern is easy to follow & I’m making it now. Looks great!
Thank you so much for these clear and nice instructions! And thank you so much for taking the time to make them suitable for lefties such as myself. I’m still new to crochet (less than 1 year practicing), but thanks to people like you, I am finally able to learn and creat things in record time, when before nobody wanted to teach me (because of being a lefty).
This tutorial is so well explained that I’ll have my crochet hok case done in minutes! (the project you proposed here as well)
Thank you once more!
Many greetings from a lefty Ecuadorian, living in Indonesia,
Paola 🙂
hello. any odd number? what if it doesn’t work as a multiple of three? will 23 stitches work? from what i’m seeing, it looks like the only way to make the star stitch is to make chains in multiples of three and then have an extra on the needle, like 22 or 31. if it’s a number like 23 or 37, what happens to the extra stitches at the end of the row?
I found row 2 always caused my pattern to curl (or look like it was growing) I was able to solve this by doing 2 hdc in each chain 1 space instead of 3 hdc. I found a great video tutorial that could help a lot of people who are having trouble: http://www.youtube.com/watch?v=Voo3D3l_mpE
This tutorial is great but I’m thinking 3hdc may be too much for each “row 2”! I’m currently making a beaded bag using this stitch so I hope it works out!
Thanks for the article and pictures by the way!!
Kendra
Thanks so much, I have been looking for simple instructions for a star stitch for over a year now, and although some of the You Tube videos have been helpful, they are not so easy to follow. Also, I have never seen 3 HDC at the beginning of a row before, and the ends are what I have such trouble with! Your photos explain it well. I would be interested to know how to do increases/decreases. Thanks again!
I’m a crochet beginner, I managed to figure out row 1 and 2, but you completely lost me on row 3. I pulled up loops in the 2nd and 3rd chain, then I was like “how am I suposed to chain 3 now? So i chained 3 in the loop i pulled up on the 3rd chain and then i got even more confused! “how am i supposed to hdc 3 now, and into what? lol, i’m so confused.
Hi Jenny, you don’t have to make a chain 3, instead you’re going to “pull up loops in the 2nd and 3rd ch of turning ch-3” meaning the loops you are pulling up are the 2nd and 3rd chain of the chain 3 you already made. Also, you’re not doing 3 more hdc, the “pull up loops in the 2nd and 3rd ch of turning ch-3 and in the next 3 hdc” means to pull up loops in the next 3 hdc as well.
There does seems to be a typo in row 3 though. After the “pull up loops in the 2nd and 3rd ch of turning ch-3 and in the next 3 hdc” there should be a “yarn over and pull through all 6 loops on hook, ch 1 to close star” in order to finish the first star. I’ll go ahead and edit Erin’s tutorial to show this change.
Thank you for this, your pattern is the only one that explains how to continue on to the next row.
Thank you so much I made a few change purses out of this you helped me out so much
Thank you!
I’m a beginner but this is my favorite stitch and I would very much like to try it.
Do y ou think there might be any chance you could post pictures for row 2 and row 3 please, just as you did for row 1? I can’t read patterns, and it would really help.
Thanks!
Ps: learning thanks to you, in France!
i got the 1st row, but row 2 confuses me ? i know how to crochet but the 3 hdc in ch 1 . i can’t find the ch 1 & the stitches look to straight not nice like the 1st row.not like a fan .HELP??? . I really like the stitch.
Hi Carol! When you work row 1, try to put a stitch marker (scarp of yarn, safety pin, paper clip, etc.) in the ch 1’s immediately after you make it. That way when you get to row 2 you’ll be able to see where to make the hdc stitches. Once you get the hang of where the ch 1’s are at you probably won’t need to use stitch markers, but they are really helpful when first getting started.
I did the star stitch years ago but lost my pattern and had been looking for a new one for a long time, love the stitch. I am like the one person said I used to couldn’t read instructions when first learned to crochet so would look at a pattern and follow but after alot of practice taught myself to read the instructions and now would not do without them but is nice to have both instructions and a pattern. Now that have found will one day again make something with the star stitch is so pretty. I found out that the way to keep something from curling when you are working is that when you begin use a hook a cuople of sizes larger than the size you use for the body of the pattern and it will lay flat and no curl on you. I alway had trouble with things curling till tried doing like I said.
Just found your site via Stumble Upon and LOVED this tute, because I am left handed! Have subscribed. Thanks so much!
Laura
I adore you ! Thank you so much. Great tutorial and a wonderful stitch.
Hi, I am alternating between using your tutorial and a YouTube video to perfect this stitch into a blanket for my soon to be daughter. My issue lies in that I want to do color changes so that I can stitch stripes. How do I change yarn colors and keep the pattern? I am at the point where I’ve completed 3 full rows of stars (6 rows total). My plan is to make many, many different color changes (i.e. little woollie star stitch blanket no. 2). How do I make the changes, and what do you suggest to secure and hide the tails? I will be adding a boarder if that makes any difference. Thank you SOOOO much for all your blog. I’m a new, self-taught crocheter and you’ve been instrumental!
Hello! You can use the traditional method for changing colors that is show in this tutorial: How to Change Colors in Crochet
Hi! I love this stitch so much, I’m a beginner, and I think I’m following the pattern correctly, but I keep missing the number of stars in every row that I continue. For instance, I have nine completed stars in my first and second row, when I start my third row, I only have six stars. I know I’m missing stitches somewhere, but I don’t know how to fix it. Help?
I hope my description isn’t too confusing!
Thanks!
Hi Katie! Take you’re time with it. When you do row 2, double check to make sure you are working all the stitches. If there aren’t enough stitch on row 2, then that may be why row 3 is too short.