
How to Crochet Around Flat Cards or Paper Scrapbook Embellishments
By Caissa "Cami" McClinton – 3 CommentsI have been so excited and inspired by art journaling and mixed media techniques! Crochet is not the only craft in my life, but I always want to incorporate it into my artwork. My major influences in art journaling and mixed media are Christine Urias, Traci Bautista, and Kathy Cano-Murillo. Aren’t we lucky to have so many wondeful artists at our fingertips through the magic of the internet?
During this tutorial, I will show you how to add texture to your flat cards or scrapbook embellishments by crocheting around them. By the end of the step-by-step tutorial you will have a finished embellishment.
I would look great on your Pinterest board.
Materials:
Yarn
Crochet Hook
Needle
Flat card or Scrapbook embellishment. I used a free printable by Traci Bautista. It can be found here. I love the grunge look of the card and I chose a crochet border that complemented the distressed style.
Yarn and hook size will vary by the size of the element you’re embellishing. I used Cascade Ulta Pima cotton yarn (size 3) and a 2.75 mm crochet hook.
Abbreviations:
ch – chain
sc – double crochet
rep – repeat
sl st – slip stitch
Prepping your Flat Card: Using the needle, poke holes evenly around the edges. I eyeballed it, but you could use soft pencil lines as a guide.
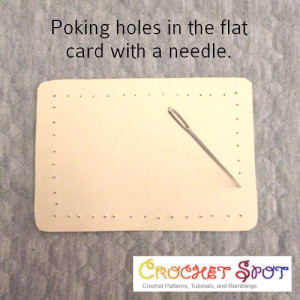
Tip: Place your card on a soft surface like a mouse pad or quilted fabric over a hard surface in order to make the hole punching easier.
Foundation: Make a blanket stitch around the card. You can consult this tutorial to become more familiar with the blanket stitch.
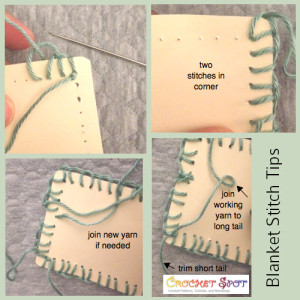
1. Make a knot on the bottom of your yarn and leave a tail so it won’t pull through the card.
2. Work two blanket stitches into the corner.
3. If you run out of yarn, just attach a new piece with a knot on the back of the card.
4. To attach crochet yarn, tie a ball of working yarn to the beginning tail. Trim the tail.
You may mouse over images for left-handed views on relevant photos.


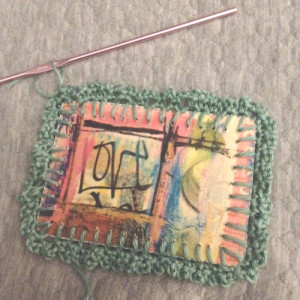
Repeat the pattern (sc into next blanket stitch space, ch 3) around the card. Join with sl st into first ch.
Finishing: Fasten off and cut yarn close to knot in keeping with the grunge aesthetic.
I hope you enjoy crocheting around your flat cards or scrapbook embellishments! As always, if you have any questions or need any help, please leave a comment below!

This reminds me of a trinket box I had as a little girl which was made of flat card panels sandwiched between mylar sheets and then the mylar covered panels were crocheted together into a 3-dimensional container. It is possibly a ‘next step’ on from the process you have demonstrated here. Thanks for the memories! 🙂
Great tutorial! I really want to try this.
Hi Could you please tell/show me how to crochet around materials such as voile (tea net) or a facecloth (terrycloth) or any other materials?