
How to Crochet: Single Crochet Invisible Decrease
By Rachel Choi – 20 CommentsDecreasing while working with single crochet stitches is easy! Here is the link to the traditional method for making a single crochet decrease: How to Crochet: Single Crochet Decrease. The problem with the traditional method is that sometimes it leaves gaps and holes in your work. In this tutorial I will show you the “invisible decrease” method, which as the name implies is more invisible, and less noticeable.
You should not use this method all the time, as it works great in projects such as amigurumi, toys and stuffed animals, but for other projects you may want to use the traditional method for making a single crochet decrease. My rule of thumb is to always make a traditional decrease first, but if it is noticeable, then switch to an invisible decrease. I also find that making an invisible decrease takes longer than making a traditional decrease.
The invisible decrease is commonly abbreviated into the following steps: insert hook into front loops only of next 2 stitches, yarn over, pull through 2 loops on hook, yarn over, pull through final 2 loops on hook, counts as 1 single crochet.
The following is a step by step picture tutorial to help you visualize the steps. This tutorial is for both right and left handed people. For left handed pictures, roll your mouse over the image and it will change for you.
Start with a swatch to practice on. Below I used a square of single crochet stitches.
Insert your hook into the front loop only of the next stitch.
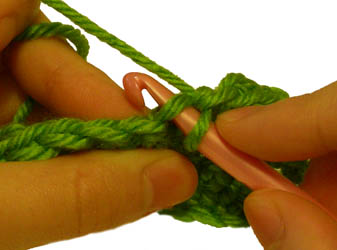
Now insert your hook into the front loop only of the next stitch. Be sure to insert your hook from front to back as you did with the previous stitch.

Yarn over (wrap the yarn around your hook).

Pull the strand of yarn through 2 loops on your hook.

Yarn over (wrap the yarn around your hook).

Pull the strand of yarn through the final 2 loops on your hook.

Congrats! You just completed an invisible single crochet decrease! Remember, that this method may not be right for every project you work on. So experiment as you wish to see what works for you. Also, remember that decrease normally count as one single crochet when you are counting stitches and a decrease will cause your row to have one less stitch than the previous row.
Was this helpful? Need more help? Let me know!

We work an invisible single decrease in the front loops. Don’t you think it looks a little odd to have those front loops showing after you finish the decrease in the back loops only? Working it in the front loops the decrease looks exactly like all the other stitches in the project.
Have a Blessed Day,
Diane
You’re right Diane!
dumb question. how is it invisible if your still ccrocheting 2 stitches?
Hey Bananas, crocheting 2 stitches together is what makes it a decrease. The steps you take to crochet the 2 stitches together is what makes it invisible. The steps in the “invisible decrease” method is more like the steps you take to make a single crochet stitch, compared to the steps you do in a traditional decrease. The invisible decrease would look more like a single crochet and that is why it is more invisible. You can try the two different methods on a swatch to see if you can tell the difference.
I see what your saying but the written part and the picture part or two totally different ways of doing the invisible decrease.
written part-insert hook into front loops only of next 2 stitches, yarn over, pull though all 3 loops on hook, counts as 1 single crochet.
picture part-
Insert your hook into the front loop only of the next stitch
Now insert your hook into the front loop only of the next stitch
Yarn over (wrap the yarn around your hook).
Pull the strand of yarn through 2 loops on your hook
Yarn over (wrap the yarn around your hook).
Pull the strand of yarn through the final 2 loops on your hook.
I don’t mean to be a pain but your tutorials have always helped me. Is it all 3 loops or 2 loops yo 2 loops?
Thank you for your time
Whoops, that’s my typo! Thanks for catching that. The picture part is what’s right. I’ll fix it now. 🙂
Thank you ever so much for all your help
Thanks so much!
I was waiting on this one. 🙂
Happy Stitching.
:-1
What a great tutorial! Thank you! 🙂
What yarn are you using here? It looks wonderful!
Hi Laura, the yarn in the picture is Red Heart Soft Yarn. They make my favorite green colored yarn!
I love the green yarn, too.
I just completed six amigurumi animals – I could have used this. But, better late than never! Thanks for the tutorial 🙂
Hi!!
Just wanted to say, I LOVE your site!!! Awesome stuff – hope to become a paid member after the first of the year (not too far away!!).
I really wanted to thank you for your ingenious idea to make your tutorials right AND LEFT handed!! I LOVE the way you mouse over the picture for the left handed view!! It is sometimes hard for lefties (like me) to visualize what the stitch will look like when I am doing it. This is the coolest thing I have seen in quite awhile!! I just love it!! Thanks so much for thinking of us lefties!!!
Gentle Hugs
Robin
Wow, I was wondering how to do this very thing last week and just couldn’t figure it out. The front loop makes so much sense. Thanks for your great tutorial. Crochet Spot is wonderful!
What a great turtorial! And I LOVE how you have your photos available to show left handed. I’ve never seen this before and it is great for all us Lefties. (My mom taught me to crochet by doing a chain, or a particular stitch, then duplicating it in reverse to be left handed, then patiently showing me the right, or in my case, the left way to do it. But it’s great to see photos, especially when learning a new stitch type. Great job.
Thank you~ I started by looking for a pattern for a hippo, the first sight I was on had the photos, but no pattern listed. The lady did however mention using an invisible decrease and I had to google~ Your’s was the site that topped the list and I am ever so glad it did!!
Thank you for knowing and better yet, sharing~
Nurianna~
[…] it is, right next to the traditional hdc2tog. This decrease follows the same idea as the invisible sc decrease. Remember you can roll over the pictures for a left-hand […]
With your visual aid there’s no confusion—-great stuff. Thanks again.
Thanks as I struggled last night with this, and your pictures make it pretty clear, can’t wait to get home and try again. I am sure it will work this time.
So thanks a million and then some more. 🙂
Great tutorial- thanks for sharing. I will be linking to your post on my blog today at Cara’s Handcrafted Crocheted Ornaments. Love and prayers ~ Cara Louise