Crochet in Front, Back or Both Loops
By Rachel Choi – 66 CommentsSometimes it is confusing as to where you are suppose to insert your crochet hook, especially if you are a beginner. Here are some photos of what “loops” I’m referring to and what it looks like when you crochet in the front, back or both loops. For these examples I will be using single crochets.
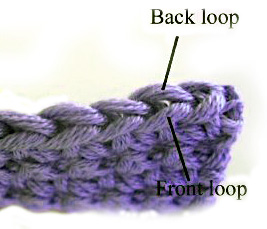
This picture labels the front and back loops of a stitch. The front loop is the one that is closest to you and the back loop is the one that is furthest from you when you hold your crochet work.

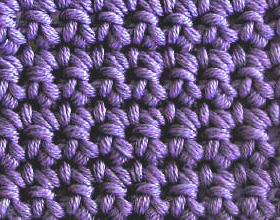
Normally when you are crocheting you are suppose to crochet into both loops. This means that you will insert your hook underneath both loops indicated in the above picture in order to make your next stitch. Here is what a few rows of single crocheting in both loops looks like.

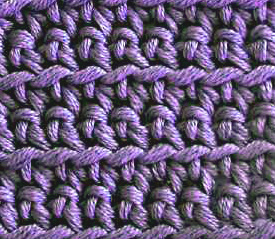
Sometimes when you crochet you may want to create a different look to your work. Instead of crocheting in both loops, try crocheting in just the front loop. Crocheting in the front loop not only gives a different look but also makes your work thinner. Here is picture of what it looks like.

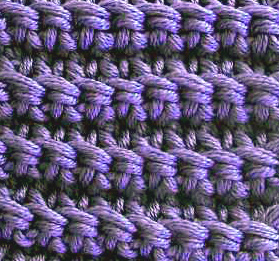
Lastly, you can crochet in the back loops only. This gives a very neat ridge looking pattern as depicted below.

Feel free to experiment with crocheting in different loops!


[…] the size of the box, continue to increase the size of the square Round 8 (work all stitch in back loop only): sc in next 6 sc, (decrease, sc in next 11 sc) 3 times, decrease, sc in next 5 sc: 48 sc Note: the […]
[…] Note: stitches are crocheted in the back loop only unless otherwise indicated. Round 1: with white, ch 2, 6 sc in second ch from hook, place marker: 6 […]
[…] Pattern: Basket Note: stitches are crocheted in the back loop only unless otherwise indicated. Round 1: ch 3, 12 dc in third ch from hook, sl st in ch-3: 12 dc Round […]
[…] Pattern: Cube Note: stitches are crocheted in the back loop only unless otherwise indicated. Top Square Round 1: ch 2, 4 sc in second ch from hook, place marker […]
You are such a wonderful teacher Rachel and everything is so clear and uncomplicated when you describe and show us things. Thankyou 🙂
[…] at the same time. This dishcloth has ridges for extra scrubbing power. The ridges are created by crocheting in the back loops only, although it may be difficult to see the ridges in the photo to the right. For super absorbency use […]
it’s true …you are a good teacher. Gotta keep it simple for us beginners
hello; i am still having trouble with the back loop do u have to use the back loop when it calls for the back loop only in that one row i find using the back loop very difficult.
please response
Hello, yes, you would work in the back loops only if a row calls for it. I understand that it may be difficult, but with more and more practice it should become easier. Take your time when you crochet!
[…] Pattern: Rug Note: all stitches are crocheted in the back loops only Start by chaining 90 or as wide as you want rug Row 1: ch 2, dc in third ch from hook and in each […]
I’ve been having some trouble with crocheting through the back look when turning ‘corners’ in amigurumi patterns.
One project that springs to mind was a cake that was supposed to be a cylinder shape but ended up as a fat, saggy cone with a flat tip. Very sad. 🙁
Are there any tips you could share on this? I know I’m missing something basic…
hmm…that’s a tough one! Maybe some stitches were miss counted, because if it’s suppose to be a cylinder and it turned out a cone, then I’m assuming it got more narrow as it was crocheted. That’s the only thing I could think of.
One of the easiest newbie mistakes is not doing the last stitch of the row. Count your stitches!!!
Thank you for the free patterns. My husband has no job, and our printer is out of ink, so I have been hand writing the patterns and just using up some of my old yarn. Thanks you again.
Thank you for this. I did not realize how very different crocheting in the different loops could look.
Rachel – I love your very helpful and easy to understand website! I am recently retired from many years of elementary teaching and teaching myself with some help from a nice experienced crocheter, to crochet – something I’ve wanted to learn for about ten years and just didn’t have the time. It’s been fun to get together with two friends and “suffer” through the process together. Anyway, your tutorials are the best on the web, your patterns are awesome for a beginning crocheter and I love your upbeat voice in the writing you do. One question: how do I keep the edges of whatever I’m crocheting straight? I AM remembering to ch 1 or two at the end of each row, but still the edges don’t come out nice and straight.Until I can solve this little mystery I don’t feel like I’m ready to make a blanket or throw. What am I doing wrong? Thanks.
Hi Jean!
Some times when people crochet the tension in a chain is tighter than the tension in a stitch. So try making the chain on the edges a little looser. Also if it is still not straight, try to block your crochet. Here is some info about blocking crochet.
Rachael, I used this pattern , I Loved it 🙂
Thanks.
This was really helpful. I have only been crocheting for a few months and I learned the front loop crochet way of doing it. I didn’t realize that the usual way of doing it was through both loops. Your pictures are very clear and have made it easier for me to understand how to do the different stiches. Thank you so much! If anyone should be writing the crochet manuals for beginners it should be you!
[…] to palm of hand), sc in second ch from hook and in each ch across: 40 sc Row 2: ch 1, turn, sc in back loop only of each sc across: 40 […]
[…] can be crocheted by a beginner! It’s made with ridges that are created by crocheting in the back loops only. The ridges allow the ear warmer to stretch so that it’ll fit snugly around your […]
[…] Pattern: Piano Key Scarf Note: all stitches are made in the front loops only. Row 1: with white, ch 35, sc in second ch from hook, sc each ch across Row 2: ch 1, turn, sc […]
[…] invisible decrease is commonly abbreviated into the following steps: insert hook into front loops only of next 2 stitches, yarn over, pull though all 3 loops on hook, counts as 1 single […]
I am a true beginner (as in, I’ve only practiced different techniques and am just now starting to actually make things), and I can’t tell you how helpful your website is! This page made me go, “Oh! I get it now!” out loud. Thank you so much.. I’ll be visiting often. 🙂
[…] BL […]
Hi! I just wanted to tell you that I am compeletly new to crochet and I was trying out a basic pattern – but I wasn’t completely sure what “in the back loop only” meant! This was so perfect – thanks for the help! I’ll be back!
[…] insert your yarn needle through the 2 loops (front and back loops) of the crochet stitch on the opposite piece (the one your yarn isn’t attached […]
[…] Crocheting in the wrong loop(s). Often times when crocheters are self taught or even taught by friends/family, without formal crochet instructions from a class or instructor, they over look the obvious. Hey, I was guilty of it! Normally when you crochet, you are to insert your hook into both loops of a crochet stitch. Other times you may find it necessary to only crochet in the front or back loops. To learn more about the different loops check out this post: Crochet in Front, Back, or Both Loops […]
[…] half double crochet, double crochet, treble crochet, etc. Instead of inserting the hook into the front and back loops of a crochet stitch as one would normally do, front and back post stitches are made by inserting […]
[…] 7, working in back ridge only, sc in each ch across: 6 sc Row 2 – 7: ch 1, turn, working in back loops only, sc in each sc across: 6 sc Note: rows 1 – 7 creates a ridge texture. The next row will be […]
Thank you so much for this wonderful and easy to understand explanation. I’m new to crochet and had no idea what a back or front loop was. It’s very interesting to know too the difference that it makes. I’m off to read more of your lessons and I have you bookmarked for future reference.
Cathy
[…] next 2 ch, hdc in next 2 ch) 2 times, skip 2 ch, hdc in next 2 ch, 2 hdc in last ch: 20 hdc Row 2: working in back loops only, ch 2, turn, 2 sc in first hdc, sc in next 2 hdc, (skip next 2 hdc, sc in next 2 hdc, 2 sc in next […]
[…] Pretty Bow Row 1: ch 12, sc in 2nd ch from hook and in each ch across: 11 sc Rows 2-4: ch 1, turn, working in back loops only, sc in each sc across: 11 sc Border: do not turn, sc in along side of each row, in each ch across […]
[…] afghans or for washcloths and face scrubbies! Want to know where the back loops are in sc? See Crochet in Front, Back or Both Loops for more information. Chain as many as needed for appropriate width. Row 1: sl st (in top loop of […]
Hi, Hopefully you can help me. I have a pattern that says as follows: ch 3, skip first sc, dc in next sc; *skip next 2 sc, dc in next sc, ch 1, dc in first skipped sc (insert hook from the front while keeping thread at the back of the work as usual – this second dc will enclose the first dc) – cross double made. I’m not really understanding..do I insert hook in the front loop? How do you do this while keeping thread at the back of work. Thanks for any help you can give me. I’m making a placemat. Beginner crocheter.
Hi Angela, it sounds like you’re making X’s with your stitches. So when you “dc in first skipped sc” you going to bring your hook in front of the double crochet that you just made to get back to the sc you skipped. Then make your double crochet into the sc as you normally would. I don’t think your pattern is referring to the front or back loops.
Hi! I’m new in crocheting, I love it but I have nobody to help me when I have doubts…your posts are really helpful and clear, I really appreciate your work in this blog! THANKYOU!
Thanks Rachel. That is exactly what it is. I think I have learned the stitch. Now just got to perfect it. Thank you for answering in such a timely manner. This is a great website for us beginner crocheter. A big help to me. Have a blessed, blessed day!!
Hi,Rachel!! Love your website! I’ve been using the back loop stitch to make scarves for my grandchildren but it all one color. I’m thinking of making a striped one. How would I go about doing that? When would I change the yarn? Would one color stripe be on the ridge side and the other stripe be the flat crochet of that particular side?As you see I’m having trouble visualizing it. Thanks! Happy Holidays !!
Hi Shirley, you can change the colors whenever you’d like! You can change the colors after a couple rows, or even every row for very skinny strips. Feel free to experiment with it by making a small swatch with the colors you like to see how they come out.
This might be a silly question but how does crocheting in the front or back loops look from the other side?
Do they look like it would crocheting in the other loop?
Asprin, both sides will look the same. Try making a small swatch of each to see for yourself. Have fun crocheting!
Because using front loops or back loops over a few rows will produce the same looking rows.
What happens if it is one row of front or back loops in a swatch of both loops? Say for a corner or bend?
The omitted loops will make a line in the work. This is often done in patterns, as you crochet more and more you’ll notice it. Also, free free to experiment and try it out for yourself. There’s nothing like actually doing it and seeing it first hand 🙂
[…] 1: ch 10, sc in second chain from hook and in each chain across: 9 sc Row 2: ch 1, turn, working in back loops only, sc in each sc across: 9 sc Row 3: ch 1, turn, working in front loops only, sc in each sc across: 9 […]
I’ve crocheted in front loops, until i’ve noticed that my toys don’t look like on the picture.
I would like to see a diagram pointing to bl of foundation chain and how it looks when sc into bl of foundation.
Need photo of working 3 rows single crochet bl and label which is considered the first stitch of the row where you put in the hook.
Hi there just wondering if you could help me ,i have a slight problem with my work as my crochet went on i realised that it was forming a triangle instead of a straight line like a scarf , and i do chain 1 after every row so if you could please help that would be perfect thanks 🙂
Hello! Here’s a post that might help you: 7 Tips to Establish Consistency in Crochet
Tip #4 discusses the chains.
Help? When a pattern says,”dc in each dc across”. Does this mean to go into the top 2 threads of the dc or do i go into the space between the 2 dc? It reads chain 3 (counts as 1st dc turn dc in 2 dc in each dc across. Does this mean go into the 2 threads at top or the spaces between the 2 dc stitches? thanks for your help. I am sure it is simple, but I have taught myself to crochet.
Hi Jewel, you would crochet into both loops. So if you loop at first pic in this tutorial you’ll insert your hook under both the front and the back loop that’s at the top of the stitch. That’s the traditional way to make crochet stitches. You would always insert your hook under both loops unless otherwise noted in the pattern.
Hi Rachel I got your email , but i need to know how to do the third row. Are you using a single crochet row then a double crochet row ?
Hi Laura, this tutorial shows all the rows done in single crochet.
Why is tension easier to control using only back loops as a left handed person doing single crochet? Using both loops makes stitches too tight no matter what I do
Hi Jean!
I’m not sure if tension is necessarily easier to control on the back loops only. But when working in the back loops only it will create a thinner fabric because there is less bulk from working through 2 loops. If you find your stitches too tight, try a larger hook. The larger your hook the looser your stitches will become.
Thank you.
Hi! Is there a crochet stitch which looks the same front and back?
Hi Maggie,
Most stitches look different on each side, but if you turn your work after each row/round then both sides of your work can look the same.
Thanks! Is a rib stitch too heavy for a moebius shawl? THANKS!
Hi Maggie! It should be okay. Try it out and see how you like it!
Back to previous ?, please bear with, am a beginner. You said both sides can look the same if I turn my work after each row. How do you turn? I thought I did, but sides do not look the same. I feel somewhat “stupid”! I truly appreciate your help. 🙂
After you get to the end of your row, you’ll turn your work so that you can work on top of the row you just made. If you are crocheting row after row after row, then you probably are already turning your work. Make a few rows and then it should start to look the same. Each row has a front and a back, but when you turn your work the front and the back will appear on both sides of your work, therefore making each side look the same.
I just purchased 2 patterns. I am unable to download them. I went to get help with download, it says to go to orange box. The only orange box I see wants me to sign up for newsletter.
Hi Judy!
You can use the orange log in box on the store page: http://www.crochetspot.com/store/
If you need more help with it email me at [email protected] and I can help you further!
Compliment on the photos; they are so clear and easy to understand. I am learning to crochet and was confused about the front and back loop. You have described it really well, the difference between the front, back and both loops.