
Alternative to the Magic Adjustable Ring
By Rachel Choi – 15 CommentsThe magic adjustable ring and the adjustable double ring are popular methods for starting a project in the round without having a large hole in the center of the work. However, I know a lot of folks who aren’t fans of those techniques, or have trouble working the adjustable rings, and prefer to crochet the traditional way by starting with chain stitches. In this post I’ll show you a very simple technique that I often use to achieve a closed circle when starting a project in the round with chains.
The secret is simple, crochet over the yarn tail as you work your first round. Then pull the tail tightly to close the hole in the work. Weave the tail into your work as you normally would to secure and hide it.
In this tutorial I will demonstrate this technique by working the pattern “ch 2, 6 sc in second ch from hook”, which is commonly used to start projects in the round. You can use the same technique demonstrated in this tutorial for other patterns worked in the round regardless of the stitches used.
Hover over the photos for a left handed view!
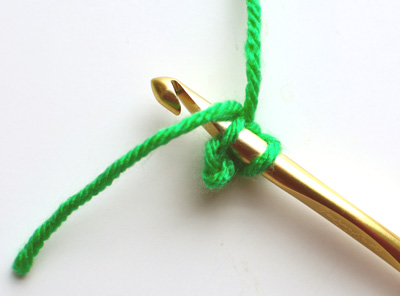
For this example, I start by chaining 2.

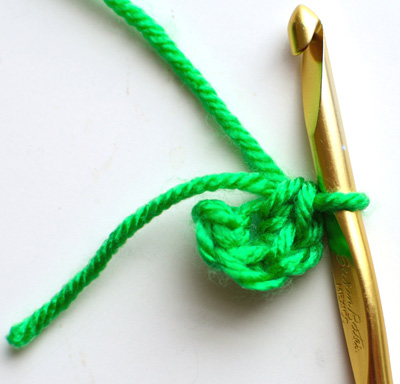
Then insert your hook into the second chain from the hook to work your stitches, 6 single crochets in this example. Be sure you are working over the yarn tail as you crochet your stitches. The tail will be draped over the hook, like in the photo below.
Continue to hold the tail against the work as you crochet your stitches so that you are working over it, covering the tail with your stitches.
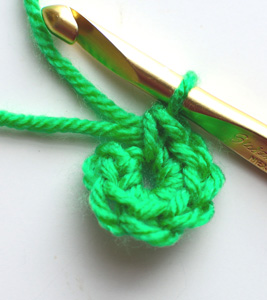
After making the required number of stitches on your first round, pull the yarn tail so that it closes the hole in the center of the work. You can secure this tight closure by weaving the yarn tail into the work. I like to weave the tail around the circle once or twice more using a yarn needle.
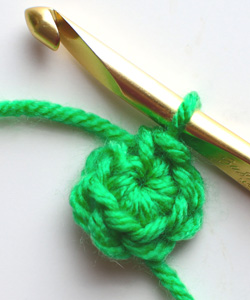
There you have it, an alternative method for crocheting a solid circle in the round without having to use an adjustable ring. Remember, you can use this method for any pattern that is worked in the round, regardless of the stitches you use to start the first round.
If you need more help with this tutorial, leave a comment below and I’ll be sure to help!

Thank you for this, Rachel. I don’t like the so-called “magic” adjustable ring technique and never use it. I just don’t think that little hole left by the traditional technique is that big a deal! I also understand from others’ comments that the adjustable ring does not sustain wear over time. Sometimes the time-honored techniques are time-honored for a reason. Anyway, what I do if I want to cover the hole is when I am weaving in ends, I pull that first tail under the hole, pull it back up and weave it in the stitches on the other side. Works really well.
Thank you for showing how to do this. I didn’t like weaving under the hole, using the traditional way. The magic ring just didn’t always seem to go right, and I had to take it out several times before I was happy with it. I think this may be just what I have been looking for.
I know what you mean! The magic ring can be tricky, hopefully this method will help.
Yes, that is so true!
This is how I’ve always done it. For some reason the adjustable ring didn’t make sense – this does! And here I thought I was so smart…lol
Lol I’m sure a lot of us have been doing this technique for a while! It is so simple to do 🙂
Thank you for showing us this, I hate trying to work the magic ring. It just doesn’t feel right to me for some reason!
The magic ring doesn’t feel right for me too! I hope this method works for you 🙂
I’ve been using the magic loop for a long time, but after reading this article I’m inspired to try this technique for my next project.
Thanks for this, Rachel.
Give it a try, I hope it works for you!
Rachel, I really appreciate posts like this one. I do like to copy some of these to my How To file. Is it possible to get right hand view pics to copy. Thank you
I just found your pattern for the chair cushions cant wait to make some of these…thanks so much for the pattern !!
When using the traditional method instead of the magic loop how do you convert the magic loop pattern? How do I know how many sc to do in my joined circle?
Hi Betty! You would make the same number of single crochets, that never changes. The only thing that changes is you’re replacing the ring with a chain.
This is so much easier than the magic circle, which has never seemed all that “magic” to me. I think you have given me a frustration-free technique to use. Thank you so much!