
Crochet Pattern: Oxford Binder Pouch
By Amy Yarbrough – 6 Comments| For lack of a better option, growing up I would put my pencils and other accessories in the front slip of my binder. Naturally the plastic slip would stretch and eventually become too lose to hold papers. Now that I am older I can very well see the flaws in that method of carrying supplies, but what else can you do with them? There are many kinds of lovely pencil bags and pouches to choose from at the store, even some with the option of latching into your binder. I liked this idea especially and designed my own. Here is the pattern for you to make also! The stitch is called Shallow Single Crochet and is easy to do while lending an academic look to the piece. | 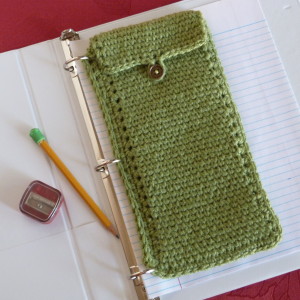 |
| Skill Level: |  |
Finished Size: 5†(13 cm) wide, 10†(25.5 cm) tall
| Materials: Medium Weight Yarn (approximately 100 yards) Crochet Hook H (5.00 mm) |
Gauge:
3 sc = 1’’
3 rows = 1’’
Gauge Swatch: 1’’w x 1’’h (2.5 cm x 2.5 cm) ch 4.
Row 1: sc in second ch from hook and in each ch across: 3 sc
Row 2 – 3: ch 1, turn, sc in each sc across: 3 sc
Finish off.
Need help understanding the abbreviations and symbols? Check out the crochet abbreviation chart.
How to Shallow Single Crochet: work a normal sc except instead of inserting hook under the top two loops, insert hook into the space between the two vertical loops of the stitch.
Crochet Pattern: Oxford Binder Pouch
Front Panel
Row 1: ch 16, sc in second ch from hook and in each ch across: 15 sc
Row 2 – 46: ch 1, turn, shallow sc across: 15 sc
Finish off.
Back Panel
Row 1: ch 16, sc in 2nd ch from hook and in each ch across: 15 sc
Row 2 – 56: ch 1, turn, shallow-sc in each st across: 15 sc
Row 57: turn, sl st in next 7 sc, (sl st, ch 6, sl st) in next sc, sl st in next 7 sc: 16 sl st
Finish off.
Seaming
Hold front panel against wrong side of back panel evenly so that the back panel is higher than the front. Join yarn on left side and sc through both thicknesses down the left side. Ch 2, turn, shallow-hdc in each sc. Ch 1, turn, sl st in each hdc across, sl st in beginning ch-2, sc across bottom and up the right side. Finish off.
Button
Sew button on front panel where it aligns with the loop.
If you run into any problems or have any questions of any kind, let me know. Either way, I’d love to know what you think!

Love this idea. Thank you so much for the pattern!
I’m glad to hear it! You are very welcome, Darlene.
Amy
This is CRAZY AWESOME, Amy!! You rock so much!!!
You think so? Thanks! 🙂 I’m actually pretty satisfied with this one, and that doesn’t happen very often with me, lol.
What a great idea!
Wow love this! I’m going to attempt one of these.