
Crochet Pattern: Strawberry Patch Garland
By Amy Yarbrough – 3 Comments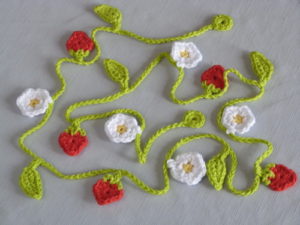
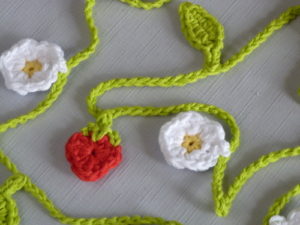
Strawberries on a strand of garland is sure to start a craving. This time I have taken the lovely spring theme of strawberries and added a few similar elements, leaves and blossoms. Each piece is made in one or two rounds with basic crochet techniques and then attached to the garland strand.
I chose cotton yarn for my garland to give it a more natural feeling, and because I like the defined look of cotton, but other fibers will work just as well. The garland is designed to have small rings at both ends to allow for easy hanging.
This garland is light and airy and will make a good compliment to any room for extra spring feeling. Hanging it from an entertainment center or mantle will surely brighten up a living room, as well as garner some attention for your handiwork. Enjoy crocheting this lovely, new pattern! And don’t be surprised if you suddenly begin craving fresh strawberries!
| Skill Level: |  |
Finished Size: 72†(183 cm) long
| Materials: Medium Weight Yarn (approximately 40 yards of color A/green, 15 yards of color B/red, 5 yards of color C/yellow, 20 yards of color D/white) Crochet Hook 7 (4.50 mm) Stitch markers |
Gauge:
Round 1 of blossom pattern measures 1/2†(1.5 cm)
Need help understanding the abbreviations and symbols? Check out the crochet abbreviation chart.
Crochet Pattern: Strawberry Patch Garland
Garland Strand
With color A, ch 4, sl st in 4th ch from hook to form ring, ch 1, 10 sc in ring, sl st in first sc, ch 244, sl st in 4th ch from hook to form ring, ch 1, 10 sc in ring, sl st in first sc: 20 sc
Finish off.
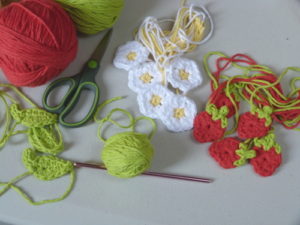
Strawberry (make 5)
Round 1: with color B, make an adjustable ring, ch 1, (sc, 3 dc, sc, dc, tr, dc, sc, 3 dc) in ring, sl st in first sc: 12 sts
Stem
With color A, join in 12th st on Round 1, ch 2, sl st in next st, ch 2, sl st in garland, sl st in next 2 ch and same st in Round 1, ch 2, sl st in next st.
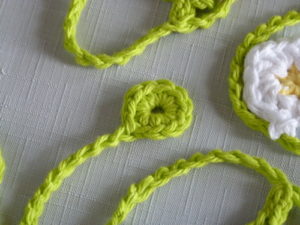
Blossom (make 5)
Round 1: with color C, make an adjustable ring, ch 1, 5 sc in ring, sl st in first sc: 5 sc
Round 2: change to color D, ch 1, (sc, 2 dc) in each sc around, sl st in first sc, sl st in garland, sl st in same sc on blossom: 15 sts
Finish off.
Leaf (make 5)
Round 1: with color A, ch 6, 3 hdc in 3rd ch from hook, sc in next 2 ch, (sl st, ch 1, sl st) in last ch to turn to opposite side of ch, sc in next 2 ch, 2 hdc in last ch, sl st in first hdc, ch 3, sl st in garland, turn, sl st in next 2 ch, sl st in first hdc: 10 sts
Finish off.
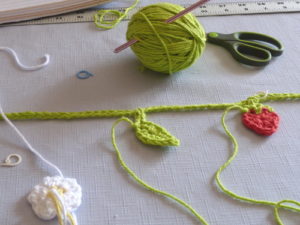
Make garland strand first. Use 15 stitch markers to represent the position of the strawberries, blossoms, and leaves. Attach elements as you go or make each one with a long tail for attaching later.
Have fun, and be sure to let me know if you have any questions with the pattern or need any help crocheting!

Very pretty!
I’m confused by the stem instructions. Specifically where it states “sl st in garland, sl st in next 2 ch and same st in round 1”. Are the 2 slip stitches made in the next two stitches on the garland? And what does “same stitch in round 1 mean”? And is the last sl st on the strawberry?
Thanks much for your assistance.
L:isa
Hello Lisa,
You are going to attach the strawberry to the garland (ch 2, sl st in garland), and then continue working in the stem of the berry, making the last stitch in the same stitch as the the one that you started the stem in (sl st in next 2 ch and same st in Round 1). And lastly, finish off the berry stem by doing the same thing to this end as the first end (ch 2, sl st in next st).
Does this help?
Amy