
How to Crochet on Opposite Side of Chain
By Rachel Choi – 70 CommentsCrocheting in the round is a very useful technique when you want to make bags, hats and other round objects. In this tutorial I will show you how you can crochet around a foundation chain. This method is used a lot in my crochet patterns to prevent having to sew your project together.
This tutorial is for both right and left handed people. For left handed pictures, roll your mouse over the image and it will change for you.
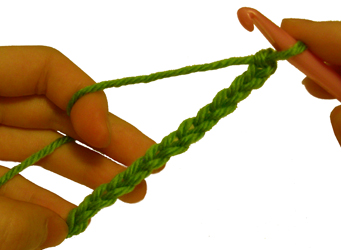
Start by crocheting a foundation chain. If you are working with a pattern, it will tell you how long to make this chain.
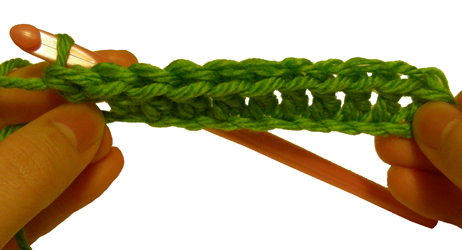
Work your crochet stitches into each chain across. Double crochets are used in this example, but any crochet stitch can be used.
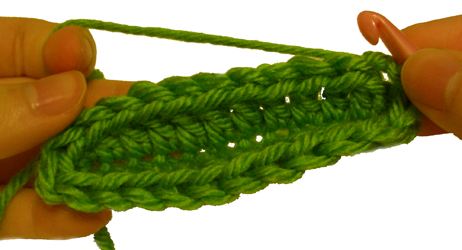
Now, turn your work upside down to work into the remaining loops of the chains stitches.
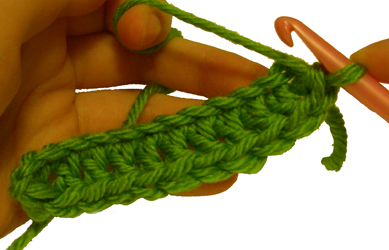
Work your stitches into each chain across the row. This is what a few stitches look like when it is on the other side of the chain.
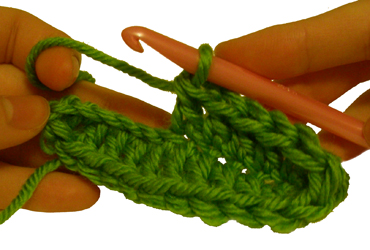
When you are done, your last stitch should be next to the first stitch you made. You are essentially working in a circle or round.
The number of stitches you make on one side of the chain should be the same amount on the opposite side of the chain. Depending on what you are making you may join the end of your round to the beginning with a slip stitch, or you may continue crocheting in a spiral fashion.
Need more help? Let me know!

OMIGOSH! This is so smart and much easier than all the rounds I’ve seen on the internet. Thanks for the tip!
Oh my gosh! Awesome! I always wondered how to do this for bags – thanks so much!
I have seen this as the foundation for a pair of toe-up socks, too! 🙂 Rachel, I just noticed that if you “mouse over” the images in your tutorial, you see a left-handed view – very nice feature! I love getting your weekly newsletters, thank you for all your helpful tips and ideas. Your patterns rock, too!
What a great help to us all. Can’t wait to try this out. Thanks so much.
Your tutorials are the best! Thanks so much, I’ll be linking.
Thank you so much. I have been looking every where for the explaination. Now I can make the bag I have been wanting to do.
This is awesome!!!! I’ve been trying to learn this but seemed to get totally lost in terms of where to put my hood.
[…] chain that is as long as the width of your cards), sc in second ch from hook and in each ch across, working into remain loops on opposite side of chain, sc in each ch across, place marker: 28 sc Round 2 – 12: sc in each sc around: 28 sc Finish […]
[…] width of your desired case. Round 1: ch 2, hdc in third ch from hook and in each ch across, turn to work into remaining loops on opposite side of the chain, hdc in each ch across, sl st in top of beginning ch-2: 30 hdc Round 2: ch 2, hdc in each hdc […]
[…] in each round will also be altered. Round 1: ch 2, hdc in third ch from hook and in each ch across, working on remaining loops on opposite side of chain, hdc in each ch across, sl st in top of beginning ch-2: 16 hdc Round 2 – 10: ch 2, hdc in […]
Thank you so much for the left-handed pictures! I would have been lost without them. Great pattern!
Very helpful. I was just starting a pattern and I got to that part and wasn’t sure what I was supposed to do 🙂
[…] of squares you make. Round 1: ch 16, sc in second ch from hook and in each each ch across, turn to work into remaining loops on opposite side of ch, sc in each ch across, place marker: 30 sc Round 2 – 15: sc in each sc around: 30 sc Finish […]
Rachel,
Are you using the back loops in the chain to do this? Then when you turn are you using the front loops?
Yes Brenda, but depending on your crochet style, you can also do the back loop with the back ridge, or the front loops with the back ridge after you turn.
thank you, I also love your site, it is very, very, helpful!
Brenda
[…] 1: ch 2, hdc in third ch from hook and in each ch across, working into remaining loops on opposite side of chain, hdc in each ch across, sl st in top of beginning ch-2: 16 hdc Round 2: ch 2, turn, hdc in each hdc […]
Thanks! Could not figure this out but you made it so easy.
Were it not for you, much uncertainty about a Sugar and Creme shopping bag would have won out. Thanks
I’m still not getting the ‘working on opposite side of chain’. What’s my problem????? : ) Does this mean you’re then working from left to right? (I’m right handed).
Laurel if you are right handed you are always working from right to left using this technique. Once you reach the end of the row, turn your work up side down (180 degrees) to crochet into the remain loops on the chains. When you turn your work, this makes it so you are crocheting right to left.
I’m not getting this very well it may also be the pattern I am working with but it says to join to beg then ch 2… how do I join to beg? Haven’t I already crocheted over the beg?
Hi Nancy, does the pattern say something like “join with sl st in beg ch-2”? If so it is telling you to make a slip stitch in the ch-2 that you made at the beginning of the round. At the beginning of the round there should be a ch 2, or 2 chains that were skipped. You will make a slip stitch in the top chain (second chain) to join the end of the round to the beginning.
Thank you so much for the explaination on how to crochet on the opposite side. I have a Chic Cell Phone Purse pattern I purchased and the pattern calls for working on the opposite side of chain and I didn’t know how to do this. I learned how to crochet from my aunt (she was right handed and I am left). It’s been years since I picked up a crochet hook. Now that my aunt has passed away I was give some of her yarn and crochet hooks and started crochetng again.
Being left handed can sometimes be a challenge and your pictures of how to and being able to move the mouse around so the picture changes to a left handed view is pure genius.
Thank you so much 🙂
thx and i have a quick question would that lead to like a spiral if a pattern says
Round 1:Ch 11 Working in back loops of ch sts, sc in second ch from hook,sc in each of next 6 ch.
Do not join.Work in a spiral.Mark beginning of round, moving marker up as work progress.
I have been “attempting” to do this for a market bag. However, when I join to continue the next row, slip stitch, chain 1, then sc in the same stitch. The bottom of the bag, this end seems to go outward, like I added a stitch? What am I doing wrong? This is the “market bag” done with Lily’s Sugar & cream
Hi JoAnn, make sure you double check the stitches on the beginning round if aren’t already. If there are the right number of stitches, then you’re probably doing it correctly. Maybe you just have to weave in the end of yarn sticking out to make it look right?
Instructions are chain 43, sc in each chain, for 42. Then sc around the end and come back for 42, join with slip stitch, chain 1, then sc in the slip stitch place, and then repeat. Total of 7 round for the bottom of the tote. The side that “slip stitch” always looks funny. It angles up & out. I tried the suggestion above of turning the chain toward me for better visualization as I sc back. But that didn’t seem to help either.
Omg, thank you so much for this. I will be definitely be coming back to you if more help is needed.
Hi Rachel
Thank you so much for the explaination. I am definitely going to crochet bigger bags.
Really appreciate this site.
Be blessed.
Sandi
Hi,
I’m not a season crocheter….my forte is knitting, but I do know some crochet stitches. I am working on a project and the instructions say ch 27, join in a ring with a sl st, ch 1 and turn.
Rws 1-3: sc 26, join, ch1 and turn.
When I turn after the the 1st sl st, I see nothing but bumps. What sts do I put my hook into to do the 26 sc? This is different then the normal chain foundation. Any assistance would be great appreciated.
Thanks, Sylvia
Hi Sylvia, in your pattern it is just like crocheting into a regular foundation chain, only the chain is in a circle instead of a straight row. On row 1, you’re going to make your single crochets into the chain like you would for a normal foundation chain. Try make sure that your chain isn’t twisted, as that may make it harder to see the stitches.
[…] Round 1: with main color, ch 14, dc in BL of 4th ch from hook and in each ch across, working into remaining loops on opposite side of chain, dc in FL of each ch across, sl st in top of beg ch-3: 22 dc Rounds 2-8: ch 3, dc in each dc […]
omigosh, THANK YOU SO MUCH!!! I got an amigurumi book a while ago that claimed it was for beginners(it so isn’t!) while there are some instructions on how to do things in the beginning when I was reading a pattern it said to work on the opposite side. Majorly confused and only one video popped up on youtube that made it even MORE confusing(and would ramble on about other stuff). So thank you for the pictures and your info that was very direct and to the point! You’re a life-saver!
I have been crocheting for a few years now, but I have stuck to afghans only. I have so many afghans now, that my family will be very very warm for a long time! I wanted to branch out and start trying new projects, but I could never figure out how to make things like purses or eyeglass holders. Your instructions on turning the work over and working into the other side of the stitches is GREAT! A whole new crochet-world has opened up to me now! Thanks so much for sharing in a way that is easy to understand!!!
hello Rachel:
i am crocheting a little bootee and i am finished it but now i am stuck i was wondering if you can help. the part that i am stuck on is leg trim. the part is telling me to Attach peach in opposite side of foundation ch in the same ch as sc, ch3, sc of Rnd 1 of bootee,this a the part that i don’t understand,,,,,, this part i do understand is to ch 1,sc,ch 3, sc in same ch sp, sk 2 chs,(sc ch3, sc in next ch, sk 2 chs) Rep Around
Hi Ann, I don’t think I understand the pattern completely because I don’t know the full pattern. The tutorial above will show you how to work on the opposite side of the foundation chain though. My guess is that your pattern wants you to work those stitches into the opposite side of the foundation chain, so maybe you can try that and see how it goes. You can also try asking the designer of the pattern if you can, since he/she would know the most about the pattern and can help you the best.
ok thanks Rachel i am thinking there is a mistake in there cause i had made the sweater and the pants that goes with the bootees and there was mistakes in there to..
the pattern came out of a crochet world magazine july/ Aug 1991
thanks alot Rachel
Hey Rachel,
Thanks for the tutorial. I hope you can help me figure out a problem I am having with a bag I am making. The pattern calls for me to make a loop out of a chain and then work the first round of stitches into the loop (much like a granny square begins). However, after the single chains are all made, it says to do a single chain in each chain across opposite side. If I am understanding your instructions correctly, this would mean I am supposed to be putting the single chains into the end attached to the loop. I can’t picture that working correctly. Can you tell me what I am not getting here? Or is it possible that they really do want me to do that?
Thank you,
Allison
Hi Allison, normally this technique is used when you start with a long chain and you work across the chain, then work on the opposite side across the other side of the chain. For your pattern, it seems a bit weird that it starts with working into a loop. Are you sure you are starting that way? Are you suppose to work into the loop or each individual chain? If you can tell me the exact wording of the beginning, I may be able to help better.
Maybe I am just reading the pattern wrong. I am not very good at all the abbreviations. I will type out exactly what it says for round 1:
(Right Side): ch 2, insert hook in second ch from hook, YO and pull up a loop, YO and draw through one loop on hook (ch made), YO and draw through both loops on hook (first sc made), *insert hook in ch at base of previous sc, YO and pull up a loop, YO and draw through one loop on hook (ch made), YO and draw through both loops on hook (sc made); repeat from * 14 times more, place marker in last sc made for st placement, sc in each ch across opposite side; do not join, place marker to mark beginning of rnd: 32 sc.
Any light you can shed on this will be much appreciated. Thanks!
Allison
Thanks for sharing round 1 with me! It looks like they are using the foundation single crochet technique, here’s a link to that tutorial if you need it: How to Crochet: Foundation Single Crochet (fsc)
The “ch 2, insert hook in second ch from hook, YO and pull up a loop, YO and draw through one loop on hook (ch made), YO and draw through both loops on hook (first sc made), *insert hook in ch at base of previous sc, YO and pull up a loop, YO and draw through one loop on hook (ch made), YO and draw through both loops on hook (sc made); repeat from * 14 times more” is basically the instructions for how to do the foundation single crochet, just written out. I’d recommend check out the tutorial I linked to so you can see how it’s done.
For the foundation single crochet technique you are making the foundation chain and a row of single crochet stitches right on top of it, all at the same time. So it’s like you make a series of chains with single crochet stitches worked into them. When you get to the part where it says to “sc in each ch across opposite side” you’ll work on the opposite side of the chains stitches like it shows in this tutorial.
Thank you so much! That makes much more sense to me. I had never heard of that stitch, and the pattern didn’t tell me that was what I was doing, so it didn’t make much sense. I appreciate your help!
how to make laces for football?
Hi Renee! Are you using one of our football patterns? If so, this tutorial shows you how to crochet on the opposite side of the chain. So you’ll work the beginning instructions as you normally would going across the row (it will have half of the laces). Then when it tells you to work on the opposite side of the chain, you’ll turn your work like in this tutorial to work the remaining instructions.
Hey I was just wondering if you could use this technique with hat patterns? Or thick double blankets?
Yes, in both cases!
Hey I am stuck on a pattern sequence! I am new at this so bare with me.
Row 4: Ch 4, turn; sc in next ch-3 sp, ch 1, 5 dc in next ch-3 sp, ch 1, sc in next ch-3 sp, *ch 3, skip next ch-1 sp, ***(sc in next ch-1 sp, ch 3) twice, *** skip next ch-1 sp…(side note from me…there is no ch-1 sp left to skip) sc in next ch-3 sp, ch 1, 5 dc in next ch-3 sp, ch 1, sc in next ch-3 sp; repeat from * across to last sc, ch 1, dc in last sc; 90 sts and 49 sps.
*** is the confusing part. Do I do it in the same stitch or not?
Hi Lisa, you’ll single crochet in the next chain-1 space, then chain 3, then single crochet in the next chain-1 space, then chain 3.
I’m trying to make an Afghan and it says do not turn ;pivot to work alongside. In just curious as to how to do that
Hi Thora,
This tutorial will show you how to crochet along the side and around the entire piece too: Crochet Finish Technique: “Crochet Evenly Aroundâ€
The first couple of steps should explain it, but all the info might not be relevant depending on the pattern you are using. The first photo show working on the side, where the edge that is on the right hand side of the pic is the top of the work.
I am making your seat cushion pattern. I marked 30 on the first row but when I completed the 2nd row I don’t end on the 30 mark. Usually it is the 29th stitch and then I move up the marker one stitch. Would this be right? I also am using the back loops only. Is this right?
Hi Regina!
Try counting as you crochet the stitches to see if you are actually making 30 stitches. You should be making the same amount on each round (30 stitches). If you are using the stitch marker and the stitch marker is in the first stitch on the previous round, you will end up stopping right before you get to the stitch with the stitch marker in it.
Thanks for the response. I am trying to get a project started to take to the hospital when I have my cancer Tx. It seems that that the first two rows of the pillow cushion is using the back loops in the first 15 and the front loops for the last 15 count; then back loops for all other rows. I think I have the count now but I have problems with the corners and missing loops.
Thank you so much for your quick reply.
Thank you SO much! You would not believe how many times I started a slipper pattern and tore it apart because I couldn’t make heads or tails of it!! LOL You are a life saver!
Hi Regina,
I am making a chamaeleon that starts like this but then tells me NOT to turn and work sc into the the sts at the of the rows to the center and then across. I have no idea what this means. Could you help?
Hi I am making a kangaruu and I’m stuck in the leg I finish Rrow11 with 22 sts and I have to work around. Rnd1 ch14, sl st last ch to hdc st opposite end of Row 11 to make a rnd 36 sts. I will appreciate your help.
Hi Maria! I’m not familiar with the pattern you are using. But from the information you provided it sounds like you are joining your 14 chains to round 11. So you’ll have 22 sts on round 11 plus 14 chains (22 + 14 = 36 sts total). You may want to double check with the designer of the pattern if you can to make sure you are doing it correctly.
Hi Rachel,
Thanks very much for this tutorial! I’m new to crochet and am trying to make a tote bag. On the 1st rnd I’m at the end of my row and it says “ch. 5 hdc in last ch. Working into opposite side of ch, …” I don’t think I understand that, because I did the (plain) ch 5 in last ch. but there’s a hole at the end of the turn. Does it sound as though I messed up? If so, can you guide me how to correct that?
Hi Julie, is this a pattern on Crochet Spot? If so, let me know which pattern it is and I can take a better look at it so that I can help.
Hi Rachel,
No, it’s from a craft store (those free hang-tag patterns stores sometimes have in the yarn aisles).
This “opposite side of foundation” has me stumped. I understand what you have shown, but, I am through with my blanket, and this ‘opposite side’ deal, is in the edging! “You sc down the left edge, then rotate so the bottom (beginning) chain is facing up and where the ‘opposite side’ comes in. ” You can’t very well turn it upside down with all that blanket attached????????? HELPPPP
Thank you
Hi Mick! It sounds like you are going to crochet on the opposite side of the beginning chain (the bottom of the blanket). So you will crochet along the edge of the bottom of the blanket.
Enormously helpful, thank you so much.
I love and understand your tutorial for crocheting in opposite side of foundation stitch. However my pattern calls for fewer stitches than the first row. So confusing. I’m working with scrubby yarn so its doubly hard to see. Any suggestions? Thank you!
Hi Fran! I would need more details about the patten to help, would need to actually see the pattern instructions.
I am working on a stole and need to join yarn to the bottom of the foundation chain to do the 3 rows that consist of the edging. How would I do that?
You can join the yarn by either tying it where you want to start or start with a slip knot on your hook then make your first stitch.
Thank you so much. I thought this might be the way to work the opposite side of beginning chain but wasn’t sure and I so appreciate the pictures with the answer. Very Helpful.