
How to Crochet: Slip Stitches (sl st)
By Rachel Choi – 17 CommentsSlip stitches are the smallest stitches in crocheting. They are great for joining ends. In this example of how to crochet a slip stitch, we will assume that you already created a foundation and we will be using a slip stitch to join two ends to create a circle.
This tutorial is for both right and left handed people. For left handed pictures, roll your mouse over the image and it will change for you.
Let’s start with a foundation chain like this. (How to Crochet a Chain)
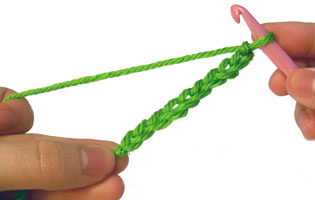
Insert your hook into the first chain on the chain. You should now have 2 loops on your hook.
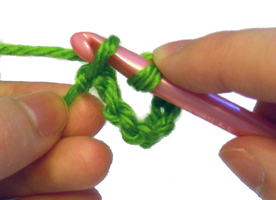
Yarn over (wrap the yarn over your hook).
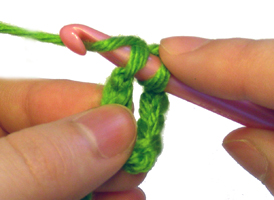
Pull the strand of yarn through the 2 loops that are on your hook. You should now have only one loop on your hook.
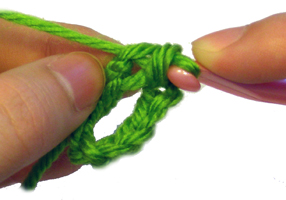
Congrats! You just made a slip stitch! Slip stitches are used for more purposes than just to make circles. You can also slip stitch across rows if desired. The idea is to insert your hook into the stitch that you want to make your slip stitch in, then yarn over and pull your strand of yarn through all the loops on your hook.
Was this helpful? Do you still need more help? Leave a comment to let me know!

My instructions call for a tr in next slip st. Do I accomplish this by YO 2X before pulling thru slip st?
Hi Terri! You will yarn over 2 times before inserting your hook into the slip stitch. No matter where you make a tr, you always make it the same way. Here is the tr tutorial if you need it: How to Crochet: Treble Crochet Stitches (tr)
[…] the seam virtually invisible. This tutorial shows how to join crocheted pieces together using the slip stitch. It also shows how the seam looks like from both sides of the work. Please note that this tutorial […]
Hello,
I was going through your website and I found your tutorials very helpful. but i am kind of stuck right now, I am making a flower that requires a bp sl st ( Back Post sl st )?
Could you help me out with this?
Thank you =)
RB, here’s a post that explain back post stitches: Front Post and Back Post Stitches
When you do your back post slip stitch, you’re going to make a regular slip stitch, but you will insert your hook as if you are working a back post stitch.
When you join a round and then ch3, does the slipped stitch count as one of the chains or is it disregarded in the count?
Thanks for your diagrams and help.
Most of the time it’s disregarded in the stitch count.
PEASE PLEASE tell me how to do this”…Working across opposite side of ch, 1 sc in each ch to ch-5 loop.
Hello! Here’s a link to a tutorial that demonstrates working on the opposite side of the chain: How to Crochet on Opposite Side of Chain
I just sent you a question 4/23 about a Bernat free pattern for a baby’s front zippered hoodie I’m trying to make. Is this the best way to communicate and receive an answer?
Thanks, BTW, for your LEFT HANDED info…..rare and SO needed!!
Hi Cathleen, you can leave a question about a particular Crochet Spot pattern or post on its post here on Crochet Spot. If you need help with patterns that aren’t on our site, you can always send me an email (click on the “about” page for the address), or better yet contact the designer of the pattern since he/she would probably be able to help you the best.
Im completley new to this, HELP!!!
@can’t read a pattern to save my life!
Hello! Here’s a tutorial to get you started: How to Read Crochet Patterns
Hi there,
I am trying to make the antlers for the reindeer. The final line says 19ch, 9 sl st- where do these slip stiches go?- back down the chain line-?it seems to leave me with open chains?? I also find it hard to follow where you say chain 4 , sl st in 4th ch from hook (that bit is OK) but then sl st in next 3 chain- does this mean you have to find the next 3 chains and sl st into each or do you sl st into the original 3 times?
bit of a novice
sorry!
Hi Barb, the “19 ch, 9 sl st” is the stitch count for the row. Anything after a colon is a stitch count. So you don’t have to do it again, it’s just there to let you know what you should have already done for that round so you can double check.
The “sl st in next 3 ch” means to make a slip stitch into each of the next 3 chains.
I’ve looked at the instructions for sl st. The Pacifer pattern says to sl st, and finish off. I am not sure how to do this. Looked around site, but didn’t find this. Thanks! -Jane
Hi Jane! You will work the slip stitch like in this tutorial. Then you will finish off by cutting your yarn and weaving it into your work to hide it. Let me know if you need more help with it.