
Crochet Pattern: Wrist Cuff with Button
By Erin Burger – 7 CommentsCrocheted accessories are usually versatile and this wrist cuff pattern is no different. Wrist cuffs can be worn as sweat bands, as jewelry, or simply as a winter accessory to help keep warm. Keep in mind that different yarns would be preferable for the different uses of the cuff. Cotton, linen or bamboo would be better for a sports type sweat band and acrylic or wool-mix yarn would be better for a winter weather cuff.
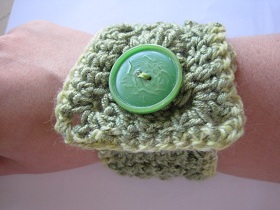
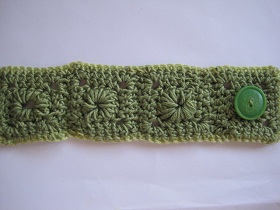
Four motifs of the same color are whip-stitched (see Whip Stitching in Crochet for more info. on this technique) together to form the cuff in this photo, but feel free to experiment with different colors and textures of sportweight yarn (any heavier yarn will make a larger cuff) while making your unique cuff.
| Skill Level: |
Finished Size: 10″ (25.4 cm) long, 2 1/2″ (6.35 cm) wide
| Materials: approx. 16 yds main color, 2 yds accent color Crochet Hook G (4.5 mm) One button measuring approx. 1″ across |
 |
Gauge: each motif measures 2 1/2″ (6.35 cm) X 2 1/2″ (6.35 cm)
Need help understanding the abbreviations and symbols? Check out the crochet abbreviation chart!
Crochet Pattern: Wrist Cuff with Button
Make 4 Motifs:
Round 1: ch 8, sl st in first ch to form a ring, ch 3, 15 dc into ring, join with a sl st in beg. ch-3 to join: 15 dc
Round 2: ch 1, sc in same st as join, sc in next 3 dc, ch 3, (sc in next 4 dc, ch 3) 3 times, join with sl st in beg. sc to join: 16 sc, 4 ch-3 spaces
Round 3: ch 1, (2 sc, ch 3, 2 sc) in same st as join, sc in next 3 sc, [(2 sc, ch 3, 2 sc) in next ch-3 space, sc in next 4 sc] around, join with sl st in 2nd sc to join: 39 sc, 4 ch-3 spaces
Putting it all together:
Whipstitch each motif to the next, attaching them together on one side until you have four motifs in long row.
Sew button onto the ring of the first motif, the button will fasten into the ring of the motif on the opposite side of the cuff when closed. Test your button before sewing it on to insure that it will fit through the motif’s ring.
Optional accent border: Using a small amount of any weight yarn (fingering weight sock yarn is used in photo) attach yarn at top right hand corner (ch-3 space) of joined motifs, 3 sc in ch-3 space, sc in each sc across, 3 sc in top left ch-3, sc in each sc down left hand side of joined motifs, 3 sc in bottom left ch-3, sc in each sc across bottom of joined motifs, 3 sc in bottom right ch-3. Finish off.
Weave in all the ends, make it pretty!
Have any questions about this pattern? Comments or tips on how you made it? Please don’t hesitate to share!!

So AWESOME! I can’t wait to make a pair!
You go, Erin! You´re the free pattern goddess! 🙂
Really pretty, Erin. Thanks!
I was just thinking… if you attached a few more motifs, you could also turn that into a really pretty belt! : )
Hi I started this but on round 2 I dont see how you have 16 sc is something missing? Thanks Love it so pretty!
Hi Steph!
I can’t believe I missed this but in Round 2 it should say (sc in next 4 dc, ch 3) and in that case the end result will yield 16 sc.
Thanks for noticing!
-Erin
Hi Erin, you are fab and ahead of the rest. I was only thinking yesterday I must look online for a crochet band bracelet, as I hope to be getting one of those new Ipod Nanos for Christmas. They have an analogue watch display and as they come with an integral clip, can be attached to a wristband to look like a watch! Can’t wait to try out this pattern! Love your blog. Many thanks. Sue
Very nice. I like!!!