
Free Crochet Pattern: Air Plant Hanger
By Claire Golden – 4 Comments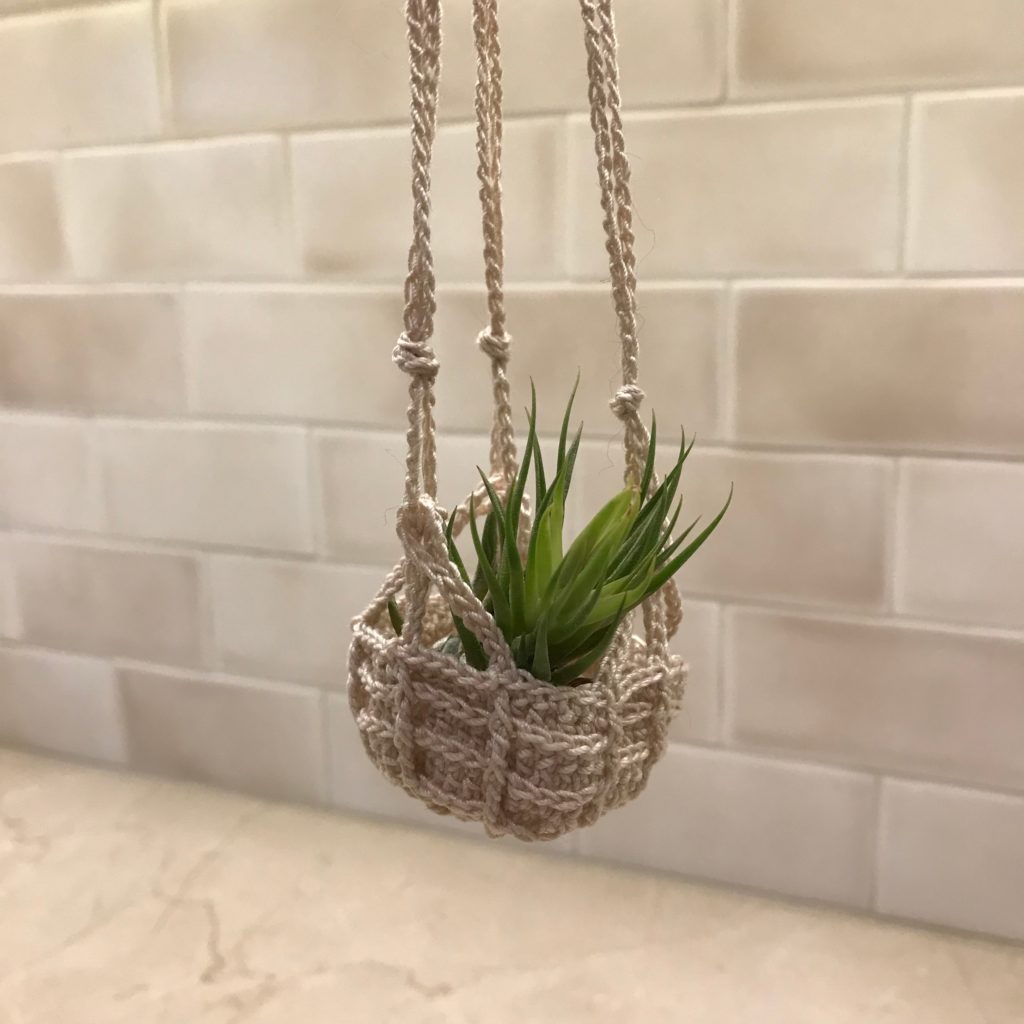
Have you heard of air plants? I discovered them several months ago and fell in love. These adorable little desert plants don’t have roots, so they don’t need dirt. They just sit around looking cute. The most common type is called Tillandsia, and they’re quite affordable and easy to care for. Macrame plant hangers have been regaining their popularity, and I was inspired to crochet one. All you need is a hook to suspend the nest from. I’m going to make one for each of the plants in my ever-expanding collection; the one in the picture is my very first Tillandsia.
| Skill Level: |  |
Finished Size: nest is 2″ (5 cm) in diameter, hanging chain is 12″ (30 cm) but easily adjustable. For reference, air plant pictured is 2″ (5 cm) long.
| Materials: Size 10 Crochet Thread (approximately 30 yards) Crochet Hook 2.1 mm |
Gauge:
First 3 rounds of pattern measure approximately 1″ (2.5 cm) in diameter. Exact gauge is not critical for this project.
Special Stitches:
Front post half-treble crochet (fphtr): Yarn over 2 times, insert hook around post of indicated stitch, yarn over and pull up a loop, yarn over, pull through 2 loops on hook, yarn over, pull through all 3 loops.
Need help understanding the abbreviations and symbols? Check out the crochet abbreviation chart.
Crochet Pattern: Air Plant Hanger
Round 1: make a magic ring, ch 2, 9 hdc into ring, sl st in first hdc: 9 hdc
Round 2: working in the back bars, ch 2, 2 hdc in each hdc around, sl st to first hdc: 18 hdc
Round 3: ch 2, (hdc in next hdc, fphtr around first hdc from Round 1, hdc in next hdc) 9 times, sl st to first hdc: 18 hdc, 9 fptr
Round 4: working in the back bars, ch 2, (hdc in next 2 sts, 2 hdc in next st) 9 times, sl st to first hdc: 36 hdc
Round 5: ch 2, (hdc in next 3 hdc, fphtr around previous fphtr, hdc in next st) 9 times, sl st to first hdc: 36 hdc, 9 fphtr
Round 6: working in back bars, (hdc in next 4 sts, 2 hdc in next st) 9 times, sl st to first hdc: 54 hdc
Round 7: ch 2, (hdc in next 5 sts, fptr around previous fptr, skip next st, hdc in next st) 9 times, sl st to first hdc: 54 hdc, 9 fphtr
Round 8: working in back bars, hdc in each st around, sl st to first hdc: 63 hdc
Round 9: sl st into next st to shift the beginning of the round 1 stitch to the left (right if you’re left-handed), ch 2, (hdc in next 5 hdc, fphtr around previous fphtr, skip next hdc) 9 times, sl st to first hdc: 54 hdc, 9 fphtr
Round 10: Repeat round 8
Round 11: sl st in next st, *sc in the next 5 hdc, ch 14, sl st in eighth ch from hook and in next 6 ch, fpdc around previous fphtr, sl st in sc before the chain, skip next hdc, sc in next 5 sts, ch 10, skip 5 sts, sl st in last 5 sts, fpdc around previous fphtr, sl st in top of sc before the chain, skip next st, sc in the next 5 hdc, ch 14, sl st in eighth ch from hook and in next 6 ch, fpdc around previous fphtr, sl st in sc before the chain, skip next hdc, repeat from * 2 more times, this creates 3 sets of hanging loops, sl st in first sc: 9 loops for hanging, 6 long and 3 short
Finish off.
Hanging Chain (make 3)
Make a chain that’s twice as long as you want the hanging section to be. I wanted a 12″ (30 cm) chain, so I made mine 24″ (60 cm) long. Finish off.
Hanging Loop
Ch 15, sl st in first chain made, (ch 14, sl st in same chain as previous sl st) 2 times. This creates 3 loops joined together at the top. Hold all 3 loops together and work around all 3 at once while making the next round.
Round 1: Sc around all 3 loops until the whole loop is filled. Make sure the stitches are squished tightly together so you can’t see the chains underneath. Do not join.
Round 2: Make a second round of sc into the same large loop, encasing the stitches you made in Round 1. When you reach the beginning, sl st and finish off.
Finishing
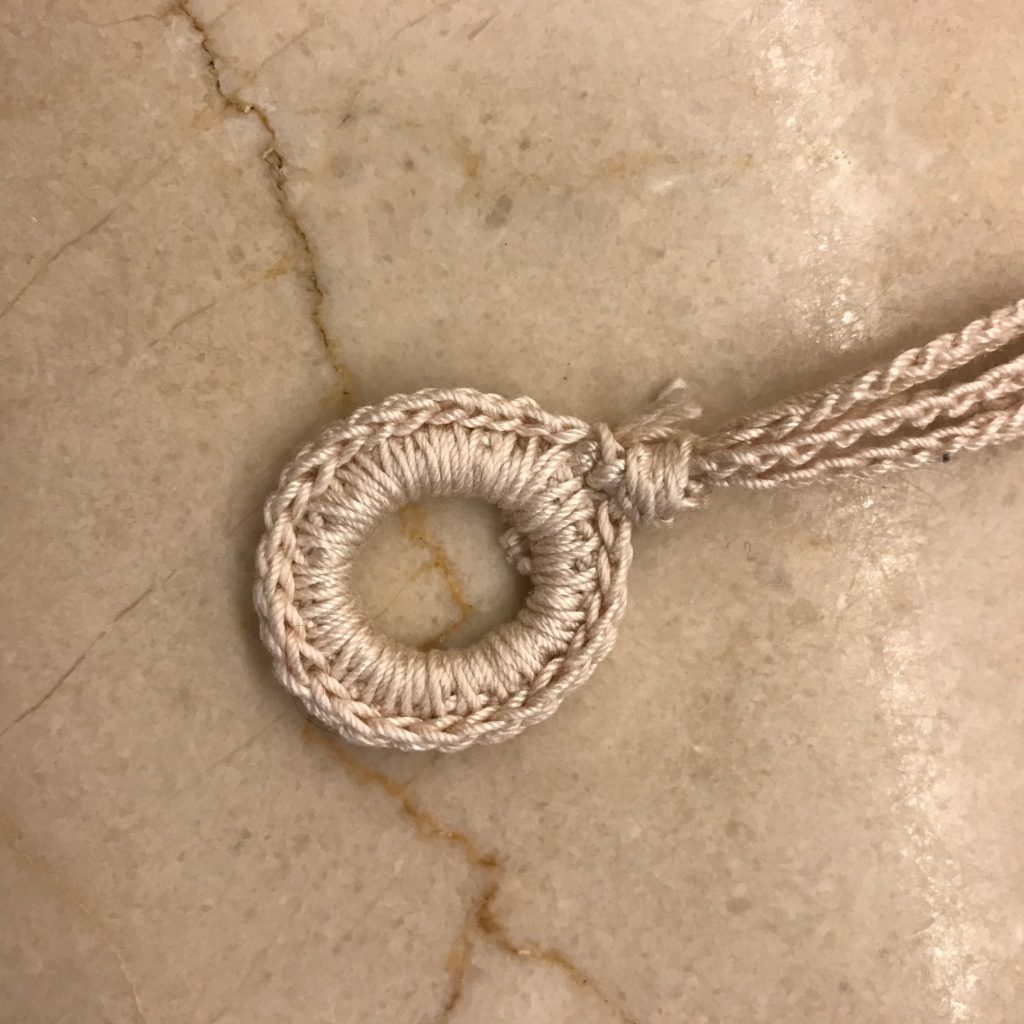
Separate the loops from the nest into three groups. The shorter loop should be in the middle of each group. Thread a hanging chain through each group of three loops. Next, knot the hanging chain about 1″ (2.5 cm) above the nest. When all chains have been attached, sew them to the hanging loop. Weave in ends. The following photo shows a closeup of the hanging loop with chains attached.
Need help while crocheting? Feel free to leave a comment below and I’m happy to help you on your journey to making homes for your air plants!

Thank you for the idea of the air plant and your hanger pattern. You just lifted me up from my 236-page workday tedium! Bless you muchly!!!
Thank you for this pattern!! It is exactly what I was looking for!!
This is so cute! I’ve been trying to make some macrame hangers for my plants. Would this work for regular plants in pots?
That’s an excellent idea, Verdi! The concept works for regular plants in pots, too, but I would make some changes to make it more supportive. I’ll try to come up with something for my next post!