
Free Crochet Pattern: Barbie Cobble Stitch Mermaid Tail
By Claire Golden – 4 Comments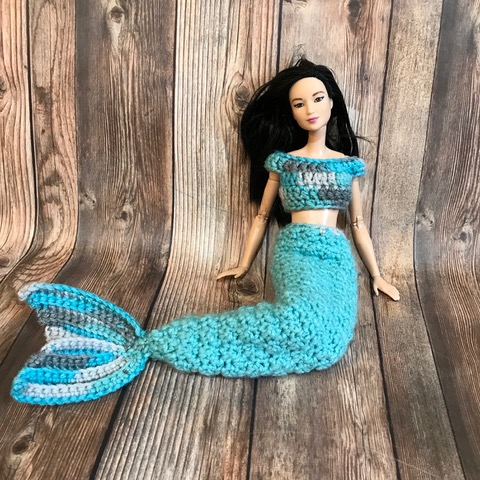
For many kids, the most fun part of playing dolls is dressing them up. This mermaid tail is an especially fun outfit that can be enjoyed by both kids and older doll collectors. It uses the cobble stitch, a pattern of alternating single and double crochet that’s much easier than it looks. The stitch makes the tail durable for many afternoons of play, and you can use any color combination you like for a variety of looks. You could even include a mermaid tail along with a Barbie doll for a unique gift.
| Skill Level: |  |
Finished Size: Fits standard 11.5″ (29 cm) Barbie doll (with the belly button). Please note that there are various Barbie body types on the market today such as “Curvy,” “Tall,” and “Petite.” This pattern is designed for the classic body type because it’s the most widely available.
Tail measures approximately 10.5″ (27 cm) to end of fins.
| Materials: Medium Weight Yarn in 2 colors (approximately 30 yards of main color for tail and 15 yards of contrasting color for shirt and fin color) Crochet Hook F (3.75 mm) Yarn needle |
Gauge:
10 sts (in cobble stitch) = 2″
9 rows = 2″
Gauge Swatch: 2″w x 2″h (5 cm x 5 cm) ch 11.
Row 1: sc in second ch from hook, dc in next ch, (sc in next ch, dc in next ch) across: 10 sts
Row 2 – 9: ch 1, turn, (sc in next st, dc in next st) across: 10 sts
Finish off.
Need help understanding the abbreviations and symbols? Check out the crochet abbreviation chart.
Crochet Pattern: Barbie Cobble Stitch Mermaid Tail
Round 1: with main color, ch 9, sc in second ch from hook, dc in next ch, (sc in next ch, dc in next ch) across, sl st to first sc: 8 sts
Round 2: ch 1, turn, (sc in next st, dc in next st) around, sl st to first sc: 8 sts
Round 3: ch 1, turn, (sc, dc) in each st around, sl st to first sc: 16 sts
Round 4-8: ch 1, turn, (sc in next st, dc in next st) around, sl st to first sc: 16 sts
Round 9: ch 1, turn, (sc in next st, dc in next st, sc in next st, 2 dc in next st) around: 20 sts
Round 10-16: ch 1, turn, (sc in next st, dc in next st) around, sl st to first sc: 20 sts
Round 17: ch 1, turn, *(sc in next st, dc in next st) 2 times, 2 sc in next st, (dc in next st, sc in next st) 2 times, 2 dc in next st, repeat from * 1 more time: 24 sts
Round 18-26: ch 1, turn, (sc in next st, dc in next st) around, sl st to first sc: 24 sts
Round 27: ch 1, turn, *(sc in next st, dc in next st) 10 times, sc in next st, 2 dc in next st, repeat from * 1 more time: 26 sts
Round 28-32: ch 1, turn, (sc in next st, dc in next st) around, sl st to first sc: 26 sts
Round 33: change to contrasting color, ch 1, turn, (skip next dc, 2 sc in next sc) around: 26 sts
Invisible join to first sc. Use starting tail and a yarn needle to sew the small hole at the bottom of tail closed.
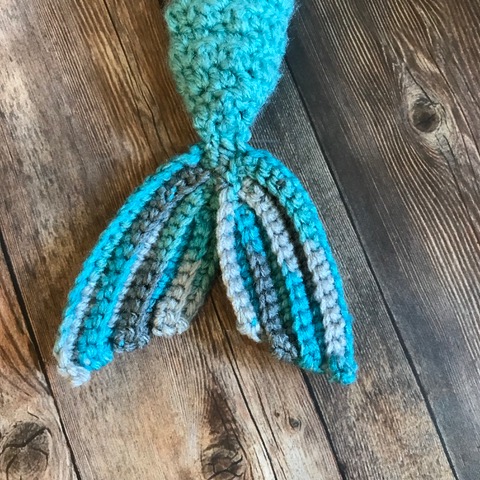
Fins (make 2):
Row 1: with contrasting color, ch 19, sc in second ch from hook and in each ch across: 18 sc
Row 2-7: turn, do not ch, skip first sc, sc in back loops of each sc across, leaving last sc unworked
Note: Stitch count will decrease by 2 each row with 8 sc at end of Row 7.
Row 8: do not turn, instead work across the diagonal row end, sc in each unworked st from previous rows: 4 sc
Sl st to next st. Finish off, leaving a tail for sewing.
To attach, place the fins so that the final Row 7s are touching. (The beginning ch is the outside of the fin.) Sew together two stitches on Row 7. Then attach the fins to the bottom of the tail.
Crop Top:
Round 1: with contrasting color, ch 31, dc in third ch from hook and in each ch across, sl st to first dc: 29 sts
Round 2: ch 2, dc in first 3 dc, 2 dc in next dc, skip next 6 sts (armhole made), (2 dc in next dc, dc in next dc) 4 times, 2 dc in next dc, skip next 6 sts (second armhole made), 2 dc in next dc, dc in last 3 dc, sl st to first dc: 24 dc
Round 3: ch 2, dc in each dc around, sl st to first dc: 24 dc
Round 4: ch 1, (sc in next 2 dc, sc2tog) around, sl st to first sc: 18 sc
Finish off.
Need help while crocheting? Feel free to leave a comment below and I’m happy to help!

I made this to the T and it did not fit my barbie at all. I have 3 barbies of the exact same standard size with regular barbie clothes and the tail went all the way above the chest of my barbies with room to spare and had about an inch space between the hips/waist and the tail. The top was too big as well. I want to crochet this tail for my nieces but it’s hard to do when either the pattern is wrong or the hook and yarn size is wrong. I will try to figure it out but i thought i would let you know
Hi April, I’m sorry you’re having trouble with the sizing! I went to double-check the pattern and the hook and yarn I used are correct. I am a pretty tight crocheter, so if you’re a loose crocheter, you’ll probably need to go down a hook size or two. Did you check gauge? And just to confirm, this tail won’t fit the original Barbie body type with the super-tiny waist, it’s made to fit the belly button Barbie type. I’m guessing that’s the one you’re using, but never hurts to check again 🙂 I hope you have better luck this time!
I made this for my daycare kiddo, it’s a perfect fit! Thank you for a great pattern 🙂
I only made the crop top as a quick first Barbie crochet project and it came out super cute! Will probably make the rest eventually.