
Free Crochet Pattern: Maui Beach Tote
By Amy Yarbrough – Be the first to comment
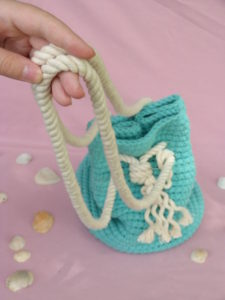
Make this bag for summer vacation and be the most stylish person on the beach!
I enjoy making new and unique bags as much as some people like shoes. (Of course, I happen to be one of those people as well). I probably have as many bags as I have notebooks, and that’s saying something because I love pen and paper. Although the tote itself is very much like your average drawstring bag, there are a few little twists that make this bag superior.
For a few years now I have been contemplating an idea for a sturdy summer bag with chunky rope straps. I wanted to choose a stitch pattern that would be dense and give a good stiffness to the project. When I began designing this tote I went searching for a yarn that would highlight the stitch pattern I had chosen. I found Bernat Maker’s Home Dec, a cotton/nylon mix with little fraying I thought to be the perfect choice for a summer project.
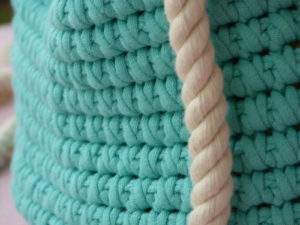
The tote is a cylinder, worked in the round with a stitch pattern where one round is worked in single crochet and the next is repeated and worked over the previous round, creating a dense and unique pattern. Holes for the ropes are made in two different rounds with simple techniques. For those who wish to sew a liner in the tote, there are simple instructions with the assumption that one knows the basics of sewing.
| Skill Level: |  |
Finished Size: 8†(20 cm) in diameter, 13 1/2†(34 cm) wide when laid flat, 12†(30 cm) tall
| Materials: Bulky Weight Yarn (approximately 400 yards) Crochet Hook I (5.50 mm) Stitch markers 1 yard of cotton fabric 4 yards of 3/8†twisted rope Sewing needle and thread or Sewing machine |
Gauge:
6 sc = 2’’
6 rows = 2’’
Gauge Swatch: 2’’w x 2’’h (5 cm x 5 cm) ch 7.
Row 1: sc in second ch from hook and in each ch across: 6 sc
Row 2 – 6: ch 1, turn, sc in each sc across: 6 sc
Finish off.
Need help understanding the abbreviations and symbols? Check out the crochet abbreviation chart.
Note: The entire pattern is worked in a spiral with no chaining at the beginning (unless otherwise specified in the pattern) and no sl st to end. Use stitch marker to mark beginning of round.
Crochet Pattern: Maui Beach Tote
Note: The tote is a cylinder, worked in the round where one round is worked in single crochet and the next is repeated and worked over the previous round, creating a dense fabric.
Round 1: make an adjustable ring, ch 1, 9 sc in ring, place marker: 9 sc
Round 2: 2 sc in next sc and around: 18 sc
Round 3: work in Round 1, repeat Round 2: 18 sc
Round 4: * 2 sc in next sc, sc in next sc, repeat from * around: 27 sc
Round 5: work in Round 3, repeat Round 4: 27 sc
Round 6: * 2 sc in next sc, sc in next 2 sc, repeat from * around: 36 sc
Round 7: work in Round 5, repeat Round 6: 36 sc
Round 8: * 2 sc in next sc, sc in next 3 sc, repeat from * around: 45 sc
Round 9: work in Round 7, repeat Round 8: 45 sc
Round 10: * 2 sc in next sc, sc in next 4 sc, repeat from * around: 54 sc
Round 11: work in Round 9, repeat Round 10: 54 sc
Round 12: * 2 sc in next sc, sc in next 5 sc, repeat from * around: 63 sc
Round 13: work in Round 11, repeat Round 12: 63 sc
Round 14: * 2 sc in next sc, sc in next 6 sc, repeat from * around: 72 sc
Round 15: work in Round 13, repeat Round 14: 72 sc
Round 16: in blo, sc in each sc around: 72 sc
Round 17: sc in each sc around: 72 sc
Round 18: work in Round 16, repeat Round 17: 72 sc
Round 19 – 54: repeat Rounds 17 and 18
Rope Holes
Round 55: sc in next 3 sc, * ch 2, skip next 2 sc, sc in next 6 sc, ch 2, skip next 2 sc, sc in next 8 sc, repeat from * around, ch 2, skip next 2 sc, sc in next 6 sc, ch 2, skip next 2 sc, sc in next 5 sc: 56 sc
Round 56: work in Round 54, repeat Round 17, working sc in each ch of rope holes: 72 sc
Round 57 – 58: repeat Rounds 17 and 18
Round 59: sc in next 4 sc, * ch 2, skip next 2 sc, sc in next 6 sc, ch 2, skip next 2 sc, sc in next 8 sc, repeat from * around, ch 2, skip next 2 sc, sc in next 6 sc, ch 2, skip next 2 sc, sc in next 4 sc: 56 sc
Round 60: work in Round 59, repeat Round 17, working sc in each ch of rope holes: 72 sc
Round 61 – 68: repeat Rounds 17 and 18: 72 sc
Round 69: sl st in each sc around: 72 sl st
Round 70: sl st in back loops of sl st and Round 68 around: 72 sl st
Finish off.
Sewing the Liner
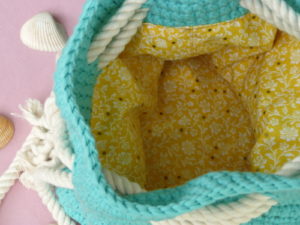
Making a liner for your bag is not required, but if you want to, cut a strip of fabric measuring 29 inches long and 9 ½ inches wide, then cut a circle that is 9 inches in diameter. I wanted a liner that had no wrong side, so I cut an extra strip and circle and sewed both strips together and both circles together first. Sew the strip to the circle and then sew to the inside of the bag no higher than Round 53. I used a machine for all of my sewing, including sewing the liner to the bag. If you have never done this with a machine before, I suggest testing it first with a sample swatch of crocheted material and fabric.
Ropes
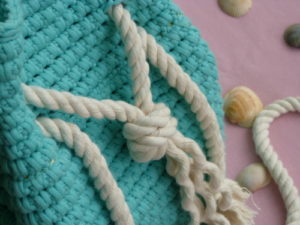
Note: Use duct tape or masking tape to cover the area of rope you wish to cut. Cut through the center of the taped rope so that both ends will remain secured until you are ready to knot them.
Cut 2 strands of rope 68†long. With one strand, insert rope through a lower rope hole and in and out of each lower rope hole until you have returned to the rope hole parallel to the one where you started. Use a stopper knot, like the overhand knot, to secure both strands together. Turn the bag to the opposite side and repeat with second strand in upper rope holes. Knot them. Make sure both knots are tight and then cut off taped area of rope and unravel up to knot.
I hope you enjoy making this tote as much as I enjoyed designing it! If you have any problems while crocheting, just let me know in the comments below and I’ll do my best to help you out!
