
Crochet Pattern: Simple Cell Phone Case
By Erin Burger – 19 CommentsA crocheted case is a very simple solution to screen scratches and purse dialing on smart phones and newer non-flip cell phones. This pattern is for a case that can be easily changed to fit your cell by simply changing the beginning number of chains in the first row to measure the same as the width of your cell and the number of total rows to measure the same as the length. Keep in mind that each person crochets differently, so measuring your phone and the case as you’re working will ensure for a better fitting case.
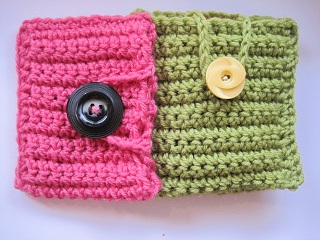
This pattern also includes instructions for an open at the top case for phones with headphones and charging jacks at the top of the phone, and instructions for an open at the side case, for phones with jacks on the side. Embellish your case with a bunch of darling poseys as a perfect girly gift for a teenager’s first cell phone or make a black and orange case with some Halloween appliques!
| Skill Level: Beginner |
Finished Size:Smaller case: 3 1/2″ (8.9 cm) wide, 5″ (12.7 cm) long
Larger Case: 4 1/2″ (11.43 cm) wide, 5 1/2″(13.97 cm) long
| Materials: worsted weight yarn approx. 7 yards, .5 oz. Crochet Hook H (5.00 mm) one 1-1.5″ button |
Gauge: 11 sc and 18 rows= 3 1/2″
Need help understanding the abbreviations and symbols? Check out the crochet abbreviation chart!
Crochet Pattern: Simple Cell Phone Case
For smaller cell phone measuring 4″ X 2″ or smaller (Lg Envy, Samsung Highlight etc…)
Row 1: ch 12, sc in 2nd ch from hook and in each ch across: 11 sc
Rows 2-28: ch 1, turn, sc in each sc across, don’t finish off.
See below for finishing instructions!
For larger cell phone measuring 4.5″ X 2.3″ or larger (IPhone, Droid 2 or X etc…)
Row 1: ch 14, sc in 2nd ch from hook and in each ch across: 13 sc
Rows 2-32: ch 1, turn, sc in each sc across, don’t finish off
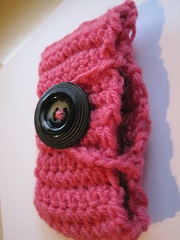
For finishing with side opening (pink case in photo): Folding the case in half with two ends held together, continue working down left side of case, sc in each row down to bottom left (the folded end), finish off. Attach yarn at top right hand side of case and holding the two top ends together sc in each st across. Finish off. Attach yarn with a sc at the 3rd row of just one side of the opening, ch 16, sc in 9th row of that same side, finish off. Sew button approx. 1 1/2″ down from middle of open side of phone case, opposite of the ch 16 closure. Make sure the ch 16 and the button are evenly lined up on their respective sides.
For finishing with top opening (green case in photo): Folding the case in half with two ends held together, continue working down left side of case, sc in each row down to bottom left (the folded end), finish off. Attach yarn on the bottom right side holding both sides together, sc in each row up to the top right hand side (the open end), finish off. Attach yarn with a sc 5 sts from the right top of just one side of the opening, ch 16, sc in 9th st of that same side, finish off. Sew button approx. 1 1/2″ down from middle of open side of phone case, opposite of the ch 16 closure. Make sure the ch 16 and the button are evenly lined up on their respective sides.
Have any questions or comments? Please ask and comment away! Also, if you attempt this pattern share a photo with us on the Crochet Spot Facebook Page!

I like it, thanks for sharing the pattern!
I made the perfect case for my phone using your eyeglass case pattern. I just didn’t make it as big. It was great not having to sew it together! 😀
I’ve been making & selling these for years and have a suggestion. Instead of crocheting the loop closure, use a strip of ribbon. It doesn’t stretch out and the crochet loop will.
gREAT TIP
I’ve found the comments helpful, particularly the one for using a strip of ribbon in lieu of crocheting the loops closure. Thanks!
Peggy
I love this! Hoping to make for my family and myself soon!
Honestly, I’m actually embarrassed to admit that I am confused on something so easy, but I am EXTREMELY knew to crocheting, actually this is my first project (and I have to say this site has helped SO MUCH–the learn how to crochet book I bought has NOTHING on this site. It’s AMAZING. Period.) Anyway, I’m having trouble finishing this off.. when you say, “sc in each row down to bottom left (the folded end), finish off.” Am I supposed to do one sc in each row/side of the case, back and forth, until I get to the end, and then finish off. Because obviously I can’t just do a sc in one of the rows because it won’t connect it.
I know I must sound silly to all of you crochet guru’s but I am lost! I really want to do my product right, and so far it is REALLY pretty good for a newbie! Thanks again for you site, and in advance for your help. (If you can even understand my question to help me) =0)
-Kimberly
I spelled “new” wrong… =0)
Hi Kimmy,
You’re right, you sc with each side held together to connect the two sides. So you’re inserting your hook into both sides and sc-ing through both.
Thanks for your question, hope this explains it for you!
Erin
I absolutely love this. As soon as I saw it I made one right away for myself. It’s so easy!!!
I just got a phone today, and this is so cute! MUST TRY!!!
I believe you forgot the “ch 1, turn” at the end of each row.
I agree with IKA masume..but I think its doing fine without the chain 1
I’m just learning to crochet and am a bit confused. Do we turn at end of each row? If not, how do I crochet the next rows?
Thanks!!
Hi Lanny, yes you are suppose to turn after each row. Thanks for catching that, the pattern was missing the “turn” in it. I’ll fix it now 🙂
Thanks Rachel! I made this the first time with acrylic wool and then with cotton which turned out much nicer! Great pattern for us newbies!
Is there a picture of a phone actually in the case? I am trying to figure out how the button works with the phone inside. Does it go over the phone, around it? I am making the one with the closure at the top.
Thanks.
Hi Stacey, I don’t have a photo with the phone in it, but maybe I can try to explain it. If you look at the pics that are there, the loop that goes around the button to close the case is on the opposite side from the button. So you would stick your phone into the opening on the case. Then take the loop and cross it over the opening and loop it onto the button to secure the opening closed.
Thank you it was very .
nice looking also