
Crocheted Edges with a Sharp Crochet Hook & Surprise!
By Corinne Munger – 16 Comments| If you follow our posts, you’ll remember a recent blog about a new item I came across called the “Sharp Crochet Hook”. I received my hook about a week after I ordered it and I couldn’t wait to try it out. Though I have close to a million ideas for usage in my head for this, I’m going to share two with you here. | 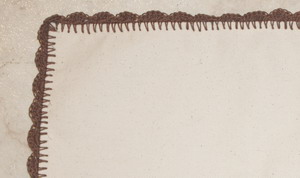 |
First, I wanted to make some observations so that you, the reader, can decide if it’s something you want to eventually try or not.
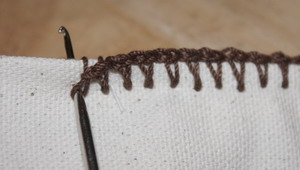
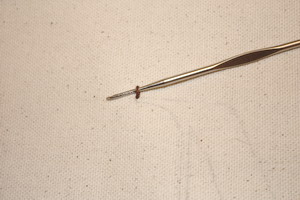
1) The “Sharp Crochet Hook” is a steel crochet hook, just like those used for thread crochet with one major difference….. it has a pointed, sharp head so that you can PIERCE through fabric allowing you to put a crocheted edge on just about anything.
2) In my example below, I used canvas fabric to demonstrate the technique. At certain points of this project, I had to go through FOUR layers of canvas and this hook did it (not so much with ease, but it did it).
3) Since you can pierce fabric, it doesn’t have to be just on the edge (you’ll see what this implies….)
In a previous post, How to Crochet Edging onto Clothing, Rachel demonstrates basically the same technique as here except she uses a standard steel crochet hook without this pointy head. Using a regular hook does the job, but it may cause your fabric to rip as you force the rounded head through, so be careful. This new hook will eliminate that and, again, will allow you to go through several layers of fabric. Using her technique and the Sharp Crochet Hook, crochet around the piece you want to add an edge to.
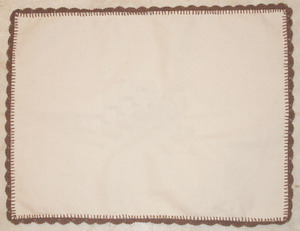
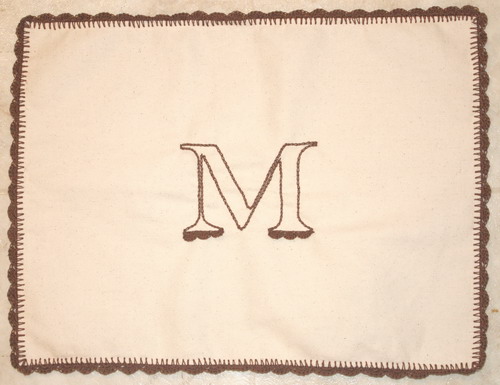
In this example, I’m making a place mat. I cut my piece of canvas to be 13″ x 17″. I then folded over about 1/2″ of fabric all the way around and ironed it flat (to hold it in place). The corners, now had 4 layers of fabric. I then crocheted all the way around with my new hook.
With a crocheted base, I can now add any border I want. I chose a simple Shell stitch. It was looking pretty, but blah when I had an AH HA! moment.
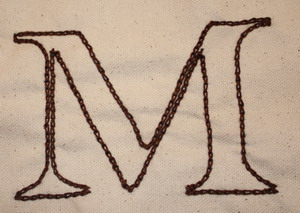
I love monogrammed items but absolutely HATE to embroider. I don’t have a fancy sewing machine that will do it, and I’d rather stick a needle in my eye than sew by hand! Enter the Sharp Crochet Hook….
First I made a LARGE “M” on MS Word and printed it out. (it’s several inches tall). I then used a trick I learned in art school to transfer the printout to my fabric: Rub a pencil on the BACK of the printout where your print is (rub a LOT of graphite on it!) Rub over all the lines really well. Turn the paper over and place it on your fabric where you want the transfer to be (be careful not to move the paper around on your fabric too much as the pencil marks may come off). Then using your now pointy pencil, trace the printout on to your fabric. Make sure to use a good pressure or it will be hard to see. When you remove the paper, you should have nice transfer marks.
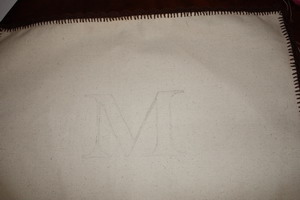
Following your transfer, you are now going to crochet a Chain THROUGH your fabric – it will look like embroidery but is very simple. And this is where this hook is incredible!!!
Feel free to see the How to Crochet: Surface Crochet or Surface Slip Stitch tutorial for details on this technique.
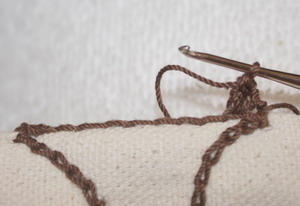
Tie a knot in the end of your thread so that it won’t pull through the fabric.
Insert hook at your determined starting point, yarn over your hook (this is behind your fabric) and pull a loop through to the front of the fabric.
Keeping the loop on the hook, insert your hook along the line of the transfer (about 1/16″-1/8″) away from the first insertion.
Again, yarn over in the back of the fabric and pull the yarn through the fabric AND the loop on your hook. Repeat this step all the way around your transfer (insert, yarn over, pull up loop through fabric and loop on hook). You will see the chain forming on top of your fabric immediately.

As you crochet, be sure to crochet loosely or you will see a “bunching up” in your fabric. If you start to see this, remove the stitches that are too tight and re-crochet them.
You now have your monogram. For reference, the one in the picture took me just about an hour to complete (once you get the hang of this, it starts going much faster).
Here is a picture of what the back should look like when done properly:
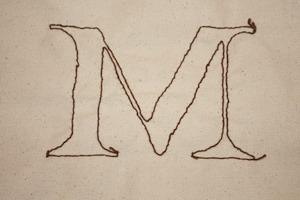
When your monogram is complete, you now have a base to get fancy – or leave it alone (which I can NEVER do! ha ha ha!). I added a little “touch” to mine at the bottom of the “M”. Using the same shell stitch pattern as the edge, I attached my thread to the chain at the bottom of the letter and crocheted 3 shells across each bottom. I only crocheted in the back loop as I wanted this to hang flat.

It added just enough flair to call this project complete.
Imagine all you can do with this……
Initials on the ends of scarves
Little hearts on fabric cards for Valentine’s Day
4 leaf clover on St. Patrick’s Day……
Florals, vines, team names……….. the list is endless.
Was this inspiring? What plans do you have to incorporate either edging or surface crocheting into your craft? Let me know if you have any questions or comments – as always…. I LOVE HEARING FROM YOU!

what a great idea .. thanks so much. I have a Sharp hook but haven’t tried it yet. I’m thinking you could probably use one of those water soluble marking pens (think thats what they’re called – they vanish when you wet the item). xoxox
I’ve ordered mine and can’t wait to get mine. I plan to make my grandaughter Hannah the Watermelon change purse for my first project with this new hook. The pattern is adorable and can be found on the Sharp Crochet hook website as well as other awesome patterns.
I will be looking to buy a Sharp hook. I crochet many kitchen towel toppers and this will be a great help. Thanks for a great website.
I actually ordered one last week 🙂 Still waiting on it to arrive but there was a note on their website that they were back ordered and all new orders wouldn’t go out before the 22nd.
That’s ok – I have plans!
I actually have 2 of these now and used one last night to fix a hat. Love it!
What a wonderful idea!
This has been SO helpful to me. Thank You.
Cool! I have never heard of the sharp hook before and now I definitely want one!!!!
I have a couple questions – are sharp hooks available in various sizes and where do you order them from? Thanks for telling us about these hooks I also appreciate your demonstration of outlining your M
That was pretty cool! Thanks for sharing….I will definitely be getting one in the future.
Good stuff!! the surface crochet would allow lots of different 3D crochet, too. Got to buy another new hook for me now 🙂
Love this idea. I got my sharp hook 2 weeks ago and haven’t started using it. Saw another picture of a knitted pillow cover with crochet flowers attached and embroidered stem/leaves. I think I will try that with the sharp hook.
I’ve ordered mine and can’t wait to get mine. I plan to make my grandaughter Hannah the Watermelon change purse for my first project with this new hook. The pattern is adorable and can be found on the Sharp Crochet hook website as well as other awesome patterns.
Very good work! Put this in an embroidery hoop when doing your monogram handan call it Tambour work! The hoop will keep it stable. Thanks for the tip about transfering.
I so love this idea, can’t wait to get one . . . or three. I currently use a very tiny silver crochet hook to do mine and it takes some ‘pushing’ to get it into the fabric! Thanks so much for inventing this!
Makes perfect sense! I ordered one and can’t wait. Will help make my embroidery go easier with different threads.