
How to Slip Stitch Crocheted Pieces Together
By Claire Ortega-Reyes – 18 CommentsIf you’re anything like me, you’ll find the most difficult part in crocheted projects is the assembly. If I had my own way, I would crochet all the pieces in one piece–but of course this wouldn’t work for every single crochet project I would like to make. This tutorial will show you an easy way to join crochet motifs or parts together: slip stitch away all the seams!
This particular method is ideal for projects with double thicknesses like trivets, hot pads, and hat brims. Aesthetically, this method is very flexible–one side looks like a chain-embroidered border, while the other side renders the seam virtually invisible.
This tutorial shows how to join crocheted pieces together using the slip stitch. It also shows how the seam looks like from both sides of the work. Please note that this tutorial uses two colors to clearly differentiate the piece from the seam; but usually, seams are made with the same color used in the project unless it is meant to be seen as a decorative touch. Mousing over the images shows the photos for the left-handed tutorial.

First, we’ll need the two pieces to be joined. For this tutorial, we’re using two similar-sized granny squares. But you can use any other motifs, crocheted pieces, or even knitted items or cloth (just make sure to make evenly-spaced holes big enough for the hook you will be using).

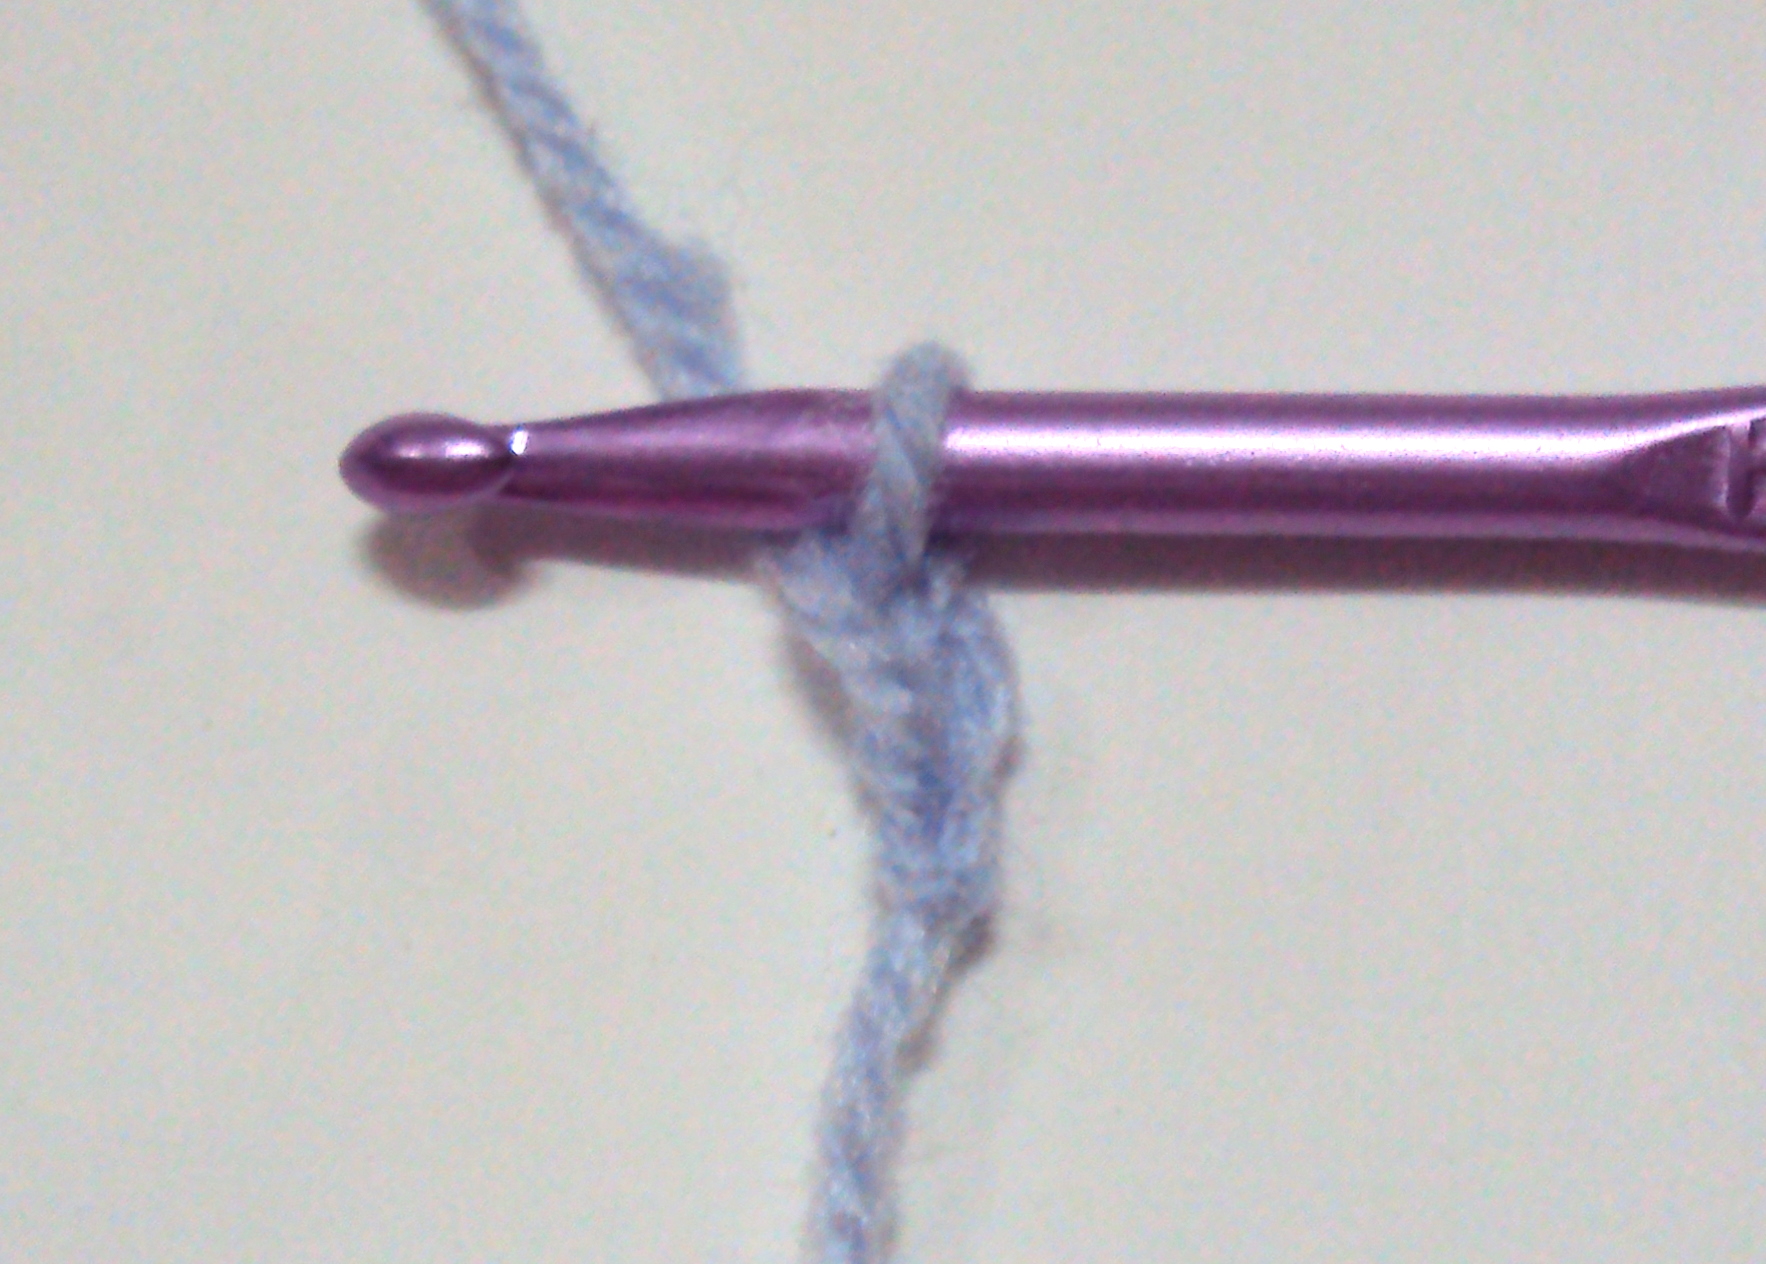
Place the two pieces on top of each other, back to back or with the wrong sides against each other. Align the piece stitch to stitch, to see where the stitches should go.
With the yarn you’ve chosen to seam your project with, make a slip knot. I personally like to make a chain or two, just to be sure the slip knot doesn’t unravel. Make sure that you leave a lengthy tail to sew in the ends when you’re done.

Make that slip stitch! Insert your hook under both loops of the piece nearest you, and under the two loops of the other piece. Yarn over and pull yarn through all the loops.

Slip stitch made! Continue to slip stitch your way through the rest of the seam.

One row of a slip-stitched seam looks like this. Make sure that you don’t skip any stitches on either side–doing so will make unsightly holes appear in the seam, and also make it appear lopsided.
 |
 |
The two images above show how the slip stitch seam looks when the granny squares are laid flat. One side creates a three-dimensional ridge, while the other makes the seam invisible. Well, in this tutorial the blue yarn can be slightly seen, but if the seaming yarn used is the same as the rest of the crochet project, it wouldn’t be visible unless inspected closely.
I hope that was helpful! Leave a comment below if you need any additional help.

I can do that! It’s fun to make granny squares. And I love it. I made me
a vest It taken a lots of worked on granny squares.
I slip stitch grannies together by holding right sides facing and using only the two inside loops, not both.
I have used this method, and also used double crochet (Australian term) to join squares with a fluffy texture and contrast colour to make a beautiful babies cot blanket. It is so much easier than threading a needle and sewing together items. I am yet to try it out on a knitted garment though. Thanks for the good tips on this page!
Diane, that’s a neat idea! I’ll have to try that – I’ve got a granny mini-throw to piece, but I’ve never liked the bulkiness of stitching through both layers whole.
great tutorial. I have a gazillion grannie squares made, love making them, but didn’t know how to join them. I’m going to give this a try.
thanks, appriciate it.
I have always joined motifs together like Diane has. But I can’t wait to try this way Thanks
Thank you so much for showing!! I had done single crochet and it didn’t turn out as nice… Then again, it was my very first piece ever… I enjoy afghans and such that are all one piece as well… Tell me – do you have a way to do this with Tunisian Stitches?
Hi nice and useful idea.
Can u suggest any trimmings for square corners ..
Like step.
Thanking u.
Will have to try that one, but found out that doing a slip stitch or a single crochet around the out side of each mofit makes it look nice. Have tried both ways and like the finished look of a mofit that has been gone around look much neater. Plus by doing this you don’t take away the ourter edge of the mofit.
Thanks for sharing the slip stitch idea.
Thanks, now my crochet basics are complete. I am one who follows directions. I have never seen directions of how to do this with pictures. Thank you. When doing what someone told me,” just crochet them together!” I felt that it was too bulky, and, is there supposed to be a chain on the back? I didn’t feel any better when whip stitching them together. Now, I totally get it! Thanks so much.
Thank you, thank you, thank you. I have a zillion crocheted squares that I have totally avoided joining because it never looks neat whether I do it through both loops or just one. I love the crocheted afghans that look like quilts and this solves my biggest problem. Thanks again.
I just read your tutorial about changing colors and I understand all but how to keep the different yarns from raveling out of the project–somewhere in there, the yarn has to end, and what happens to it when it does?
when i piece granny pieces together and tie them they always come apart,how do i stop that from happening….i want to make a baby blanket
Hi Adrian!
Make sure the ends of your yarn are secure in your work. You can weave them into your work when you are done, like zigzag them back and forth inside the work. You can also make small knots on the end of the yarn to make it even more secure, which you can hide when you weave the yarn into your work. Here’s a post that talks more about it: Finish Off and Weave in End in Crochet
Inthe photos of front and back of completed piece, which is right side and wrong side? I want the seam to show on the right side.
Either one can be the right side or the wrong side. It is really up to you how you want the front/back to look. If you like the definition of the ridge you can make that the right side. Or if you would rather have it seem invisible you can make that one the right side.
Hi Rachel
I was stuck with the slip stitch thing but your instructions got me right through it. Your instructions were so easy to understand and the illustrations were great and made it so clear. Thank you so much!
Yay!! I’m so glad that the instructions helped you 🙂 Keep up the crocheting!