Archive for 2009

Crochet Pattern: Ice Cream Cone Fridgie

Posted in Free Crochet Patterns on July 22nd, 2009 by Rachel Choi – 11 Comments
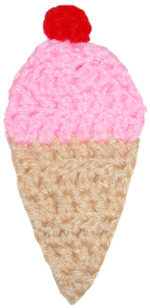
Yummy yummy ice cream! Alright, don’t eat this ice cream cone, it won’t taste very well. But you can use it as a cool applique or fridgie (refrigerator magnet). The ice cream cone works up really fast using only a little bit of yarn, so scraps are perfect. Plus, no sewing is required. Have fun with this summer inspired crochet pattern!!

Skill Level: crochet skill level easy

Finished Size: 5 1/4″ (13.5 cm) tall, 2 1/2″ (6.5 cm) wide

Materials:
Medium Weight Yarn (small amount of each color)
Crochet Hook H (5.00 mm)
crochet yarn size 4
crochet ice cream cone

read more »

Crochet Pattern: Goldfish Applique

Posted in Free Crochet Patterns on July 21st, 2009 by Rachel Choi – 23 Comments
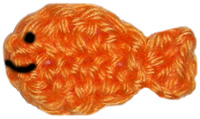
Need goldfish? Here is a tiny little fishy to sew onto any item that you can think of. Use it to decorate clothing or bags. Or use it as a cute fridgie (refrigerator magnet) or pin. You can even embroider a face if you desire. Have fun crocheting a school of little goldfish! crochet goldfish
Skill Level: crochet skill level easy

Finished Size: 2″ (5 cm) long, 1″ (2.5 cm) tall
Note: to adjust the size of the goldfish, use a larger or small hook and different weight of yarn

Materials:
Medium Weight Yarn (small amount)
Crochet Hook H (5.00 mm)
crochet yarn size 4

Crochet Pattern: Goldfish
Round 1: ch 7, sc in second ch from hook, hdc in next ch, dc in next 2 ch, hdc in next ch, sc in last ch, working into opposite side of chain into remaining loops, sc in next ch, hdc in next ch, dc in next 2 ch, hdc in next ch, sc in last ch, sl st in first sc made joining to beginning of round
Round 2: ch 3, turn, 2 dc in next st, finish off.

Using photo as a guide, embroider face to goldfish.

If you need help crocheting this goldfish applique, let me know and I’ll be glad to help!
Crochet Flower Pattern: Daisy

Posted in Best Crochet Patterns on July 18th, 2009 by Rachel Choi – 7 Comments
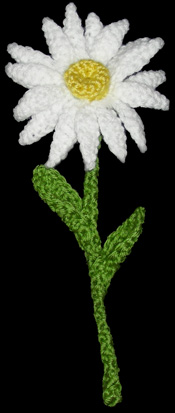
Crochet a bunch of daisies to create a bouquet! I guarantee that you won’t need to water them and they won’t die! Theses are great to give as gifts or to decorate a room. The daisy pattern is now available in the Crochet Spot Store (free for premium pattern members).

Skill Level: crochet skill level easy

Finished Size: 5” (13 cm) wide, 11” (28 cm) tall

Materials:
Medium Weight Yarn
Crochet Hook
Stitch marker
Yarn needle
And optional materials as specified in pattern

Instantly download this pattern by logging into your Crochet Spot store account. As always, profits are used to support Crochet Spot in purchasing yarn, equipment and other materials needed to create the tutorials and patterns that you enjoy. All of your support is greatly appreciated!!!

crochet daisy

Crochet Pattern: Tunisian Knit Stitch Scarf

Posted in Free Crochet Patterns on July 17th, 2009 by Rachel Choi – 14 Comments
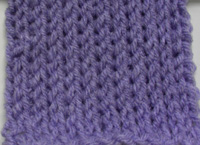
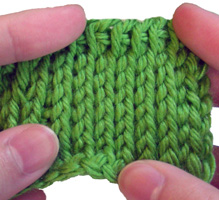
What better way to practice a new stitch than to make a scarf with it? The Tunisian knit stitch tutorial will show you the steps to make your crochet look like knitting! Once you get the hang of it, come back here and start on a new scarf.

Skill Level: beginner crochet skill level
crochet tunisian knit stitch scarf

Finished Size: as long and wide as you desire

Materials:
Medium Weight Yarn (approximately 250 yards)
Crochet Hook N (10.00 mm)
crochet yarn size 4

Gauge: is not that important. The scarf created in the photo uses a large hook so that it is easier for beginners to see the stitches. It also minimizes curl.

Special Stitches Used: Tunisian Knit Stitch (tks)

Crochet Pattern: Scarf
Start by chaining 12 or as wide as you want your scarf
Row 1: tks in second ch from hook and in each ch across
Row 2: tks in second st from hook and in each st across

Repeat row 2 until scarf is as long as you desire.

If need help with crocheting your Tunisian knit stitch scarf, let me know!

What’s So Great About Ravelry?

Posted in Fun Ramblings on July 17th, 2009 by Rachel Choi – 28 Comments

I joined Ravelry a few months ago just to see what all the hoot and holla is all about. I was told it was an awesome site for knitters and crocheters. But till this day, I still don’t know what’s so great about it. It feels like I’m missing something.

I noticed that there’s neat features to electronically organize your stash, hooks and the projects you’re working on. My only problems is that I don’t have the patience to enter in all the info and keep up with it. But if you do it, then kudos to you!

My username there is “crochetspot” so feel free to add me as a friend. Also, let me know what you think of Ravelry!

Crochet Pattern: Picnic Scarf

Posted in Best Crochet Patterns on July 15th, 2009 by Rachel Choi – 8 Comments
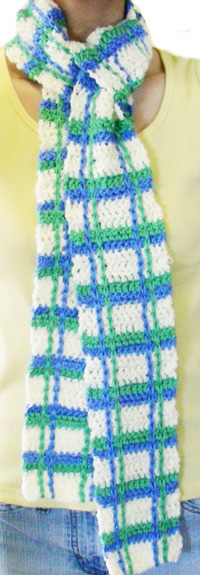
Whether it’s for a woman or a man, this scarf is bound to keep the neck warm during the cold winters and top off the perfect outfit. Just pick a main color and his or her two favorite colors to crochet this picnic scarf in a jiffy. This pattern is now available in the Crochet Spot store!

Skill Level: crochet skill level easy

Note: prior knowledge of how to change colors in crochet is required. Directions for special stitches are given in pattern.

Finished Size: 4″ (10 cm) wide, 60″ (152.5 cm) long

Materials:
Medium Weight Yarn
Crochet Hook I (5.50 mm)
crochet yarn size 4

To instantly download this pattern, log into your Crochet Spot store account. If you are a Premium Pattern Member, no payment is required and you may instantly download this pattern using the download link! If you are not a member, you may download this pattern upon purchasing.

As always, let me know if you need any help with the pattern!

crochet picnic scarf

New Comment Feature

Posted in News on July 15th, 2009 by Rachel Choi – 7 Comments

I added a new feature for when you comment on post! It allows you to receive e-mail notifications when someone else leaves comments on the post. It’s totally optional and the good thing about it is that if you’re really interested in knowing what other people write, you’ll be notified when someone else leaves a comment. Or if you happen to leave a question for me and then I go and answer your question, you can be notified that I did.

If you would like to receive these comment updates for a particular post all you have to do is click the box at the end of the post that says “Notify me of followup comments via e-mail”. The box is right underneath the “Submit comment” button.

Again, it’s absolutely optional. I just think it’ll be a great way to keep up with conversations and I noticed that lots of other blogs had this feature too!

Let me know what you think!

How to Crochet: Tunisian Knit Stitch (tks)

Posted in Tutorials and Help on July 14th, 2009 by Rachel Choi – 40 Comments
Have you ever wanted your crochet to look like knitting? Well here is the stitch for you! The Tunisian knit stitch is really similar to the Tunisian Simple Stitch also known as the afghan stitch. Please check that tutorial first before attempting this one since I’ll be making lots of references to it.

The only difference between the Tunisian simple stitch and the Tunisian knit stitch is the location you insert your hook during the forward pass/row.

This tutorial is for both right and left handed people. For left handed pictures, roll your mouse over the image and it will change for you.
read more »

Cutting My Own Hair

Posted in Fun Ramblings on July 12th, 2009 by Rachel Choi – 9 Comments

This weekend I took a break from crocheting to adventure into cutting my own hair. I’ve never cut my own hair before or anyone else’s until now. Okay, maybe I did cut my doll’s hair when I was a kid, but I don’t think that counts (it turned out really bad).

Good thing for youtube, that wonderful site with all those videos! I saw one with this girl cutting her own hair and it actually looked pretty nice. Oh, there are lots of good crochet videos on youtube too!

My hair was long to begin with so there was lots of room for error. I only snipped off a couple of inches, just to get rid of those horrible split ends. The hair is still long enough to run down my back and maybe next week I’ll work up the nerve to cut some more, a little shorter would be better. I didn’t want to get too scissor happy on my first attempt and end up looking like a ball of fun fur yarn.

Sorry I don’t have a picture, I was way too excited to take one.

Finish Off and Weave in Ends in Crochet

Posted in Tutorials and Help on July 11th, 2009 by Rachel Choi – 40 Comments

I’m often asked, “What is the best way to finish off and weave in ends?”

My answer: When I finish off I like to make one chain then cut the yarn and pull the strand of yarn through the chain if I’m working in rows. This makes a small little knot. If I’m working in the round I like to slip stitch in the next stitch, then cut the yarn. Then I weave the ends into the back side of the work. If you’re really scared that it’s not secure, such as when you do a color change, then feel free to tie small knots. Yes, I make knots.

I have a feeling that every time someone asks me this question, they expect some magical answer. But hey, I’m human and I just tell you what I do.

How do you finish off and weave in ends? Feel free to share your technique in the comments section below!

P.S. You can view a photo tutorial of techniques that Erin uses to weave in ends in her post: Perfecting Your Craft: Finishing the Project