
How to Crochet: Tunisian Knit Stitch (tks)
By Rachel Choi – 40 Comments| Have you ever wanted your crochet to look like knitting? Well here is the stitch for you! The Tunisian knit stitch is really similar to the Tunisian Simple Stitch also known as the afghan stitch. Please check that tutorial first before attempting this one since I’ll be making lots of references to it.
The only difference between the Tunisian simple stitch and the Tunisian knit stitch is the location you insert your hook during the forward pass/row. |

|
This tutorial is for both right and left handed people. For left handed pictures, roll your mouse over the image and it will change for you.
To begin the Tunisian knit stitch, complete the first row (steps 1 – 13) in the Tunisian Simple Stitch Tutorial.
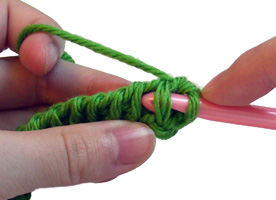
To do the next row and every row after, insert your hook under the “vertical bar” and through the back of the work. This is the only things that makes the Tunisian knit stitch different from the Tunisian simple stitch.
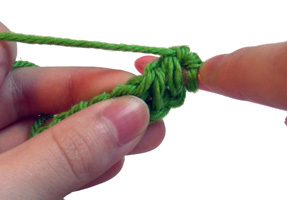
Now yarn over and pull up a loop onto your hook as you normally would. Continue this for each stitch across to complete the forward pass.
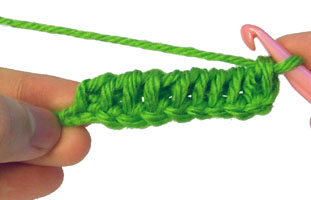
Completing the reverse pass is the same as the reverse pass in Tunisian simple stitch. Just yarn over, pull though 1 loop on your hook, then yarn over and pull though 2 loops on your hook. Continue to yarn over and pull through 2 loops on your hook until there is only 1 loop left.
Remember, the only difference between the Tunisian simple stitch and the Tunisian knit stitch is the location you insert your hook during the forward pass/row, everything else is the same!
If you need help with crocheting the Tunisian knit stitch, let me know!

Ooooh, thanks! I’ll be linking to this. Your crochet tutes are the BEST!
Hi Rachel,
I read this post, went home after work and tryed it. I love the look of Knit, but can not Knit no matter how hard I try. Anyway…How do you keep your project from rolling up?
Thank you so much for what you do….Love it, Love it, Love it
Hey Jennifer,
Naturally Tunisian crochet curls up, because the stitches that we are crocheting into are located on the first on the work and not the top like in normal crochet.
To make it flat, try blocking your work when you are done.
Also the bigger the hook, the loose the crochet, the less curly it will be.
Some even say that for the first row, if you pull up a loop in the back ridge of each chain instead it will be less curly. If you don’t know what the back ridge is, the back loop is located on the back of the chain behind the 2 loops that make the “V” shape. It sort of looks like a hump.
[…] better way to practice a new stitch than to make a scarf with it? The Tunisian knit stitch tutorial will show you the steps to make your crochet look like knitting! Once you get the hang of it, come […]
Thank you!!! Your directions and pictures are so easy to follow!!! It took me a few tries but I finally got it.
Thank you so much. I love your pictures – that is what makes it all come together for me. I tried this from a tutorial without pictures and didn’t understand, now it seems easy.
Rachel,
I’ve gone through both of the Tunisian stitch types. Am I wrong or are they the same? What am I missing? The pattern that I’m using Tunisian on calls for slipping one stitch off and then two stitches off and then one stitch off and then two stitches off until the end. The problem is either way my stitches don’t look anything like your or the pattern I’m using! I’ve been crocheting for about 20 years now and knitting for one year, so you’d think that I would be getting this. What am I doing wrong? Thanks for your help in advance!
Hi Dana,
If you are referring to my Tunisian simple stitch and Tunisian knit stitch tutorials, they are different. The difference is the location where you insert your hook during the forward pass. Everything else in the stitch remains the same. There are a bunch of different Tunisian stitches, so I’m not sure which one you are trying to use in your pattern. From your description, it seems like you are just modifying the reverse pass, it wouldn’t look like the pictures in my tutorial. I wish I could help you more, but I’m not sure what pattern you are looking at.
Hi Rachel,
Thanks for the info I went back and put my glasses on this time and I do see the difference. As for the pattern I’m trying to do, I’m not sure what I’m looking at either! Thanks for the help and as always keep up the great work that your doing!
Hi Rachel,
I LOVE this stitch!! I’ve been looking for a knit-like crochet pattern for the LONGEST time and this has just saved my life. 🙂 I’m just wondering if you know how to increase and decrease using this stitch so that the pattern retains the knit-look. I’ve come up with my own way to do it, but I’d love any advice you have. Thanks!
Hi Amanda, to increase I would make a stitch in the horizontal stitch between the 2 perpendicular loops, and to decrease I would just insert your hook into more than one loop at a time to make your stitch.
Thanks so much!
Thank you! I finally “get” this stitch!!
I am not getting this. Where into the back am I putting the hook?
Hi Michelle, after your put the hook under the vertical bar, push the hook through the work so that it is sticking out the back. If you do a couple of stitches, you’ll start to see the knit look.
I don’t get the “under the vertical bar” part. Where do you put your hook?
Hi Bella, take a look at the second to last photo in the tutorial. The “vertical bar” is the stitch that runs up and down and the hook is being put behind it.
Ok,the only thing is,I feel like I already do that when I just do the regular TSS….. I’ll try it anyway….Thanks for your help!! =)
I’m so glad I found this! I can crochet anything and yet for some reason I cannot get my hands and brain to coordinated knitting so this stitch is awesome… I do have a question though, how can I use this stitch for a larger piece? I make woolies (basically wool pants to cover cloth diapers) for my son and I usually work in a round, which is fine for regular crochet stitches but how can I get 60-120 stitches on my hook?
Hi Melissa, you can use a special Tunisian hook that has a flexible extension. It looks like a plastic cord that is attached to the end of the hook. You can find them on a single hook or as a double ended hook. If you’re feeling adventurous, you can make one yourself by neatly attaching a cord to the end of your hook.
You can also try using more than one crochet hook.
Do you happen to have a throw pattern in this ? Or do I just make it as wide as I want and go from there with just the same stitch? /any info is appreciated.
Thanks,
Betty
Hi Betty, yes you can make it as wide as you want for your throw using this stitch. You can also make squares and piece them together if you don’t want to make one large piece. Have fun with it!
I have a really quick questions that I can not seem to find anywhere, I assume its b/c the answer varies, BUT, on a 14 inch Tunisian Crochet hook, how many stitches can you comfortably work with. Also, I am wanting to do a pattern that has 100 stitches across (I want to do the Tunisian Crochet b/c it seems to be the most square). Is the 14 inch big enough, and if not, is there larger ones out there that I can not see?
Hi Amanda, I’m not sure how many stitches a 14″ hook can hold, since I don’t actually have one to try with. Maybe someone else can chime in with that answer. For Tunisian crochet, I like to use the hooks that have the flexible plastic cord on the end that holds the stitches. The cord at the end of the hook serves the same purpose as the extra long crochet hooks, just that the cords seem to hold more stitches because they are longer. The cords can even come in several different lengths. Here’s a link that will show you what I’m talking about: Tunisian Crochet Hook with Cord
btw, I just read one of the reviews in the link I provided and someone suggested not to use more than 100 stitches for the 22″ hook.
OH WOW, OK, I did not see the cord thing, but I did only look at the walmart craft section, and not a craft store. Im in the middle of a blanket, and dang pinterest showed me that I can crochet pictures and what not, so I am really excited but trying trying as hard as I can to keep it on the back burner, with the blanket I am doing now, school, work, and my baby…. BUT ITS SOOOOO COOL!!!!
Thanks again for the info, and the tutorial! I am a visual person so your pictures were the best!!!
Hello there. I have a 14″ Tunisian crochet hook. Yes you can comfortably work 100 stitches on it. I am actually currently making a baby blanket with a 14″ Tunisian crochet hook that has 100 stitches wide on it.
I Love this stitch and tutorials. Do you know where I can find patterns using this stitch?
Can you make a hat using these stitches?
Sure!!
I have followed your example on tunisian simple stitch and knit stitch but my sample doesnt have the little v’s on the front side. The back looks right. Once you do steps 1-13 and then start going through the vertical bars my front side has vertical bars across the piece. I like the look of the v’s which makes it look like knit. Am I suppose to view the piece as it is looks when you are working the stitches (horizontal) or do you turn it vertically). Confused. How do I get the little v’s like the pics. I crochet left handed and was able to follow along alright.
Thanks
Mary
Hi Mary, the v’s are made when you insert your hook under the “vertical bar†AND through the back of the work. You have to make sure that you’re doing that step correctly, because that’s what makes the v’s. If you’re just going under the bar, you’re doing the regular Tunisian Simple Stitch and not the Tunisian Knit Stitch. You may also have to do a few rows before you start to see the knit look.
Hi. I was wondering… Is there any way you can use this stitch when working in the round? For instance I am wanting to create a hat, is it possible to use this stitch to do so or can u only use this stitch for flat pieces?
Thanks
Kris.
Hello! Yes, you can use this stitch while working in the round. You can either slide the loops off of your hook as you work, use multiple hooks, or use a hook that has a flexible cord at the end to hold the stitches.
Is there a video you would recommend for using this stitch while working in the round? I am having a hard time visualizing what you mean by sliding loops off as I work, or using multiple hooks. Thanks a alot
Hmm… I don’t have a video, but maybe I can try and explain it better. You would work the stitches the same way as you would if it were flat. But if you are using a regular straight crochet hook you’ll get to a point (typically half way) where you can’t put any more stitches on your hook because your fabric is curved/rounded and your hook is straight. So at that point you can use a second hook to work the remaining stitches (the same way you worked the stitches you already made), or you can remove the hook from the stitches/loops that are on the current hook and use that hook to make the remaining stitches (you have to be careful not to pull the stitches out if you do it this way), or you can opt to use a special type of crochet hook that has a flexible cord, so that it can curve around your piece.
Try experimenting with it if you’d like! I’d recommend practicing the stitch back and forth to make a flat piece first. Then when you’re ready you can try one in the round. Have fun with it!
I’ve been to a lot of sites and watched videos, but this is the first time I’ve understood and successfully completed the Tunisian Knit stitch. Thank you! 🙂
Thank you so much Rachel.
I got it finally.
Help,
I already made a Tunisian piece that is 14 inches across by 28 inches long, but I found out now that I need to increase my width to 28 inches. How can I widen my piece I really do not want to start all over.
Hi Judy!
Unfortunately, starting over is probably your best solution. If you really don’t want to start over, you can crochet a separate piece and sew them together, but you would have a seam in your work.