
Crochet Technique: Hairpin Lace – Part 1
By Corinne Munger – 32 Comments| I recently came across one of the most gorgeous scarves I’ve ever seen and knew I had to make it. To my surprise, when I read the instructions, it begins with hairpin lace –something I know nothing about, but am now determined to learn. This craft began in Victorian times and is so called because women actually used their hairpins to create this beautiful lace. As seen in the photo, hairpin lace is a length of loops connected by crochet. You can use this for a multitude of items. | 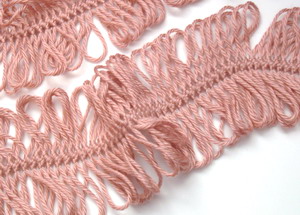 |
I thought that by exploring this technique in two parts, you would get a first hand, step-by-step tutorial where we could learn together. So, first things first, I had to purchase a hairpin lace loom. I didn’t even know these were still sold, but I easily found one at Joann Fabric. It was only $6.00 and with a coupon I got it for $3.00. How can you resist learning a new technique for $3.00? I can’t!
Here’s what I’ve learned so far…
1) It appears to be a lot harder and more complicated than it actually is!
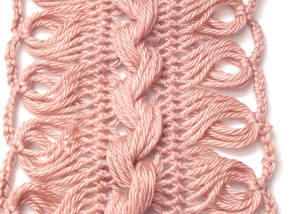
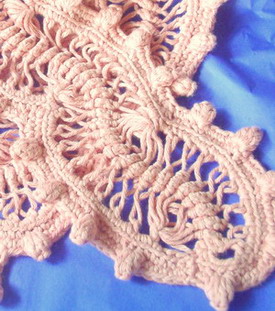
2) Hairpin lace is basically a length of loops (or a strip) that are joined in the middle with crochet. You can then attach the loops to other loops (1st picture), leave them alone as a fringe, or edge them (second picture).
3) Using a proper hairpin lace loom, you can adjust the size of the loops to make small, 1/2″ sized loops, or larger 2″ loops (some looms will make the loops even larger still).
4) This is the only way you can achieve this look in crochet. You can make many strips and then create articles of clothing, blankets, table linens, etc. by joining them together. Though it’s similar in look to the broomstick stitch, it really isn’t the same.
5) Once you add yarn to your loom to begin, there’s lots of flipping and turning of both the loom and the crochet hook. It must be done in the correct sequence for it to come out properly.
So, I’m going to start with my loom today. I actually can’t wait. I think this is going to add a whole other dimension to my crochet skills and start me on a path of all new designs. This technique seems very versatile with many levels of possibilities. In my next posting, I will hopefully have some photos of step-by-step instructions for you. Maybe you’ll decide to give it a try too!
Have you ever tried this technique? Do you have any pointers for a beginner? Share your knowledge here – I love these helpful discussions!

A friend of mine gave me a box full of these things and asked if I would finish it for you (since another friend had given it to her and she had no idea how to do it). I took one look it and didn’t even know what it was!! Luckily there was a small sample in there that I could follow.
That was the first time I had done hairpin lace and I can’t really give any tips, but it really is a lot of fun once you get the hang of it. Especially if you have someone to show you how to do it! 🙂
I’m finding it to be fun myself. I seriously need some help with the finishing part, though! lol It should come in time….
On my *to learn* list! I bought the loom 2 years ago and still haven’t set down to do it. So many crochet items keep coming up!
Stay tuned… Part II is on its way!
I have been doing hair pin lace for years and whenever I wear something that is hair pin somebody always asks me what it is and want me to share.
I usually make afghans or scarfs, I hook all the loops (going all the way up the sides and keep adding strips till I get the width I want.
I prefer to hairpin lace rather than knitting, all you really have to know is how to do a single crochet.
Keep us updated with your progress….I think at some point I may have to give it a try, I love the history of it as well!
Part II will be published shortly. I think you’ll find some great tips in there. Keep watching….
I would love to learn this. I already have loom or whatever it’s called.
The second part will be published shortly. Maybe we can compare notes and conquer this together!
I agree that it is really not as hard as it looks. I started a shawl a while back in hairpin lace.
My problem was that each strip was supposed to have 100 loops in it, but I had miscounted
some of them. Still haven’t finished it, but have been thinking lately that I wanted to give it
another try. Now I think you will be part of the reason I actually do it. 😀
Counting the loops is not exactly my favorite part, but like with anything, taking the time to do it will certainly pay off. The new scarf I wanted to make (still in debate) takes about 350 loops on each side. I’m not even sure my loom is big enough! LOL
once the loom fills just remove the bottom support slide off most of the loops and keep going.
i also tie scraps of yarn every 10-20 loops or so to help me keep track.
What a wonderful idea. I never did this but was thinking about doing an afghan. Thank you for a very good idea when counting…..
Me too
I’m so glad you all find this post interesting. Part II is on it’s way so please check back. Let’s all learn a new technique TOGETHER! Happy New Year everyone!
My mom loved to use the hairpin loom. I remember her making shawls and scarves. I do a lot of crocheting and have since I was 9 but have never used the hairpin loom. I might have to get one and try something new. I’ve made a couple of afghans using broomstick which also gives you a pretty pattern. Can’t wait to see your update.
Very elegant. I can’t wait to see the rest of your tutorial. There are some demos on UTube, but I’d prefer to wait to follow your instructions.
My grandmother taught me hairpin lace over 30 years ago. It’s incredibly fast and relaxing, so enjoy yourself!
Tip 1: Use scrap string/yarn as guide lines. Basically cut the string longer than the finished strip will be and then tie one along each rod on the loom.This keeps the strips in order, and keeps the loops from twisting in ways you don’t want them to go.Not necessary, but really helpful if you want to do amy fancy joining or grouping later.
Tip 2: The loom has one end that should stay connected to the cross-bar or dowel and one that ypu remove to make room for extra loops. Strips don’t need to fit in the loom that way. The way I prefer to work, the stable end is on top and the strip forms and falls into my lap as I pish it down and eventually off the bottom of the loom to make more room.
Tip 3: Always start the strips on the same side. So the tied-on loop will always be on the left rod if right-handed or the right rod if left-handed. It helps keep the number of loops even from side-to-side.
Tip 4: Use a marker to count out loops on a large project as you go. (Right-handed example here) The first loop on the left-side is 1. When you hit 10 (or 20 if you’re both fast and good at maintaining the count in your head), place a marker on the loop on the left-side. You can tie a small piece of contrasting yarn, use a paper clip, a safety clip, or a bread tie or twistie. Anything that will stay on and not damage the yarn! If you already know you’re going to group the loops in a particular number to make patterns when edging or joining then use safety pims all along the edge to group as you make the strip – or stop partway and add the pins. It will let you count quickly, and joining then becomes mindless.
And those pins can stay on till the very end if you don’t want to pause to remove them while joining strips.
Emjoy!
These are some great tips – Thank you! Especially using a marker to count the loops – this is a BIG help for me right now!
Hi Elizabeth!
I was so interested to read that your grandmother taught you to hairpin when you were a child! Mind did too – but to make very tiny, delicate handkerchief edging. I never knew her to make hairpin on a larger scale (scarves or clothing), for that she would knit.
I’d love to hear more about what you learnt, and maybe how your grandma learnt too?
Thanks!
Katy
Oh my goodness, Corinne, my dear MIL and I each made a small hairpin lace afghan back in the mid-1970’s. I didn’t care for my afghan at all since the strands of yarn split horribly and it just looked raggedy to me. Now I realize we used really cheap yarn that was bound to split; if we’d known enough to use a better quality yarn, the afghans would have been lovely. My advice is to use only good quality yarn that doesn’t split or splits minimally. The technique is not difficult to master and the results can be lovely. Thanks for the Memory Lane trip!
I think back in the 70’s we ALL used the “cheap” yarns and that’s, in part, how you can recognize a vintage piece of crochet. Yarn has come a long ways and even now using the lesser expensive fibers you don’t have to worry as much about all the splitting and pilling from repeated washes. Yarns that split drive be absolutely bonkers!!!! LOL As my talent progressed, I gained the confidence needed to spend a little more on good yarns and I’ll admit that my finished products look soooo much better because of it. Thanks for sharing!
Ooh, you’ve motivated me to learn how to do this! My mom picked up a hairpin lace loom at a thrift shop a few months ago and gave it to me, but I was a little too intimidated to try it. Thanks for posting some tips, Elizabeth Z.!
For those tempted to try hairpin lace but not ready to commit to a big project, consider making a bracelet. Set the rods to 1″-1.5″ (your preference for bracelet width) and do a strip that’s just the right length to go around your wrist. Finish off the end of the strip with a 1/2″ of single crochet the same width as the strip. Attach a button to the single crochet and it can go through any loop to fasten the bracelet.
You can leave the loops free for a fringe-y look, or finish the edges in any manner you choose. Takes about 5-6 yards of scrap yarn, and can even be done in ribbon, including leftover present-wrapping ribbon. (It’s that time of year!) If you’re into wirework, this makes a stunning piece.
Can you provide more details on the first picture. The twist affect is beautiful.
Hi Catherine, the twist effect IS beautiful, however, I’m so new to this technique I personally don’t know how to do it. I’m sure you can probably find instructions on the internet somewhere. The little bit of criss-crossing that I did was simply grabbing several loops on my hook and pulling them through an equal amount of loops. Let me know if you find anything interesting out there – or maybe a good video!
I tried it once with instructions from a book… I threw the thing across the room!! I love the look and would love to learn (properly) how to do it…
There are tons of youtube videos on making hairpin lace! 🙂 I find the most beautiful is the lace from Russia! Happy hair pinning! 😉
Hello please can you tell me where I can get this pattern for the hairpin lace bobble scarf shown above.
I have just started hairpin lace and am addicted to it
One helpful hint is to use markers every 20 stitches or so, so you are not continually counting them.
Regards Patricia.
Is there a pattern available for the scarf shown (the first picture after the second bullet point)?
Hi Madi! Sorry, she didn’t publish the pattern for the scarf.
Hello,
I just purchased one on eBay today, and I am eagerly waiting to use it.