
Free Crochet Pattern: Flower Crown Headband
By Claire Golden – 4 Comments
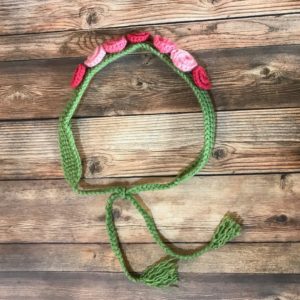
I’ve always loved wearing flower crowns because they have such a fairytale feeling. A boring day gets much more exciting when you feel like a princess. But daisy chains wilt and flower crowns aren’t always that comfortable to wear, so I crocheted an alternative. This flower crown is quick and easy to make if you know the basics of Tunisian crochet, and the headband is easily adjustable to fit any size head. Try mixing up the colors to make something that will brighten your winter days!
| Skill Level: |  |
Finished Size: 1″ (2.5 cm) wide, adjustable length
| Materials: Medium Weight Yarn in green and desired colors for flowers – sample uses three shades of pink (approximately 30 yards for headband and 2-3 yards per flower) Crochet Hook G (4.00 mm). A Tunisian hook isn’t necessary for this project. Yarn needle Measuring tape |
Special Stitches:
Tunisian Simple Stitch (tss): View a tutorial on this stitch here. Tunisian crochet has two steps: the forward pass and the return pass. In this pattern, the return pass is always the same.
Return Pass: yarn over, pull through first loop, (yarn over, pull through 2 loops on hook) across.
Tunisian Simple Stitch Decrease (tss dec): Insert hook through next two vertical bars, yarn over, pull up a loop.
Gauge:
8 tss = 2″
8 rows = 2″
Gauge Swatch: 2″w x 2″h (5 cm x 5 cm) ch 9.
Row 1: pull up a loop in second ch from hook and in each ch across, work return pass: 8 sts
Row 2: pull up a loop in each vertical bar across, including the edge stitch, work return pass: 8 sts
Row 3-8: Repeat Row 2.
Finish off.
Need help understanding the abbreviations and symbols? Check out the crochet abbreviation chart.
Crochet Pattern: Flower Crown Headband
Headband:
Row 1: ch 3, pull up a loop in second ch from hook and in last ch, work return pass: 2 sts
Row 2: (pull up a loop in gap before next st, pull up a loop in next vertical bar) 2 times, work return pass: 4 sts
Row 3: tss in each st across, work return pass: 4 sts
Measure around your head and subtract 4″ (7.5 cm) from that measurement. Repeat Row 3 until the headband matches that measurement.
Row 4: tss dec 2 times, work return pass: 4 sts
Row 5: Bind off by slip stitching into the 2 vertical bars. Continue sl sts down the long side of the headband until you reach the starting chain. Sl st 2 into the starting chain. Continue sl sts up the other long side of the headband. Invisible join to first sl st. Finish off.
Flowers (make 7 or as many as desired):
Round 1: make a magic ring, ch 1, 6 sc in ring: 6 sc
Round 2: working in front loops only, 2 sc in first st, 2 hdc in each st around: 12 sts
Round 3: work in the 6 unused back loops from Round 1, 3 dc in each loop around: 18 dc
Invisible join to first dc of Round 3. Leave long tail for sewing. Finish off.
Finishing:
When you’ve made all the flowers, space them out and sew them to the headband with a yarn needle. I spaced the flowers 5 rows apart from each other.
To make the headband tassels, cut 3 strands of yarn that are each 12″ (30 cm) long. Fold them in half and attach them to one end of the headband like you would attach fringe to a scarf. Braid the strands and tie a knot at the end. Repeat on the other side.
Need help while crocheting? Feel free to leave a comment below and I’m happy to help!

I love floral headbands, and perfect for spring! So pretty!
Thank you very much, Amy! Flowers make me smile, I’m so happy they’re starting to bloom.
This is such a pretty flower crown! Thank you for sharing.
Thank you Erica, I’m happy you like it! It’s always my pleasure to share anything with crochet flowers, they make me smile.