
Free Crochet Pattern: Rustic Pumpkin Favor Bag
By Amy Yarbrough – 2 Comments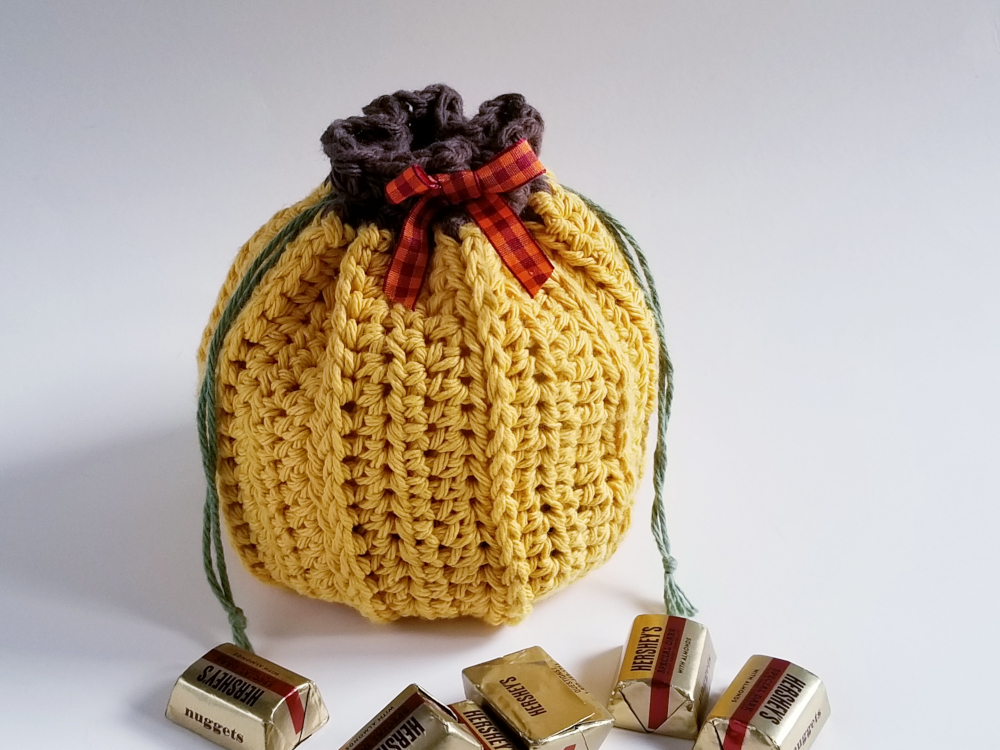
Last year I designed the first favor bag that began a trend when I designed the Carrot Favor Bag for Easter. Since then I have crocheted a total of 6 favor bag designs, 4 revolving around Spring, you might say, and 2 at Christmas. Be sure to check out my other Favor Bag Crochet Patterns. This year I realized I hadn’t designed any for the Autumn season and I set about to remedy that. And wouldn’t you know what I would make?
Are you a pumpkin maker? Every Autumn I get sucked into the fascination of the crocheted pumpkin. Perhaps it is the warm, festive colors that so suit the season, or perhaps it is the unique but easy construction. I don’t know.
In designing the Rustic Pumpkin Favor Bag I had to figure out how I would achieve the ribbed effect. Since this wouldn’t be a sealed project, and I couldn’t cinch in the sides with stitches, I decided to simply create the effect with the fabric by working every 4th round around the front post of each stitch.

First you crochet a panel as you would when beginning a pumpkin. After sewing the ends together, you then gather and sew up the bottom. The stalk is created with rounds of half double crochet that is cinched when the bag is closed.
Top it off with an Autumn-inspired bow and you’re ready to fill it with goodies!
| Skill Level: |  |
Finished Size: 6″ (15 cm) tall, 15″ (38 cm) in circumference
| Materials: Medium Weight Yarn (approximately 90 yards of yellow, 10 yards of brown, small amount of green) Crochet Hook 7 (4.50 mm) 8†of 3/8†wide ribbon, in complementing color Yarn needle Ruler or measuring tape Fabric glue, optional |
Gauge:
7 hdc = 2’’
4 rows = 2’’
Gauge Swatch: 2’’w x 2’’h (5 cm x 5 cm) ch 9.
Row 1: hdc in third ch from hook and in each ch across: 7 hdc
Row 2 – 4: ch 1, turn, sc in each sc across: 4 hdc
Finish off.
Need help understanding the abbreviations and symbols? Check out the crochet abbreviation chart.
Crochet Pattern: Rustic Pumpkin Favor Bag
Panel
Row 1: with yellow, ch 26, hdc in third ch from hook and in each ch across: 24 hdc
Row 2-3: ch 2, turn, hdc in each hdcacross: 24 hdc
Row 4: ch 2, turn, fphdc in each hdc across, hdc in last hdc: 24 hdc
Row 5-7: ch 2, turn, hdc in each hdc across: 24 hdc
Row 8-36: repeat Row 4-7
Finish off, leaving a long tail for sewing.
Fold panel in half matching ends and single crochet together. Flip panel inside out, and, with same color yarn and needle, make a running stitch around end of one side. Cinch up and sew closed. Flip bag right side out.
Stalk
Round 1: join brown in any stitch along open end of bag, ch 2, hdc along side of each row around, sl st in first hdc: 36 hdc
Round 2: ch 1, * sc in next hdc, ch 1, skip next hdc, repeat from * around, sl st in first sc: 36 sts
Round 3: ch 2, hdc in each st around, sl st in first hdc: 36 hdc
Finish off.
Drawstring
Cut 2 strands of green yarn, 16″ long. Lay bag flat. With one strand and needle, from one side, make a running stitch, working every two stitches of Round 1, returning to the same side. Knot at the end. Take the other strand and, starting on the opposite side, do the same, being careful not to sew into the other strand. Knot at the end as well.
Tie a small bow with the ribbon and stitch or glue onto center between drawstrings of stalk.
Have any questions? Leave me a comment below and I’ll see what I can do!

Darling!!! I can also see this done up in tomato pincushion colors. thank you for the pattern
My pleasure, Darlynn, glad you like it!
Amy