
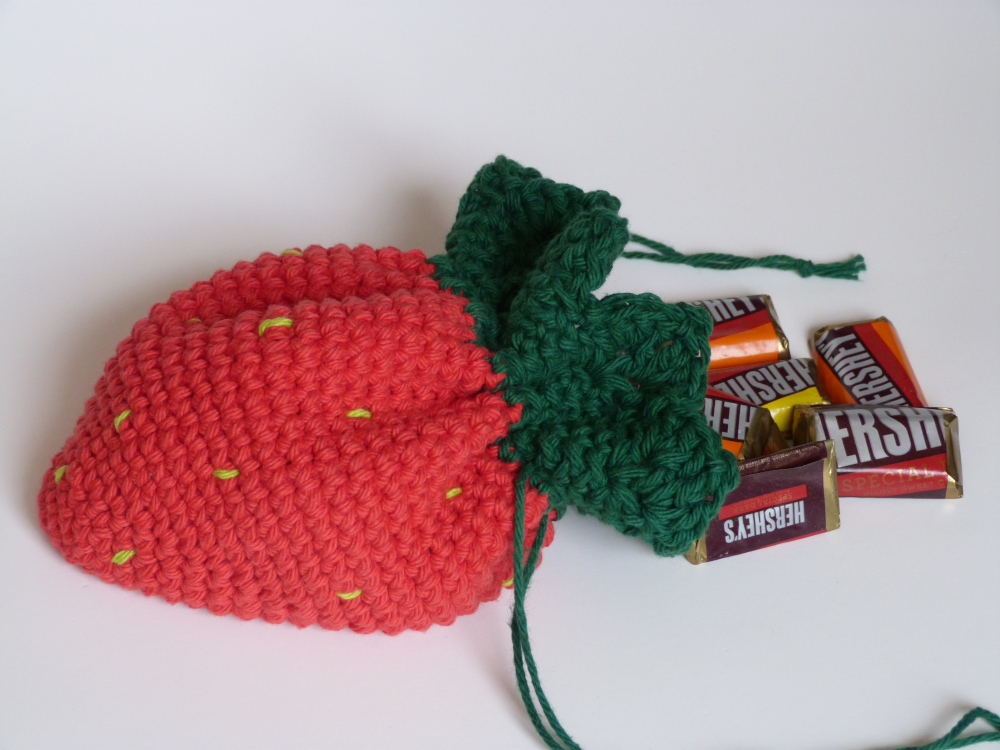
Free Crochet Pattern: Strawberry Favor Bag
By Amy Yarbrough – 8 Comments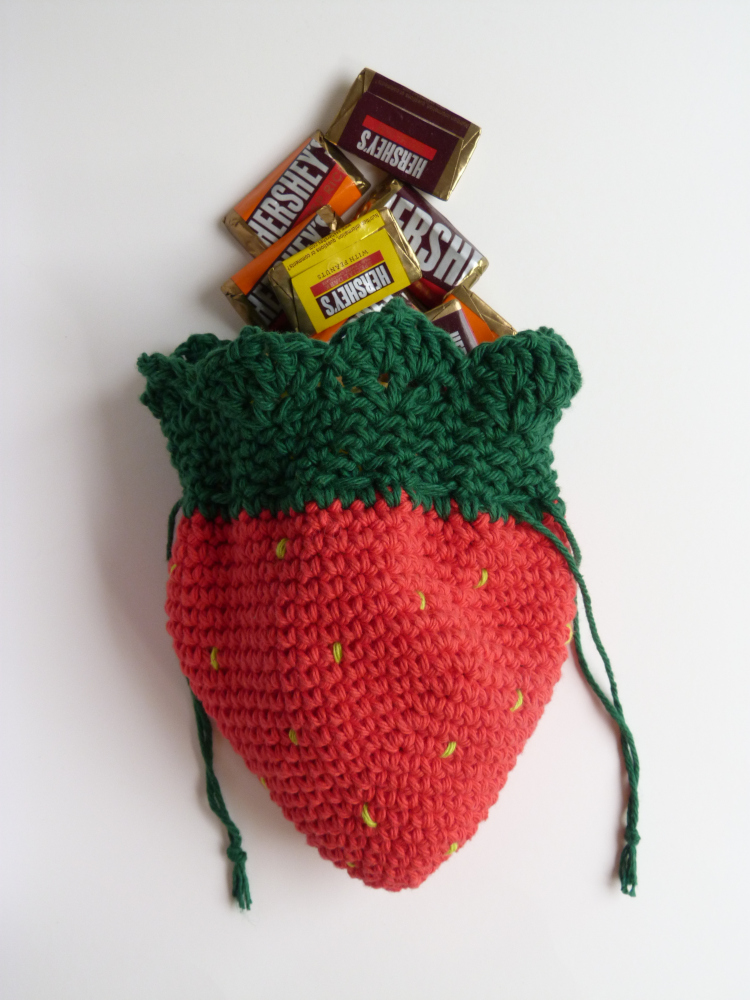
Here we are again, another Spring and I’m dreaming of strawberries. For some reason, though I have never been overly obsessed with strawberries, I always start adding them to my designs when Spring comes around. Perhaps it’s because the splash of red against the pleasing green is always a delight.
Not surprisingly then, I have a new design for you completely centered on the beautiful fruit: the Strawberry Favor Bag. Recently I designed the Carrot Favor Bag and had a great time visualizing how the natural greenery would look in a crocheted fashion. Then I thought, why not try the cinch bag idea with other fruit and vegetable designs?
The Strawberry Favor Bag is very easy to make. The bag is worked from the bottom up in simple crochet increases while the greenery is worked in a simple but unique stitch pattern to create the pointed leaves of the strawberry plant. Add little stitches of light green or yellow for the seeds and you’re ready to fill the bag with candy or trinkets to give as a gift!
| Skill Level: |  |
Finished Size: (laid flat) 6 1/2†(16.5 cm) wide, 7†(18 cm) long
| Materials: Medium weight yarn (approximately 45 yards of red, 20 yards of dark green, and a small amount of light green or yellow) Crochet hook H (5.00 mm) Yarn needle Tape measure Stitch markers |
Gauge:
4 sc = 1’’
4 rows = 1’’
Gauge Swatch: 1’’w x 1’’h (2.5 cm x 2.5 cm) ch 5.
Row 1: sc in second ch from hook and in each ch across: 4 sc
Row 2 – 4: ch 1, turn, sc in each sc across: 4 sc
Finish off.
Need help understanding the abbreviations and symbols? Check out the crochet abbreviation chart.
Note: Pattern is worked in a spiral, so do not chain to start a new round and do not sl st to join to end the row. Use stitch markers to keep track of the start of a new round.
Crochet Pattern: Strawberry Favor Bag
Round 1: with red, make an adjustable ring, ch 1, 6 sc in ring: 6 sc
Round 2: * 2 sc in next sc, sc in next sc, repeat from * around: 9 sc
Round 3: * 2 sc in next sc, sc in next 2 sc, repeat from * around: 12 sc
Round 4: * 2 sc in next sc, sc in next 3 sc, repeat from * around: 15 sc
Round 5: * 2 sc in next sc, sc in next 4 sc, repeat from * around: 18 sc
Round 6: * 2 sc in next sc, sc in next 5 sc, repeat from * around: 21 sc
Round 7: * 2 sc in next sc, sc in next 6 sc, repeat from around: 24 sc
Round 8: * 2 sc in next sc, sc in next 7 sc, repeat from * around: 27 sc
Round 9: * 2 sc in next sc, sc in next 8 sc, repeat from * around: 30 sc
Round 10: * 2 sc in next sc, sc in next 9 sc, repeat from * around: 33 sc
Round 11: * 2 sc in next sc, sc in next 10 sc, repeat from * around: 36 sc
Round 12: * 2 sc in next sc, sc in next 11 sc, repeat from * around: 39 sc
Round 13: * 2 sc in next sc, sc in next 12 sc, repeat from * around: 42 sc
Round 14: * 2 sc in next sc, sc in next 13 sc, repeat from * around: 45 sc
Round 15: * 2 sc in next sc, sc in next 14 sc, repeat from * around: 48 sc
Round 16: * 2 sc in next sc, sc in next 15 sc, repeat from * around: 51 sc
Round 17 – 22: sc in each sc around: 51 sc
Round 23: * sc2tog, sc in next 15 sc, repeat from * around: 48 sc
Round 24: change to dark green, sc in each sc around: 48 sc
Round 25: * sc in next sc, ch 1, skip next sc, repeat from * around: 24 sc
Round 26 – 28: * sc in next sc, ch 1, * repeat from * around: 24 sc
Round 29: * sc in next sc, skip next ch-1 space, (dc, ch 1, dc, ch 1, dc) in next ch-1 space, skip next ch-1 space, repeat from * around: 48 sts
Round 30: * sl st in next sc, 3 dc in next ch-1 space, ch-2 picot, 3 dc in next ch-1 space, repeat from * around: 56 sts, not counting picot
Finish off.
Cinch Straps
Cut 2 – 28†strands of dark green yarn. Lay bag flat with seam directly in back and place two stitch markers one either side of Round 24. This will be where your straps are placed. Thread yarn needle with one of the green strands and weave in and out of the stitches, starting at one stitch marker and ending at the same stitch marker. (I weave in intervals of two stitches). Do the same with the other strand, only start from the other side so that you end opposite of the other strap.
Stitching Seeds
Use a good length of light green or yellow yarn and thread the yarn needle. Make random stitches around the bag from the inside out to represent seeds.
Note: When weaving the strands through the stitches be careful not stitch into the other strand or the stitches themselves, or this will keep the bag from cinching properly and ruin your strands.
Let me know if you have any trouble while crocheting, I’ll be glad to help!

This is so lovely! I’m having trouble on Round 29 – it says to: * sc in next sc, skip next ch-1 space, (dc, ch 1, dc, ch 1, dc) in next ch-1 space, …..does this mean i will skip the Ch-1 space AND the next sc before going into the next Ch-1 space? I tried both ways and not creating enough of a curve with this. Can you clarify what i might be missing? Thank you! (love all your designs!)
Hello Kim,
I’m so pleased you like my work!
Yes, you will essentially be skipping a ch-1 sp and a sc, though not specified, before working the dc’s and ch-1’s into the next ch-1 sp. But if you say you tried this already, I’m not sure what the problem might be. Hm, are you certain about the stitch count?
Amy
Thank you! I figured i had to skip the Ch-1 sp & the sc (i did not see skipping the sc specified) but its working. Having fun with this! Thank you again!!
Splendid! I’m glad it is working for you.
Have fun crocheting!
Amy
I’m stuck on row 25. I still have 48 stitches. I don’t understand how it’s supposed to decrease
On Row 24 do not count the Chain 1 stitch is as actual stitch. You will only be counting the single crochet. This chain space will eventually be used to put your drawstring through. Hope this helps. I made this as a Hostess gift filled with Russell Stover wrapped hard candy, strawberry bon bons!
Hello Miranda,
Don’t forget “skip the next sc” after you have “sc in next sc, ch 1.” This will leave every other single crochet unworked and you will have only half of the stitches you had before– 24 instead of 48. Do you see what I mean?
Amy
Hi,
I’m struggling with the cinch straps. What is the “seam†that needs to be directly at the back.
I also don’t understand what you mean when you say to place stitch markers either side of round 24?
Lovely pattern. I love the little pouch 🙂