
How to Crochet: The Magic Adjustable Ring
By Alicia Kachmar – 59 CommentsOne way of crocheting in the round is to chain 2 and then make a certain number of stitches into the 2nd chain from the hook (you can do so with any kind of crochet stitch–sc, hdc, dc, etc.–but for this tutorial, I’ll be using sc. This tutorial is for both right and left handed people. For left handed pictures, roll your mouse over the image and it will change for you. When you have the desired number of stitches and you join to the first single crochet, you’ll notice a little something–a hole! Right there in the middle. The way around this? The magic adjustable ring, a really simple technique that prevents a hole from appearing.
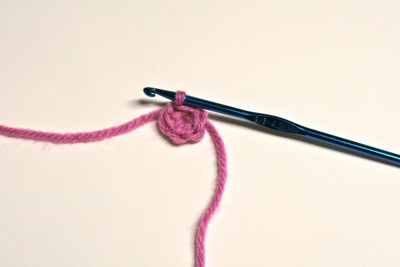
Making a magic adjustable ring only requires a few extra steps and will give your  in-the-round projects a smooth start. For this one in particular, I’ll make a magic adjustable ring with 5 single crochet stitches.
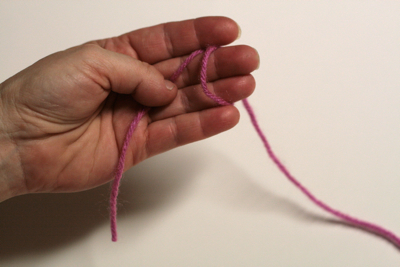
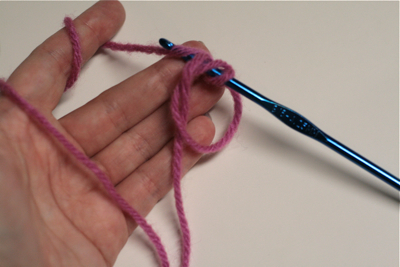
With the yarn tail hanging for a few inches along the inside of your left hand, form a ring and rap around your index and middle fingers. The working yarn should be on the right if you’re right-handed, on the left if you’re left-handed.
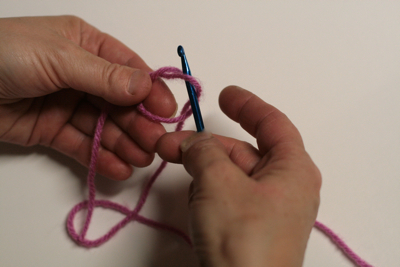
Hold where both strands of yarn overlap along the ring, the working yarn behind the ring. Moving from front to back, insert your crochet hook into the ring and pull up a loop from the working yarn.
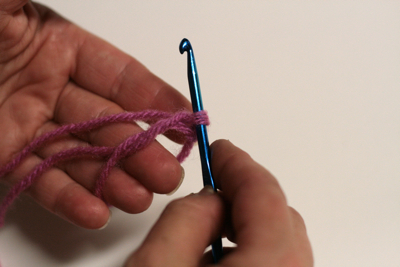
Ch 1 and insert your crochet hook into the ring; pull up a loop from the working yarn again, pulling it from front to back under around the tail and ring.

Now there are two loops on your crochet hook. Yarn over and pull through both, completing the single crochet.
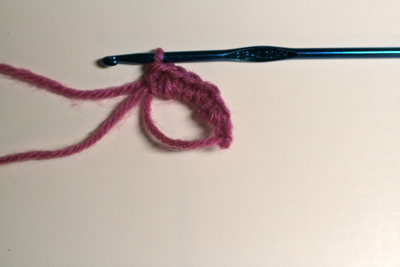
Continue crocheting around both the tail and ring until you have the desired number of stitches. When you do, gently pull on the yarn tail to close up the ring. Ta-da! You just made a magic adjustable ring.

Do you have questions about making a magic adjustable ring? Leave me a comment!

I love the magic ring, I use it all the time!
Yay! Yeah, one never goes back to the old way of beginning to crochet in the round!
I love the magic ring I learned it this past year from talking crochet and I am never going back to the chain stitch way of working in the round. I made your earrings using the magic ring and they turned out so beautifully.
I love it! I have never seen such a thing in all these years! Thank you SO much! I’ll pass this tip on to all my crochet friends!
Good information. I tell my students about the “3 ways” to work in the round. I find that most of them when they are beginning prefer chain 5, sl st to form a ring, work into the ring. Once they get that, we go over “the magic.” Also, I always show them how to crochet over the tail and then cinch the hole closed…its another great little tip. I posted these on my blog last month. I love that you are getting the information out there. That is why I started blogging myself–to have all the info in one place and be able to refer to it. I’m a novice blogger tho. Yarn hugs, D
brilliant! I’ll try it! =)
Awesome! I’m gonna try it right now! Thanks!
It is a “Ta-Da” moment! Thanks!
Thank you, Rachel! I had completely given up on the magic ring because all of the descriptions and pictures I had seen of it just didn’t make sense to me. It took me several tries here, and I almost gave up, but finally I got it. It’s great!
I saw on a website that I slip stitch with the first stitch to join it, do I make an extra stitch then?
You describe the magic ring so well. I haven’t used it before but I will definitely use it on my next crochet project.
many thanks
Caroline
I’ve never used the magic ring, but I generally just crochet 5 or 6 stitches, then join with a slip stitch. Then, I just do whatever crocheting the pattern calls for over the tail. When I finish the first round I just pull the tail to cinch it up. That also eliminates having to weave in the tail end! 😉
This is what I will do from now on when an afghan pattern calls for a magic loop. I made an afghan for my son this past Christmas. Three months later, I am noticing they are coming undone!! I’ve replaced two in the past 24 hours. Yet the afghans I’ve made with the chain-and-slip-stitch method have lasted decades with no unraveling whatsoever.
yes Corrine, I made a blanket with 144 squares now after only one month find they are coming undone, not looking forward to the job of fixing this project.
oooooohhhhh I absoluely love this!! can’t wait to use it. Thanx so much for tute!!!
Finally a simpler way to create a ring thank you.
Love this! I’m fairly new to crochet and have been a bit bothered by the hole left when crocheting in rounds, you just made my day! Thanks! 🙂
I’ve kind of developed my own way which works for me. I simply cross the working end over the tail and make a loop and then go from there. It’s much easier and less complicated.
[…] 1: make a magic adjustable ring, ch 3 (counts as tr here and throughout), 3 tr in ring, (ch 3, 4 tr) in ring three times, ch 1, hdc […]
How do you make a magic ring with dc…I’m trying to do it but the pattern calls for no joining and I keep getting a huge gap and it’s not suppose to be that way here’s the pattern I’m trying to make…
http://cloverchild.wordpress.com/2011/01/27/that-70s-slouch/
it would most appreciated if you could explain thank you.
Hi Jess, in your case, you can start the ring as in this tutorial, but instead of making the chain 1 then the stitches, you can just start making the double crochet stitches. If you skip the chain before your double crochets it’ll make your first couple of stitches shorter than the rest and it’ll be more spiral like, preventing a big hole when you do your second round.
awww thank you you Rachel! 🙂
[…] Round 1: with color A, start with a magic adjustable ring, 24 dc in ring, place marker: 24 dc Round 2: 6 dc in each dc around, changing to color B in last dc […]
[…] 1: make an adjustable magic ring, ch 1, 6 sc in ring, place marker: 6 […]
[…] Hat Keychain Note: The ch 1 at the beginning of each round counts as the first sc. Round 1: Make an adjustable ring, ch 1, 5 sc into ring, sl st into beginning ch-1 to join rnd : 6 sc Round 2: ch 1, sc into first […]
[…] Pattern: Name of pattern goes here Round 1: Make an adjustable ring, ch 1, make 8 sc in ring, sl st into beginning ch-1: 8 sc Round 2: ch 1, 2 sc in each sc around, sl […]
[…] Circle Round 1: Make an adjustable ring, ch 3, make 11 dc in ring, sl st into beginning ch-3: 11 dc Round 2: ch 1, 2 sc in each sc around, […]
[…] adjustable ring is a great method for starting crocheting in the round, but what about using it in the middle of […]
Is this the same technique as you would use when crocheting around a o-ring or hair elastic?
They’re similar in that you are crocheting around something, but there’s a loop to pull closed after you make the adjustable ring.
Thanks, I couldn’t figure this out but I had found a tutorial on crocheting around a ring and managed that. I just couldn’t figure out how to actually start – which is odd since the tutorial tells you how to start.
[…] adjustable ring is a very popular method of starting a project in the round, but some prefer the double ring for […]
Thanks! will b using this technique today!!!
hi rachel,
wow! i love your website! i stumbled on it while searching for a simple bookmark pattern that children could make. your visuals are SUPERB and really easy for a beginner like me to follow. keep up the great work with the site – cause i’m going to keep coming back to learn more!
Thanks so much for this tutorial, I finally get it! 😀
[…] Round 1: Make an adjustable ring, ch 1, 6 sc in ring, sl st in beg ch-1: 6 sc Rounds 2-12: sc in each sc around Finish […]
YAY! I finally made it!
[…] Pattern: Jumbo Lip Balm Holder Round 1: Make an adjustable ring, ch 3, 8 dc in ring, sl st in top of beg ch-3: 8 dc Rounds 2-8:ch 3, dc in each dc, sl st in top of […]
[…] Round 1: Make an adjustable ring, ch 1, 6 sc in ring, sl st in beg ch-1 to join: 6 sc Round 2: ch 1, 2 sc in each sc around, sl st […]
I am a beginner, and I am wondering – would it be possible to leave the circle fairly large, keep crocheting stitches, and then cinch it up tight later to make a gathered effect? I have seen some hats that are gathered in the middle, and it looks so cute. Wondering if that’s how they do it.
Oh thank you for this tutorial! I’ve been trying to work this out for ages and most instructions are as clear as mud but yours has helped me make my first decent adjustable ring. Thank you!
thank you so much for blog on how to MAKE A SLIP LOOP. aka magic circle. i havespent two hours. looking for one simple answer. everyone referse you to slip knot. daaa
Thank you, you made it sound much easier than anywhere else I have looked, got it in approx 4 minutes! fabulous!
These instructions make it so easy ! I’ve been crocheting for almost 50 years and finally found this !!
I’ve never tried the magic ring. call me old fashioned. =D
Do you tie it off or just weave in the end? I’m just concerned if it would come undone.
Hi Dawn! You can weave in the end of yarn into your work, like you would with other loose strands of yarn.
I know a lot of ladies use this, but I have tried and tried and tried and I still cannot do this and I am missing out on a lot of lovely projects because of this, is there a way that instead of this magic ring it can be done by chaining? I just simply cannot do the ring and I crochet to relax not to become frustrated…..would appreciate this if it is not a real problem….Thanking you one way or another…..
Sure thing! Instead of making this ring you can make an extra chain (when you are making your starting chain) then make your stitches into the extra chain instead of the ring. I do it all the time!
Thank you thank you thank you! I have tried this soooo many times with other tutorials and it made NO sense to me!! Thank you for your clear directions!!
Hi…..I am trying to crochet the shell stitch afghan…..I made a chain of 150 sts….will this work..
Thanks!
Hi Audrey, which shell stitch afghan are you making? There are a bunch out there and they will require different chain lengths. If it is a pattern here on Crochet Spot, let me know the link and I can take a closer look to help.
It is the beginner’s level…..the pattern is sc skip 2 chains 5 double crochet in the single st….the afghan shown it is different colours but I am only making one colour.
The picture shown says (crochet pattern shell stitch afghan).
I’m going to guess from the info you gave that the pattern uses multiples of 6. 150 is a multiple of 6, so it will work!
I hunted everywhere for a diagram/photo based tutorial with left handed instructions. Brilliant thank you.
Can I just suggest that your photos would be clearer still with a cotton based yarn rather than a fuzzy, woolly one?
I have a question….making a baby beanie and the pattern reads as follows….
Round 1 – starting with Magic circle, 12 HDC, pull circle tight, slip stitch to join. How many stitches before I slip stitch to join the Magic Circle? Or does it matter?
Hi Marg!
I’m not sure I understand your question, feel free to clarify.
You will make the magic circle. Then do 12 hdc into the circle. Then pull the circle tight. Then make the slip stitch. The slip stitch should be in the first hdc that is at the beginning of the round.
Hi Rachel,
Superb tutorial. I went through several other websites and videos before coming across your tutorial. Of all of them, yours is the simplest, visually clear, and most straightforward of the tutorials I’ve found. Because of you, I’m able to work the Magic Ring now, and I use it in ALL of my In-The-Round projects.
Thank you!
P.S.: I’ve linked to your tutorial on my blog. 🙂
http://lollipops-and-pipe-dreams.blogspot.com/2015/08/crafting-crochet-jute-coasters-update.html
Hi. At the end of a project using this magic adjustable loop, how do i secure the loose strand that i had used to close the loop? Please help as I can’t find the answer anywhere and i am about to finish my beanie. Thanks
Hello! I would recommend weaving the end into your work, similar to any other end of yarn you will weave into your work to finish off the project. I like to use a yarn needle and thread the end through the stitches on the first round once or twice more then cut it.