Posts Tagged ‘tutorial’

How to Crochet a Tube (Version 2 – In Spirals)

Posted in Tutorials and Help on March 15th, 2016 by Caissa "Cami" McClinton – Be the first to comment

In my last tutorial, I showed you how to crochet a tube in a certain way, by joining rounds. However, you can also crochet a tube in spirals.

For the purpose of practicing this skill, we’ll make a small swatch in this tutorial. Yarn and hook size don’t matter for this practice swatch.

You may mouse over images for left-handed views.

Abbreviations:
ch – chain
sc – double crochet
sl st – slip stitch

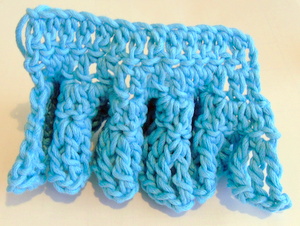
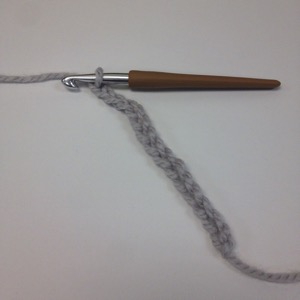
Foundation: ch 15. The photo below shows this completed.


read more »

How to Wet Block Crocheted Lace with Wires

Posted in Tutorials and Help on August 4th, 2015 by Caissa "Cami" McClinton – 2 Comments

My life has been engulfed in yarn, crochet, and having good crafty times lately and I couldn’t be happier about it. I recently made a really beautiful crochet lace poncho that looks fabulous on everyone! It was crocheted in the beautiful Louet Euroflax Sport Weight Linen. The pattern was from Rustic Modern Crochet by Yumiko Alexander.

I had a lot of fun crocheting this poncho, but I knew that it would have to be specially blocked when I was done. Maybe you are wondering what blocking is and how you can do it. If so, read on to follow my process step by step.

How to Wet Block Crocheted Lace a Free Tutorial by Caissa McClinton @artlikebread 1


read more »

How to Frog Your Crochet

Posted in Tutorials and Help on April 28th, 2015 by Caissa "Cami" McClinton – Be the first to comment

When I gave you Five Fine Reasons to Frog Your Crochet, fellow Crochet Spotter Cindi commented to ask about how to pull back crochet without stretching the yarn out further and also how to get rid of the kinks. In this tutorial, I am addressing the first part of the question – how to pull back without stretching the yarn out further. In the future, I will show you how to get rid of the kinks.

Previously it hadn’t occurred to me that we might need a photo tutorial about frogging, but then I remembered back to when I was a beginning crocheter and I wanted to soak up everything possible about the craft. (Well, I still want to learn absolutely everything about crochet, but some of it has become second nature to me.) While this tutorial may be very familiar to many of you, I hope that it will serve as good information for beginners and researchers. Also, please feel free to share your frogging tips in the comments!
read more »

A Simple Guide to Yarn Weights

Posted in Tutorials and Help on January 13th, 2015 by Tameko Barnette – 17 Comments

Have you ever noticed how some of your creations may not look and feel exactly how you imagined they would during or after creating them? Or, have you ever noticed that your creations may not look exactly like the images used in the magazine or crochet article?

Quite often, most crocheters from way back will use the yarn weight they have available to them at the time because it is cost effective and easily accessible. Perhaps, we may not even know about or use all of the yarn weights available, even if the patterns may call for a different yarn weight other than the most popular number four (4).

Here, in this piece, I have decided to compile a very simple guide to the various yarn weights and what each of them can be used for when we’re creating our items this year. This will be excellent for those crocheters who like to create their own patterns. You can start to explore the various types of yarn weights to see what works with your creation.
read more »

How to Crochet: Tunisian Reverse Stitch (Trs)

Posted in Tutorials and Help on October 8th, 2013 by Caissa "Cami" McClinton – 1 Comment

Hooray for Tunisian Crochet! Since I gave you 3 Reasons to Try Tunisian Crochet, have you done it yet? Well, if not, grab your long crochet hooks and join me! A while back, Rachel posted a great photo tutorial of the “setup row” of Tunisian crochet, which is the standard first row in each Tunisian crochet project. The tutorial can be found as steps 1-13 of the Tunisian Simple Stitch Tutorial.

Please note: Steps 11-13 of the Tunisian Simple Stitch Tutorial could also be called, “How to Work the Reverse Pass in Tunisian Crochet”. These steps remain the same in all basic Tunisian crochet patterns.

Rachel also posted the beautiful Tunisian Knit Stitch Tutorial! Today we’re going to add a stitch to our library by learning the Tunisian Reverse Stitch, abbreviated (Trs).

Tunisian reverse stitch swatch worked in bulky yarn with sc border.

Tunisian reverse stitch swatch worked in bulky yarn with sc border.

Close up of Tunisian Reverse Stitch Swatch

Close up of back of Tunisian Reverse Stitch Swatch


read more »

How to Crochet a Floppy Ruffle

Posted in Tutorials and Help on September 5th, 2013 by Caissa "Cami" McClinton – 5 Comments

Ruffles can be a lot of fun! They are great to add to the bottom of a sweater, a hat, or even as a floofy fringe alternative on the ends or sides of a scarf! There are hundreds of ways to crochet ruffles, but we’re going to learn just one here. Excitingly, this version uses both the classic double crochet and the long, slim triple crochet!

Our ruffle relaxing.

Our ruffle relaxing. I could see this at the bottom of a skirt.

Our ruffle letting loose.

Our ruffle letting loose. I could see this on the side of a scarf.

As you can see, this is a versatile ruffle that can be used in different ways for different looks. For the purpose of practicing this skill, we’ll make a swatch in this tutorial. Yarn and hook size don’t matter for this practice swatch.
read more »

How to Crochet Over Single Crochets in Rows

Posted in Fun Ramblings on August 8th, 2013 by Caissa "Cami" McClinton – 17 Comments

Sometimes we can create different textures and effects by crocheting into unexpected places on our crochet fabric. This week we’ll focus upon how to crochet over single crochets in rows. For the purpose of practicing this skill, we’ll make a small swatch in this tutorial. Yarn and hook size don’t matter for this practice swatch.

You may mouse over images for left-handed views.

Row 1: ch 11, sc into second ch from hook and into each ch across: 10 sc

The photo below shows this done.


read more »

How to Make a Crocheted Granny Square into a Granny Rectangle

Posted in Tutorials and Help on July 9th, 2013 by Caissa "Cami" McClinton – 23 Comments

The inspiration for this week’s tutorial happened at my weekly crafts group meeting. A new friend of mine, Barbara, is an experienced knitter but recently learned to crochet. She told me that she is working on a continual granny square blanket, which would end up being one big square. She said she would like to make it into a rectangle without adding more squares to the end. I told her that it could be done and then figured out this pattern.

For the purpose of practicing this skill, we’ll make a small rectangular swatch. Yarn and hook size don’t matter for this practice swatch.

This is what your swatch will look like if you use only one color.

This is what your swatch will look like if you use only one color.


read more »

How to Double Crochet an Oval

Posted in Tutorials and Help on June 13th, 2013 by Caissa "Cami" McClinton – 35 Comments

An oval is a basic shape that can be crocheted for many purposes, such as to create a placemat, bag, or dishcloth. But how do you crochet a basic oval? Ovals come in different shapes. The oval we are crocheting today is nothing more than a half circle + a rectangle (of any length) + a half circle.

caissa mcclinton artlikebread crochet oval tutorial 3045
read more »

How to Make a Peruvian Loom for Crochet

Posted in Tutorials and Help on May 28th, 2013 by Caissa "Cami" McClinton – 6 Comments

I was thrilled at the wonderful response to my last tutorial, Crocheting with a Peruvian Loom (Wood Block). Since a few people mentioned they’d like to learn how to make a Peruvian loom, I came up with this tutorial.

The goal of this procedure is to make a smooth, firm, cardboard rectangle with the following dimensions: approximately 8″ x 4 1/2″ x 1/2″. Feel free to substitute materials, techniques, or even dimensions in order to achieve your desired result. Enjoy!
read more »