
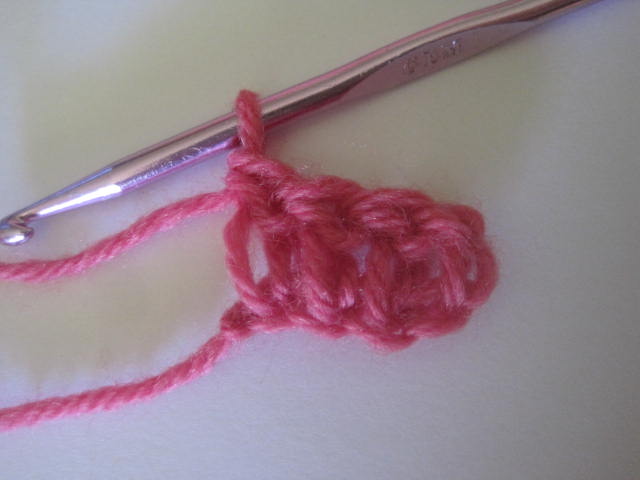
How to Crochet: Corner to Corner Diagonal Box Stitch
By Erin Burger – 59 CommentsTired of the same back and forth? Creating the Box Stitch diagonally is a really neat way of completing a corner to corner crochet project. You can use this stitch to create anything from blankets, dishcloths, placemats, scarves, clothing … the possibilities are only limited by your imagination!
This tutorial is for both right and left handed people. For left handed pictures, roll your mouse over the image and it will change for you.
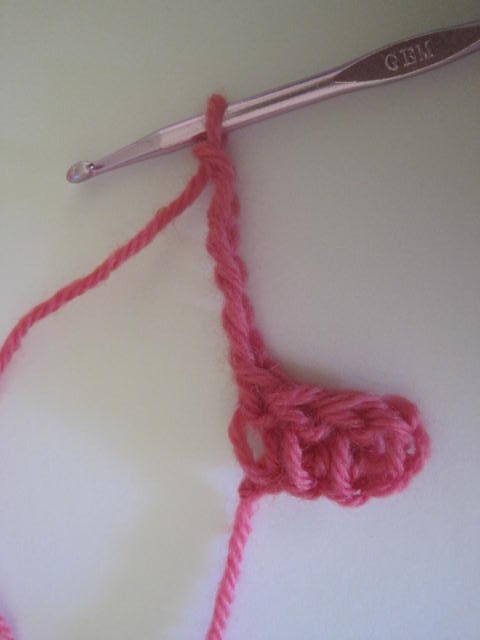

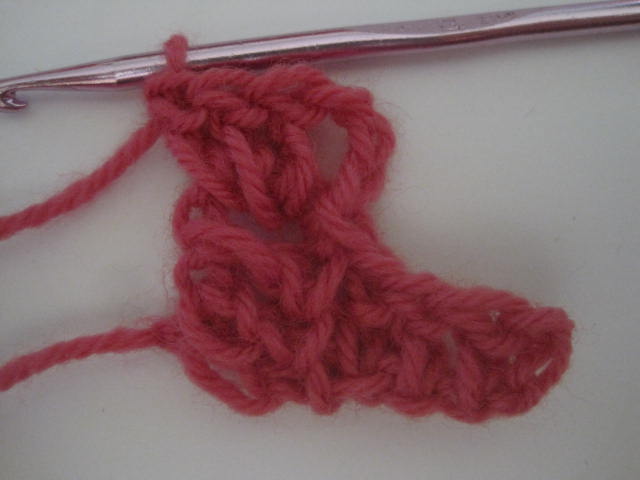


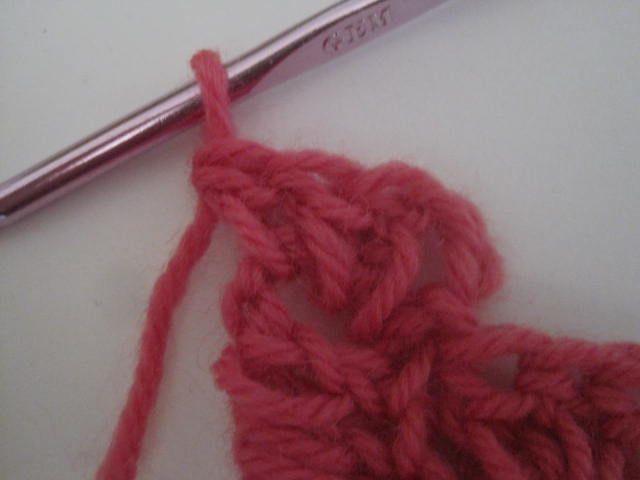
Repeat Row 3 with the beginning ch 6 block increasing the width of your project as you continue.
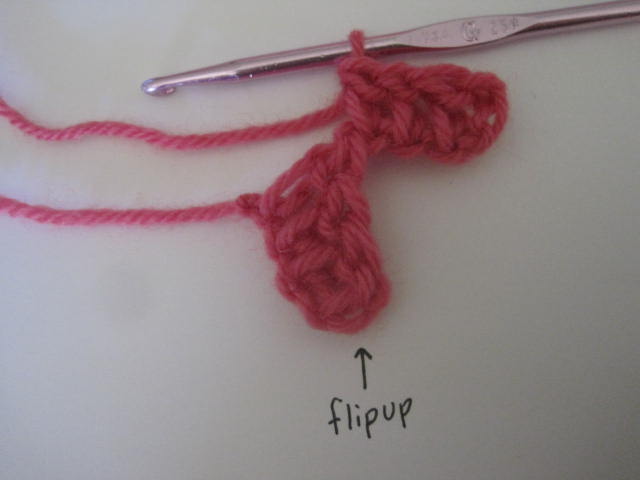
When you have met your intended width you can begin to decrease to finish your project.
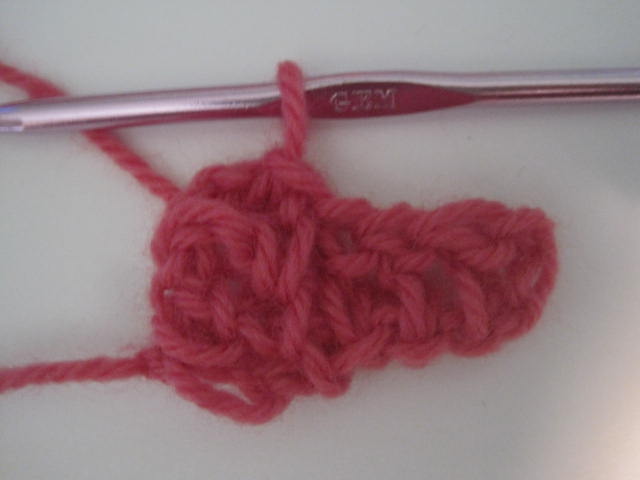
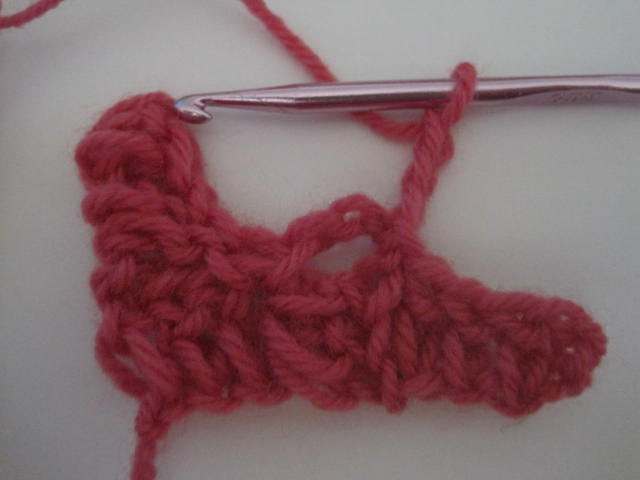
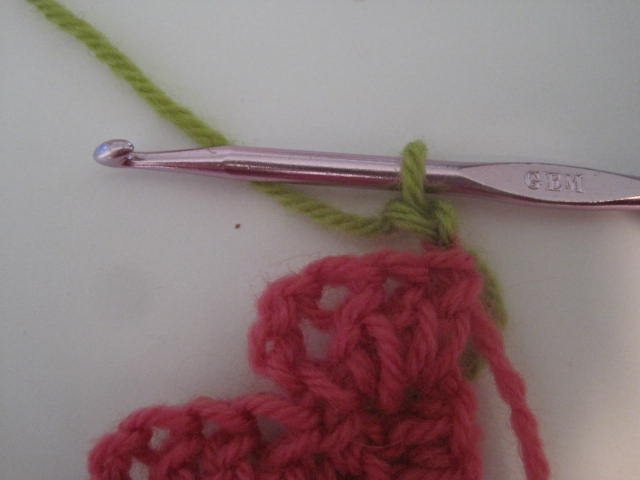
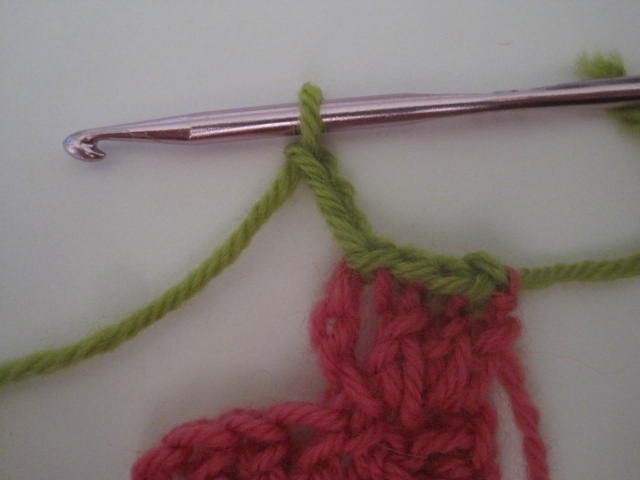
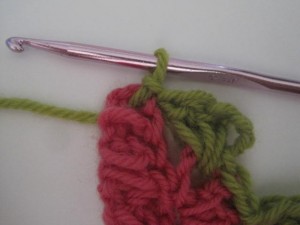
Decreasing Row (photographed in a different color, just for fun):
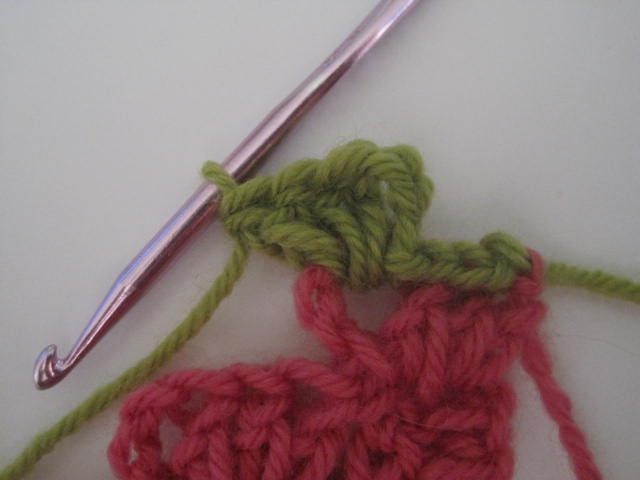
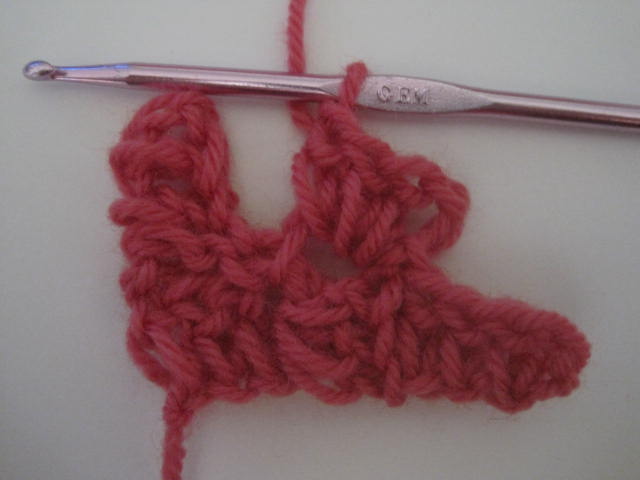
To make a square continuing decreasing row until you are finished with the last corner block.
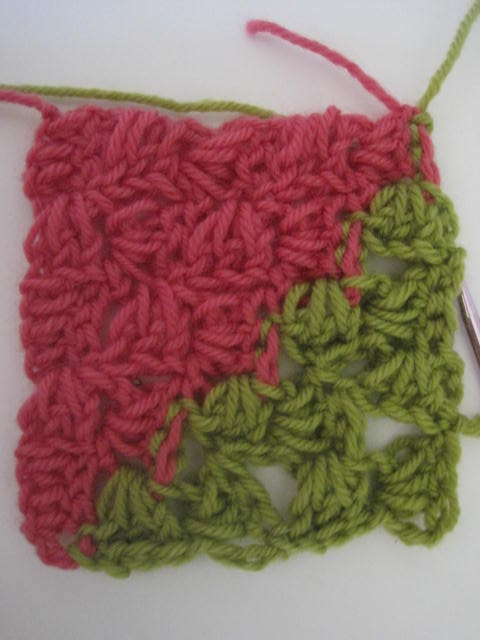
Finish off weave in all the ends.
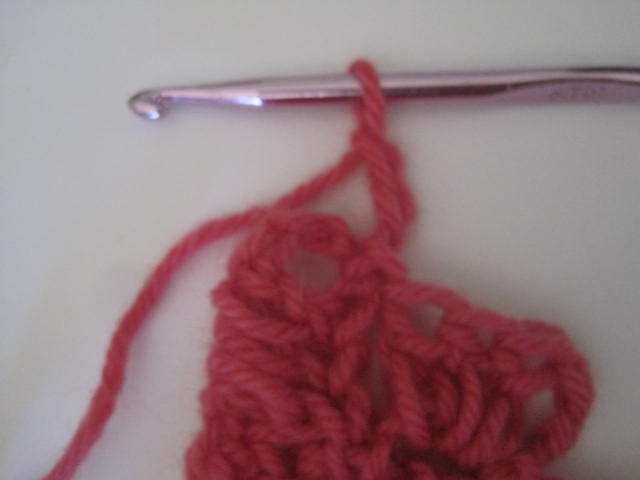
To make a rectangle alternate the increasing Row 3 with a row of decreases.
Have any questions about the diagonal box stitch? Have any comments? Please don’t hesitate to be heard in the comments below!

It is a strange coincidence that I was just thinking this morning to search for something on the internet to remind me about how to make that beautiful stitch.It was a most pleasant surprise to find your wonderful tutorial as soon as I opened “Crochet spot”as I do every day.It seems as if you knew what I was wishing for.Thank you.
This would be a start of a GREAT baby blanket! You could even use Granny Squares with it too! 🙂 How awesome would that be! Thank Erin! Now…if I didn’t already have so many projects….. 🙂
Smooth Fox also has this tutorial, funnily enough I made a square like this last night. They look so cool and depending on where you change colours it can end up making some very cool. Thanks for sharing!
Many of the women at Three Rivers Crochet in Pittsburgh use the diagonal stitch to make baby blankets for Project Linus and other charity projects (as well as gifts for family and friends). (If you’re ever in Pittsburgh on a Saturday afternoon, you might want to stop by. Search for our website for details!)
Hi Peggy Im up north of you in the Kittanning area I am interested in your project please email me the information I need. Two of my grand kids have a project Linus blankie One from MaGees and one from West Penn they are treasured items in my grand kids rooms
Shelley – and anyone else in the Pittsburgh area: I need to check my messages on Crochet Spot more often! I do make blankets for Project Linus and actually buy used ones in condition to donate to the Pittsburgh chapter. I do go to Three Rivers Crochet meetings most Saturdays, especially now that the winter weather is more-or-less past us. Pittsburgh’s Project Linus has a website with more information, but feel free to contact me through my Facebook site. TRC meets Saturdays 2-5pm in Oakland, not far from Pitt, on the Blvd of the Allies at Panera Bread. Knitters as well as crocheters are welcome! FYI – I like the C2C photos too, as I’ve found C2C challenging.
I have been searching for this stitch pattern, so was thrilled to find it. I had made a set of placemats and then an afghan for my brother from a pattern, but lost the paper. I like this one because I have never had good results from a foundation chain. With this I can decide as I go how wide and log my piece will be. I also made an afghan / bedspread by using four strands of worsted and a P hook that was heavier than a quilt.
Kudos to Crochet Spot !!!
It’s so pretty, but I find it very confusing.
My wife and I have been doing this for ages but never new what it was called (or new it by a different name). The lady that taught us didn’t know what it was called.
This is really a way to do the the stitch pattern. Also, being left handed helps to see correctly what I am doing. Would be nice if all sites were so left hand oriented.
Thank You.
I thought I knew lots of stitches but never did the diag. box stitch before.
what a great place to learn new things!
I have seen this stitch done with a variation that produces an edge with a step design creating a border at the time you crochet the center. As you work the stitch you are increasing the size of the item, and then you decrease to return to an ending corner. Are you familiar with it and the how to of the variation? I can not find it and I have been looking for over a year. All the examples I can find result in straight edges for the borders, like yours has. One lady told me it was Irish Crochet, but it is not like any Irish Crochet I have seen. Can you help me? Thank you.
Hi Elizabeth, I’m not familiar with the border. But if I do come across it I’ll let you know. Maybe someone else will chime in if they’ve seen it 🙂
My mother in law taught me this stitch last year, once you get it down it goes really quick. I made a baby blanket for my friend in no time, it looks great… =)
July 9.2011
Dear Pam, Does the stitch your mother-in-law taught you make steps on the outer
edges of the item? That is what eliminates the need to put on a decorative edge or border. The Diagonal Box Stitch I find only makes straight edges, needing a decorative edge or border. Can you send me any instructions for yours? I will provide my postal address if needed. Thank you.
If you make 4 triangles and join their straight edges, it will leave the steps all around the outside of the square.
Grandi,
Thank you for your suggestion about the triangles. The step border I am looking for instructions for is created on each row. When increasing the width of the item, a new block is added right and left for each row end. When decreasing the width, one block is decreased right and left on each row end. I feel that I am just missing a step. I will keep trying to figure and practice it out. Somewhere someone may know.
Diagonal square pattern, Decreasing row, you instructions show (sl st in next 3 dc and sl st in next ch 3 space, ch 3, 3 dc in NEXT ch-3 space.
should the word NEXT be SAME ch-3 space, repeat row across…..
This is my first time making this pattern.
Thanks
Lorraine
Started the decreasing rows. After the first decreasing row there is no chain 3 space at ends if I’m reading pattern right. Mine seems to be looking a little curved at ends. Will this straighten out when I put finishing edge on?
Love that you have the lefthanded views
THANK YOU I’ve done this stitch for years but can never remember how to start. I’ve stopped at the “halfway” and made shawls.
I was given a baby afghan before my oldest son was born made in this stitch. My grandmother stared at it for hours trying to figure out how they made it. It was so durable. It lasted through 3 sons and two grandsons. I plan on making one for the newest baby in our family. Thanks for posting this pattern on your site.
I rec’d baby blankets from my mother in law for both my son and daughter with this stitch. I asked het what it was and she told me “irish stitch”. Been searching for ditections on how to do so when I found this I was very happy! Thankyou. Now I can make a baby blanket for a friend who is expecting!
Once I got the width I wanted, I started the decrease stitch at one end & the increase at the other. Can I make the blanket longer than it is wide? How do I do that?
And I soooo needed this right now. Thanks for an excellent as always tutorial!
This is the first pattern for this I could follow. I’ve tried several on you tube to no aval thank you
I’m trying to do the box design rectangular blanket and when I alternate a decrease row with and increase row as per the instructions the end on one side is just not right. Also when do I start the alternating rows? After I’ve decided how wide I want the blanket to be or after the initial row 3. I’ve made this blanket before and just kept it square and it turns out really beautiful. Please help.
Increase both sides until you get the width you want, then decrese one side and increse the other until ou get the length you want. Then continue like you did on the square one that you made. Hope this helps.
Thank you for a great tutorial and pictures. I was asking about this stitch at our Project Linus Conference this weekend and found your web site. I will be passing it on to our volunteers. Thanks again!
Beautiful new stitch – I love it.
Thank you so much for the clear directions and accompanying pictures. I am starting a new baby blanket and was wanting a new stitch. Keep up the good work.
finally – instructions for the left-handed.
i have share your instruction in this group as lot of lefties a great link thankyou
Hi, was wondering what border would you use . Also, if your were doing mini squares , how would you join. Thanks for a brilliant tutorial and your help .
Hi Anne! You can use any border that you like, or even no border at all. It’s completely up to you! There are many ways that people join squares. Here’s a tutorial for a basic method (also my favorite method): How to Whip Stitch in Crochet
Thank you for your reply and your amazing tutorial. Finally understood whip stitch. Was thinking around my mini squares could I do a granny round. Then either see them, or maybe do join as you go. What do you think, would it work.
Anne x.
Sure, you can do either!
I found a “Scrap Yarn Corner-to-Corner” throw in an Antique Mall in Sandwich, on Cape Cod. The artist, I HAVE to call her that, is really a pro with her color choices and placement. She combined a soft #3 yarn in a contrasting color with other soft #3 yarns (crocheting as one strand) and changed colors every row. She then used a #5 Mohair on the center corner-to-corner row. (as if using scrap yarn throughout) A strikingly beautiful 5′ throw. I am going to block it, mat it and hang it! It’s a true piece of art. I was able to find a Michael’s crocheting instructor who new the pattern and directed me to CrochetSpot….FANTASTIC.!! Now, I have to try it, I only hope it comes out half as good as my found original! Thanks CrochetSpot for the instructions and tutorials.
I am confused. When I get to the width, how do you obtain the rectangle? I do not want to do a square. I have watched so many videos on You Tube, and it is not clear on the rectangle. Can you help?
Thank you so much for publishing this pattern. I learned this pattern from my senior neighbor and we called it “Untrainable”. She is the one who taught me to crochet and recently lost her battle with cancer. Now I can tell people where to go to find out how to keep her most worked pattern alive.
Hi 🙂
I have made this pattern many times. I have made about 6 of them. They make very warm blankets. I have made both baby blankets and full size blankets with this pattern. I like making them with variegated yarn that way you don’t have to weave in as many ends.
Great instructions for a “square” C2C. Rectangle will be the next one I re-search.
Thank you so much for putting this tutorial together. Your site was my third attempt. The last two were videos and I just couldnt figure it out.
I can’t find a place to print this pattern out.Can you do that or send me an email of the pattern that i can print out. Thanks
Hi Doris!
You can use the print function in your internet browser. Each page is coded to be printer friendly. Depending on your internet browser, you should be able to go to “File”, then “Print”.
Can anyone tell me why mine is shaped like a diamond? I can’t figure it out.
The pictures are SO much help! Someone taught me this stitch awhile back, but when I wanted to use it again the other day, I couldn’t remember how to get started. Your instructions are just perfect, thanks so much!
I am SO glad to have found these instructions – thank you. I have a potholder crocheted by my grandmother (she died in 1952) and have wondered all these years how she made it. I didn’t want to unravel it. Again, my thanks!
When doing stripes how do you get both sides identical? I always mess it up. Thanks
Thanks for the easy instruction, going well so far, ive done 27 blocks so far, for the width,do I count the diagonal or across the straight edge? Thanks for your help
Thanks so much, newbie.
How many blocks do u normally end up with on the last row before decreasing for a baby blanket
Hi Tasha! It would probably be better to measure the diagonal or the sides instead of counting the blocks, because the number of blocks can vary depending on your hook size and yarn. A lot of baby blankets are around 36″ wide. If you measure the diagonal it will be around 50″.
Ok thank you Rachel for the help!!!
Thanks for this pattern this is my first c2c. I am up to the decrease now and did the chain one sl in each dc sl st in ch 3 then I did ch 3 and 3 dc in next st and continued this pattern all the way across. When I get to the end do I do a ch 3 and then sl st straight into the last ch 3 or do I ch 3 3dc and sl st in last one (the last one is the 3 ch from the first block of previous row. If it is the first option then what do I do with me next row of decrease as there if no dc to sl st into? Thanks again I hope this has made some sense.
Hi Renee! You will end with the 3 dc in next ch-3 space, then sl st in last ch-3 space. The repeat ends with the 3 dc into the ch-3 space (the space before the very last one). Then you are only working the slip stitch into the very last ch-3 space.
Take a look at the second photo underneath where it says “3 dc in next ch-3 space) across, ending with a sl st in last ch-3 space”, that is what it should look like at the end of the row.
I tried two other tutorials on C2C and couldn’t understand them. Yours was so easy to follow and I am so excited to learn this new technique. Thank you!
I am crocheting for the first time a Tunisian-Entrelac c2c baby blanket. I want to decrease, but I am stuck. Been crocheting for over 60 years, but this is my first try at a Tunisian c2c. Can you help me?
Thanks a mil…
I needed a new stitch in my life. Thank you for the the step by step photo tutorial.