
How to Crochet: Knot Stitch
By Rachel Choi – 59 CommentsThis tutorial is for both right and left handed people. For left handed pictures, roll your mouse over the image and it will change for you.
The knot stitch has many different names: Love Knot, Lovers’ Knot, True Lovers’ Knot, Solomon’s Knot or Hail Stone. The knot stitch is composed of a long loop with at knot at the end. When you make several knot stitches in a pattern, it give a very light, elegant and lacey look.
Step 1: Start with a slip knot on your hook.
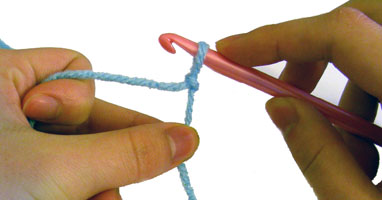
Step 2: Pull loop that is on your hook to the desired length. Try ½ to 1 inch.
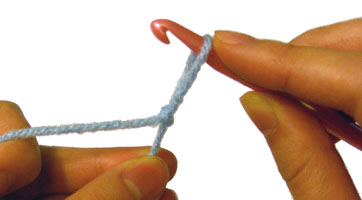
Step 3: Yarn over and pull through. This creates an elongated chain stitch.
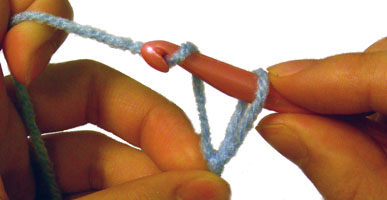
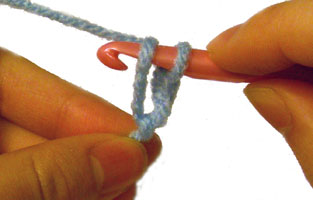
Step 4: Single crochet in the back ridge of the chain. In the image for right handed crocheters the ridge is located on the far left and vice versa in the left handed picture.
This image shows the hook inserted into the back ridge.
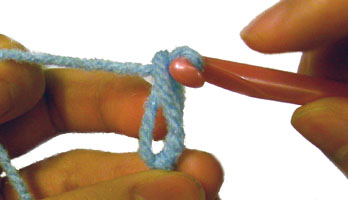
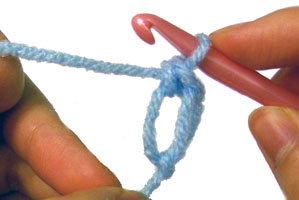
This image shows the complete knot stitch after the single crochet.
Repeat step 2 to 4 to make a chain of knot stitches.
To make rows of knot stitches, you can slip stitch or single crochet in the knots of previous knot stitches.
If you need help with how to crochet the knot stitch, leave your question as a comment and I would be glad to help!

[…] The loop on the knot stitch is approximately 3/4″ long. How to crochet knot stitch? […]
Hey Rachel,
I’ve have read instructions for this knot many times before and it may as well have been written in a different language, but I got this straight away! And the pictures are a great help. Thank you 😀
Sarah
Hi Sarah!
I’m so glad it was easy for you to understand! My mission is accomplished, woohoo! Thanks so much for letting me know 🙂
Hey Rachel! I love your work! My daughter has me making the piano scarf for her right now. Thank you so much for sharing your beautiful things with us!
Dnna
Hey Donna!
That’s awesome! Let me know if you need any help with the piano scarf. I hope your daughter loves it.
I have to agree with others who wrote you about the knot stitch. It looks so easy to understand and I am going to try it next. I have always wanted to make things with that stitch but couldn’t figure it out to save my life. Now I feel I can, thanks to you. I have heard of a double knot stitch but can’t figure that one out either. Can you help me with that?
I know you said you don’t do row counts because you don’t like them, but for the really new person learning to crochet, it is the easiest way for them to be sure they have the pattern right. I have been crocheting just about all my life, at least 50 yrs. and I am so happy when there are row counts. Maybe you might do some patterns with row counts for those that are really learning, especially difficult patterns. Thank you anyway.
Hi Rose!
I will look into the double knot stitch and see if I can write up a tutorial for that! Let me know how this tutorial works out for you when you get around to try it.
You’re so right about the row counts. I’m in the process of breaking my bad habit of leaving them out. Thanks so much for the tip!
Rachel
When You Said To Make Chain of This do You Make The Lext Stitch In The Loop Or Ch.
thank’s,Dottie In Va
HI Dottie!
There should be one loop on your hook from the knot you just made. So to make more knots repeat steps 2 – 4. So you would pull the loop that is already on your hook to the desired length, then continue the same way you made the first knot.
Let me know if you need more help 🙂
Hi – I need help with a pattern that says it’s a knot stitch but it doesn’t look like what you have –
it seems simple but it doesn’t look like the picture in the patter
KNOT ST: Pull up a 1/4″ long lp on hook, ch1, sc in back ridge of ch just made
not sure what they mean by back ridge of chain just made – if I pull up a loop then chain 1 there’s no back ridge – is there something I’m missing
would appreciate any help or suggestion you can make….
here’s the row I’m having trouble with
Ch 1, sc in same st as joining; *(work 2 knot sts, sc in next sc) 4 times **, (work 2 knot sts, skip next 2 sc, sc in next sc) across to 2nd sc of next corner 5-sc group; rep from * 2 times more, then rep from * to ** once, (work 2 knot sts, skip next 2 sc, sc in next sc) across to last 2 sc, work knot st, skip last 2 sc, tr in beg sc to form last sp.
Thx, Angela
Hey Angela!
If the knot stitches don’t look like mine it may be because they are a different size. That’s one of the beauties of knot stitches. For example, my knot stitch caplet looks different than my knot stitch shawl because one uses bigger stitches than the other.
As for the back ridge…
normally when you work into your chain you insert your hook into the top loop of the chain. The back ridge is the loop that is sort of behind it. It almost looks like a hump.
I hope that helps!
What question did you have with the row you copied?
[…] lacey and light look. If you don’t know how to crochet knot stitches yet, you can use the knot stitch tutorial. This shawl can be crocheted by beginners if you are just learning to do knot […]
Hi Rachel. Love your tutorials and really love the way I can change from left to right handed. I am right-handed and teach a crochet class of seniors. I have a few left handers and this will be great for me to learn both ways so I can teach them.
Thanks a million!
On the double knot….easy peasy! After you pull up your loop through and get it to the length you want it, yarn over and pull it through. This is the new part. Yarn over before you go into that back loop and then do the same yarn over when you go through the back loop. When you pull it through you will have 3 loops on your hook. Yarn over and pull it through 2 and yarn over and pull it through the last 2 and you are done with the double knot stitch.
Hope that helps,
TruFaithe
Sorry for the extra “through” up there in the second line. Just ignore it :o) It’s really late here, or maybe early by now YIKES 1:23 a.m. Good luck with the stitches.
TruFaithe
Awesome! Thanks for sharing Tru 🙂
Yvw. I hope those instructions made sense. I just reread them and oh boy!
I do have a question tho. At the end of the row after I turn mt work, the pattern says to make a sc in the sc between knots sts. Where exactly am I supposed to be putting this sc? Through both loops or just the front loop?
Little confused here, 🙂
Tru
Hey Tru,
The sc would go through both loops of the sc between the knot as if you were making an ordinary sc in a sc.
I don’t understand what you mean by the back loop. Do you mean the little loop on the back of the chain or the back loop like when you work in the round?
Looking at the last picture on step 3, the back loop is referring to the loop on the far left side of the picture (for right handed). On step 4, the picture shows the hook inserted into the back loop. It is the little loops on the back of the chain as you described and it is created when you yarn over.
Thank you a lot!!
When crocheting, the knot will pull out if it is done correctly? True or False?
Hi Jen, yes that is true, it should be able to come undone just like any other crochet stitch.
I’m trying to make your capelet, and mine isn’t anywhere near as cute as yours. When I’m doing the knot stitch around, do I slip stitch in the chain part, or in the single crochet part? I tried to read all your comments, but I didn’t see this one. Thank you!
Hi Laura, you sl st in the single crochet part.
Hi Rachel,
I am from argentina and just found your site!!! I need some help here!!! Would you be so kind to tell me how to start?? That was not very clear for me. I love to make triangle shawls, but this stitch…seems not to come out right. Thanks for sharing and thank you for helping!!!
Hi Beatriz, start with a slip knot on your hook (step 1). Then follow the directions and pictures for the other steps. Let me know what step you get stuck on.
Hi, Rachel,
I am from Argentina and I have just found your site. I love to crochet shawls, but I always make them as a triangle. I would like to know if you could help me here…I like the Lover’s Knot, but I don’t know how to start from the very low angle. thanks for sharing and thank you for helping.
BeatrÃz
Thanks 4 ur help. Im stuck on round 4 n 5.
I followed the tutorial n my work looks pulled and bunched. Should it look this way?
I began round 5 and it continued to look pulled and end up looking bunched together. What am I doing wrong? please help:(
Amalia, your work on the capelet should look loose. Make sure you are making 2 knot stitches between the slip stitches and are counting your stitches correctly.
Thank you – I struggled with this on a doilie and almost threw it out the window. Your instructions made it absolutely clear – Thank you Thank you Thank you.
Hi I love this site.. I am very good at crocheting,,but this is the first time
i could comprehend the love knot,,drove me nuts.I am not exactly umm
really sure what stitch I created,,but it was not a love knot,,more
like a rats nest.. thank you so much. No matter how good we are ,
we can always learn more,, take care and thanxs so much
Yvonne
great tutorial! i made garland from a long chain of this knot for my christmas tree (yarn bee gilt eyelash yarn). thanks!
A friend ask me to make a duplicate of a round dishcloth. It really had me stumped till I figured out that it is a knot stitch. I can not figure out how to do it in the round. Can you please help me?
Thanks
Hi Lois, try making a circle in the same matter you would with other stitches. For instance, you can make 2 knot stitches to make an increase and you can stagger the increases around the circle so that it’s even. It’ll probably take a little experimenting to get it right. Have fun playing around with it!
confused again it says make a slip stitch in chain 2 no problem then it says make 2 knots where. ?
this is my first time doing a lovers knot… i wish there was a video..lol
I am working on the Knot Stitch Capelet on round 4: (make 2 knots, skip 2 dc, sl st in the next dc) around am I to make the 2 knots in the first dc? Thanks for the help this is such a pretty capelet I would really like to see it finished but I have not ever crocheted knots before.
Hi Shirley, the knot’s aren’t made into the dc. The knot stitches are similar to chain stitches in that they are made one after another and not into a stitch on the previous row. Please see the knot stitch tutorial linked in the pattern on how to make the knot stitches. Let me know if you need more help.
[…] for you. Another way great way to create loose textures is to use some crochet stitches such as the Knot Stitch, also known as Solomon’s Knot Stitch or the Love Knot […]
How do you decrease a lover’s knot? I’ve been searching around the Internet and I can’t find any info on how to decrease. I can make an assumption, but it seems a bit silly.
My assumption is to do only one knot at the start, then continue like normal to the end of the row and finish with only one knot again. Is that right?
Hi Brittany, yes that’s right! That’s how I decrease in one of the patterns I made that uses the knot stitch.
How would you increase a lovers knot? I haven’t been able to figure that one out.
I’ve used 3 knots at the begging or the end of the row. But it can depend on what shape you’re making.
im working on a pattern that calls for knot st and i dont quite understand what to do
Hi LuAnn, this tutorial will show you how to do the stitch. If you’re working in the middle of a pattern and already have a loop on your hook, you can start with step 2 to begin the stitch. Let me know which step you get stuck on and I can help you further.
Hi Rachel,
I have been purchasing your patterns for a while now, and I love how clearly they are written. I recently purchased (elsewhere) a vintage pattern for a head scarf that uses the knot stitch. I despaired a little because I have never encountered this stitch. I did a search on the internet and YOUR tutorial is the first one in the search results! I knew I hit gold! I should have just gone straight to your site to begin with!. Thanks so very much!
Hi Rachel
Is there a trick to ensuring all your loops are the same size – the knot stitch seems a bit tedious trying to get them all the same size.
Thanks
Sally
Hi Sally, I used to hold my loops up to a ruler when I was first making them. But after a few repeats you can just eyeball it. It doesn’t have to be perfectly the same length each time, close enough is good 🙂
I HAVE to try this! When I’ve looked at shawls and blankets with this stitch it looked so complicated! But the way you made this tutorial, providing pictures and slowing it down a bit, I understand it! I think I may be able to do it without bringing the yarn and hook in the den where I am!
Knot stitch shawl… I have been making this shawl for more than 30 years, however, it’s been at least four years since I have made one and now I am ready to make AND keep one for myself. Even after all these years, I don’t have one…it’s time. My problem is I can’t remember the chain stitch repeat for this pattern. For example: 200 chain stitches, plus three extra stitches; or 298 stitches, plus two extra for the pattern. I just can’t remember the repeat on the base chain and I know there is one. I never liked to start out with a knot stitch as my beginning row, not enough structure for the rest of the shawl, at least not for me. If you could help, I would be so very grateful. I wanted to start my shawl, a few days ago, while I have time… Thank you for any suggestions, sean.
Thanks for the great instructions, Rachel.
I can make 1 row of love knots but can’t figure out how to turn & work in the center knots. Need to know how to crochet the next row & connect the loops together. Thanks!
Hi Tonya! We you’re ready to make the next row, you’ll make your knot stitches by inserting your hook into the single crochet portion of a knot stitch on the previous row, yarn over, pull up a loop, then continue making the knot stitch as usual by elongating the loop on your hook, and single crocheting into the back ridge.
how do you increase Solomons knot, lovers knot. Am having a lot of trouble finding out how to do it.
Hello!
It can depend on the pattern you are working on and where you want to put the increase. You can make more than one stitch into a stitch, or if you are alternating rows with another stitch then it may be easier to increase using that stitch instead.
I am trying to crochet in the round using the knot stich. How do I begin the second row? Thanks!
Hi Marilee!
You can start the second row with a knot stitch, which can act like a beginning chain. Then continue on making your knot stitches. How you start may also vary depending on how you worked the first round.
thanks so much for the info on the Elongated Ch 1, I’ve been looking for tutorial on it for a week now, never heard of such a stitch. is there a video tutorial for it??