
How to Crochet Over Single Crochets in a Circle
By Caissa "Cami" McClinton – 5 CommentsFor this week’s tutorial, I’d like to riff on my last tutorial, How to Crochet Over Single Crochets in Rows by taking the same idea and working it in a circle. For the purpose of practicing this skill, we’ll make a small swatch in this tutorial. Yarn and hook size don’t matter for this practice swatch.
You may mouse over images for left-handed views.
Round 1: Beginning with a magic ring, ch 1, 6 sc into ring, tighten loop, sl st in first sc: 6 sc
Round 2: ch 1, 2 sc in each sc around, sl st in first sc: 12 sc
Round 3: ch 1, working over the stitches of the last round, work 3 sc into each space below around: 18 sc
The photo below shows this in progress. The “i” symbol indicates round one, “ii” indicates round 2, and “iii” indicates round 3. The arrow is pointing to the space where the next stitches will be worked.
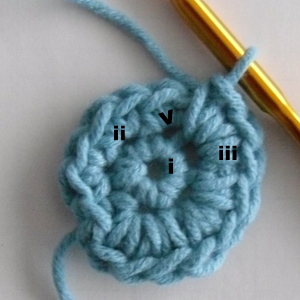
Note: In round 3, you are always working 3 sc over each set of 2 sc.
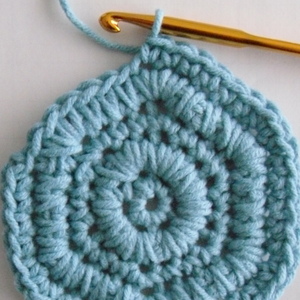
Round 4: ch 1, (sc in next 2 sc, 2 sc in next sc) around, sl st in first sc: 24 sc
Round 5: ch 1, (sc in next 3 sc, 2 sc in next sc) around, sl st in first sc: 30 sc
Round 6: ch 1, working over the stitches of the last round, (sc over next 3 sc, 3 sc over next sc) around, sl st in first sc: 36 sc
The photo below shows this in progress. The green arrow is pointing to the space where the 3 sc will be worked. The gold “i & ii” symbols mark 2 sc that were worked into the same stitch in round 5. The purple “i, ii, & iii” symbols mark 3 sc that were worked into the space below a 2 sc group.

Note: Because of the 3 sc, the circle may begin to look hexagonal at this point. The edges do soften a bit in the following rounds, but this is something to be aware of.
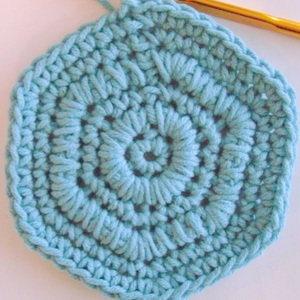
Round 7: ch 1, (sc in next 5 sc, 2 sc in next sc) around, sl st in first sc: 42 sc
The photo below shows this in progress.
Round 8: ch 1, (sc in next 6 sc, 2 sc in next sc) around, sl st in first sc: 48 sc
Round 9: ch 1, (sc in next 7 sc, 2 sc in next sc) around, sl st in first sc: 54 sc
The photo below shows this in progress.
I’m going to end the tutorial here, but the next step would be to continue in this manner, with the next round as a “crochet over” round. Please note that in the “crochet over” rounds, the increases will always take place by working 3 sc over 2 sc.
For more information about crocheting circles, check out the How to Crochet a Circle tutorial. If you need any help or have any questions, please leave a comment below.

Hi Rachel , This pattern was very useful for me . Thank youuuuuuuuu.
i’m making a doll leg have marked begining of row but every time I come to mark it seems to of moved a stitch; pattern says continue aroung without slip stitch. Is this the way it should be? Is the marked stitch considered the first st or last st of the row. Tried to on net to find info about marking beginning of row. I use a different color yarn for marking. Was hoping to find info with pictures any idea where I might look to help me learn this. Dolls leg just doesn’t look righy to me seems twirly
I think what you are describing is crocheting in a spiral. It would look swirly if you did it that way, depending on the yarn.
do i mark the beginbning of the spiral, i have been but it keeps moving to a differant spot is the leg suppose to be spiral?
I would mark the beginning and just keep moving it up, even though it moves over. See how it goes.