
How to Double Crochet an Oval
By Caissa "Cami" McClinton – 35 CommentsAn oval is a basic shape that can be crocheted for many purposes, such as to create a placemat, bag, or dishcloth. But how do you crochet a basic oval? Ovals come in different shapes. The oval we are crocheting today is nothing more than a half circle + a rectangle (of any length) + a half circle.

Therefore, we’ll use elements of each shape in our tutorial. The increases are similar to that of circles, and the rectangle part is just like crocheting in even rows. We’ll be working with a foundation chain of 9, but you can increase the length of the foundation chain if you’d like a longer oval. Additionally, we’ll be working in 3 rounds of double crochet, but you could increase the number or rounds to make your oval bigger.
This shape can be useful in designing many different crocheted objects. For the purpose of practicing this skill, we’ll make an oval swatch in this tutorial. I am going to use my swatch for a napkin I can keep with me! Yarn and hook size don’t matter for this practice swatch.
You may mouse over images for left-handed views.
Abbreviations:
ch – chain
dc – double crochet
sl st – slip stitch
Foundation: ch 9.
Round 1: 2 dc into the 4th ch from hook (turning chain counts as 1 dc)
The photo below shows this done. The white arrow is pointing to the turning chain. The back arrow is pointing to the next ch.
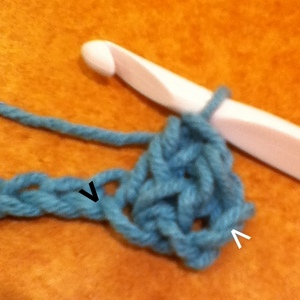
dc into next 4 dc.
The photo below shows this done. The arrow is pointing to the final ch.
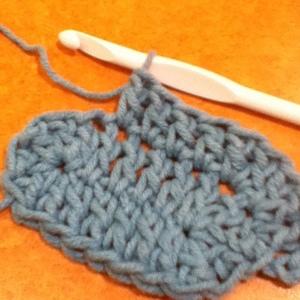
6 dc into final ch.
The photo below shows this in progress. The white arrow is pointing to the final ch. There is one dc remaining to be worked in this chain.
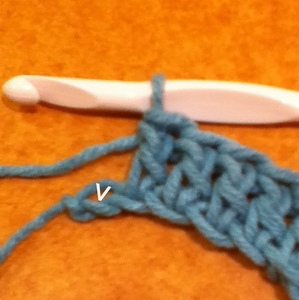
Working into the other side of the ch, dc into next 4 dc, 3 dc into last ch.
The photo below shows this in progress.
Join with sl st to the top of the beginning ch-3: 20 sc
Round 2: ch 3 (counts as 1 dc now and throughout), do not turn, dc into same stitch as slip stitch, 2 dc in each of next 2 dc
The photo below shows this done.

(Note: Increases are like crocheting a circle.)
dc in next 4 dc.
The photo below shows this done.
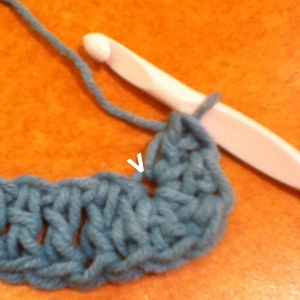
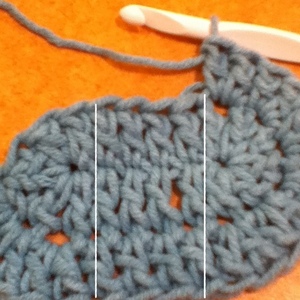
2 dc in each of the next 6 dc.
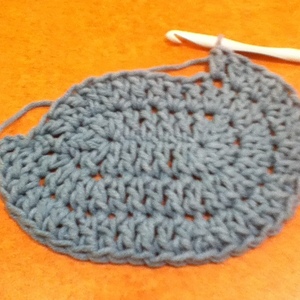
The photo below shows this done. The white lines show the half circle – rectangle – half circle divisions.
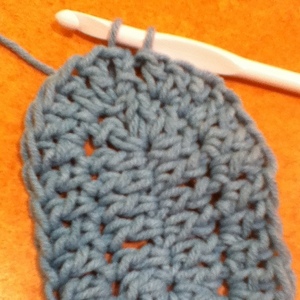
dc in next 4 dc, 2 dc into each of the next 3 dc. join with sl st to the top of the beginning ch-3: 32 dc
The photo below shows this almost done.
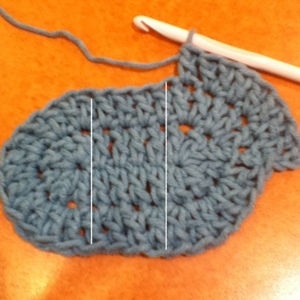
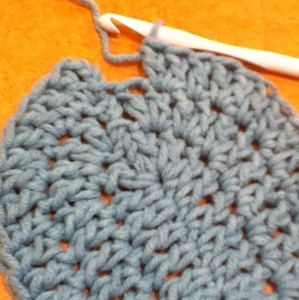
Round 3: ch 3, dc into same stitch as sl st, dc into next dc, (2 dc into next dc, dc into next dc) 2 times.
The photo below shows this done. The white lines show the half circle – rectangle – circle divisions.
dc into next 4 dc, (2 dc into next dc, dc into next dc) 6 times.
The photo below shows this done.
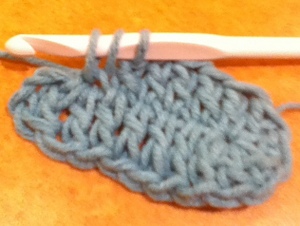
dc into next 4 dc, (2 dc into next dc, dc into next dc) 3 times, join with sl st to the top of the beginning ch-3: 44 dc
The photo below shows this in progress. Just two more stitches to go!
Finishing: Finish off. Weave in ends.
If you have any questions, or need any help, please leave a comment below!

Thank you so much for the instructions on how to make an oval. I have an oval table and have wanted to make oval placemats but was too scared (or lazy) to try and formulate a pattern.
You made it very clea and sensible, even for me.
Thank you again. pat
Thanks, Cami, for the tutorial! I already knew how to crochet an oval, but couldn’t figure out how to explain it to my students in my crochet class!! I love the explanation that it is basically 2 half circles and a rectangle!! That makes it so much easier to understand!
finally a pattern/”how to” in i could understand. Thanks from Europe! 🙂
this was just perfect for me to understand. I also like the idea of dividing it into two half circles and one rectangle. It helped me count each round since I could think of in in smaller units.
I just love your blog! I only learned to crochet last year and I have gotten so much help here on new techniques like changing colors and now this oval.
all the best from Israel
Michal
How do you make this pattern larger?
Thanks
Hi Jean! You can start with an even longer foundation chain and add more rounds if you’d like.
I don’t know the formula for increasing the circle part on additional rounds. What I’ve tried just asn’t worked.
Thanks
Hi again! The increases are the same as a circle: http://www.crochetspot.com/how-to-crochet-a-circle/
So you would work the circle pattern around the semi-circle part until you reach the rectangle part.
Hi. I am a beginner and can do the oval..but how would you continue on to do the sides of a basket? Decrease just at the ends of the oval?
Hi Gerry! If you are making an oval base for your basket, and you just want to add sides, you can crochet around the oval without increasing or decreasing. That will create height and give you sides.
I have been looking everywhere for something a bit more of an eclipse shape. I’m trying to make his and hers portal blankets. (It’s nerdy) do you have any advice for making a less rounded oval?
Thank you so much for sharing your pattern. I have been searching online for the perfect oval pattern, and I came across yours. Love it!! Thank you so much!!
Hi love the pattern “Thank You” but I am not seeing the increase like a circle to me there is no ryme or reason can you help?
Hi again well, after looking around at different web sites and prayer I finally understand and see how it comes together. Great tutorial Thank you again 🙂
Well I thought I understood but I just don’t. If I wanted to make a place mat well I just don’t know. Do I increase next row with one dc in next two then two dc in same st six on each corner of the circle ? If I could understand the concept maybe I might get it need help please.
did you make a mistake in round one you said inc by 3 but that doesn’t work out for me to make it 20 in the row I did 4 and it added up to 20 then also how would you inc in next round to make 56 stitches as you are inc by 12 44 and 56 makes i2 thank you mary
I want to crochet a half circle. It is for the bottom (the black part) of an eye on a character hat that I am crocheting. (As if it is looking down) hopefully you understand what I am talking about. Thank you!
Hi,Finally an easy oval pattern to understand! But I need a fourth row and just can’t figure out where to put the increases. Could you please let me know the stitches for a 4th row. I know I could just go around it but I don’t want to do that, looks tacky lol. Thanks so much!!
For a circle:
2 dc into each dc from foundation round
2 dc into 1st dc, dc into next dc, repeat (2 dc, dc, 2 dc, dc, …)
2 dc into 1st dc, dc into next 2 dc,repeat (2 dc, dc, dc, 2 dc, dc, dc, …)
2 dc into 1st dc, dc into next 3 dc, repeat (2 dc, dc, dc, dc, 2 dc, dc, dc, dc, …)
2 dc into 1st dc, dc into next 4 dc, repeat (2 dc, dc, dc, dc, dc, 2 dc, dc, dc, dc, dc, …)
2 dc into 1st dc, dc into next 5 dc, repeat (2 dc, dc, dc, dc, dc, dc, 2 dc, dc, dc, dc, dc, dc)
So for a fourth round, you would work two dc between working 2dc into a single dc on the rounded ends and continue to work one dc into each dc for the straight/rectangular section
(ch 3, dc into same stitch as sl st, dc into next 2 dc, (2 dc into next dc, dc into next 2 dc) 2 times, dc into next 4 dc, (2 dc into next dc, dc into next 2 dc) 6 times, dc into next 4 dc, (2 dc into next dc, dc into next 2 dc) 3 times, join with sl st to the top of the beginning ch-3: 56 dc
Hi I love this pattern but I am making something that’s larger, can you tell me how to increase for more rows.
Thanks
Laura
Brilliant! Thanks! Just what I needed to make a long oval pond for three little duckies that I crocheted. 🙂
THANK YOU for this way to make an oval. I have been trying and was about to give up. My so called ovals were either wavy or bowl like. ICK. I’m making afghans for my local Children’s Hospital as a way of thanking them for saving my Granddaughter’s life when she was a baby. She is now 12 and will get out her ‘blankie’ when she is ill. Angie can hardly wait to come over and stay with me for a few days so I can teach her to crochet so she can make afghans for the Kids.
THANK YOU again.
If I want to continue making the oval bigger what part or parts of the pattern do I follow? My test try came out great! I want to Maker larger to line the bottom of an oval basket? Thankyou so much!!!!!
Hi, Im trying to make a blanket out of this shape and I was wondering what steps do I have to keep following to make it into a pattern thanks
In order to make the oval longer, you increase the beginning foundation chain. In order to make it with more rounds, you need to form your increases on the “circle” section like a circle. It is as though your circle has been divided by a rectangle. Please note that this is an intermediate-level pattern. Rachel has a flat circle pattern which is linked to in the post above. Thanks and I am glad everyone is enjoying the pattern.
Finally a quick and easy oval pattern! Well written and the visuals help a lot! Thank you!!
Hi,
Fantastic tutorial! Really clear and I love the rectangle with 2 half circles concept. So easy to understand.
I was just wondering if I would follow the same circle pattern for longer stitches? eg. triple crochet or double triple crochets.
Does it follow the pattern of 6 stitches, 12 stitches, 18, 24, 30, etc?
Thanks =)
Hi. Love the pattern, it is very easy to visualize and read since you divide it into sections. One question though, probably a very novice question, this should work with a different stitch shouldn’t it? Maybe a hdc st? Thank you.
Wait, I think I figured it out, using hdc decrease ch st by 2?
Is it also possible to post the pattern without the photos? I would like to print the instructions but do not need the photo tutorial to follow the pattern. I always enjoy your patterns.
I wrote a post asking what to do about the increase stitchs moving to the right on each row till by row 6 the first incease has moved into the rectangle block, and the last increase has moved away from the rectangle by about 5 sts.
Hi Sylvia! You asked your initial question on this post: http://www.crochetspot.com/how-to-crochet-a-circle/
So I answered it there. If you scroll down to the bottom of the page you will see your question and my response. Let me know if you need more help with it.
Hi! Great pattern! I have successfully been able to make it to the 2 dc in same stitch then TWO inbetween, but my third row isn’t doing well. I seem to be off count for some reason, and it never matches up to the 4dc in the middle and I don’t have enough spaces at the end!
Any advice?
Hi, how would I do this in single crochet? I tried it with 6 scs in the rectangle part, but when I got to the last half of round 2 I didn’t have enough sts to sc in 6 and the incs. I want a longer chain really but I can’t even figure it out with ch9. I want to use sc because I am trying to make a stiff top hat…large fascinator size. Can you tell me how to do this? Thank you!
thank you for making this so easy!!!!!