How To Crochet: Single Crochet with Beads
By Robin Beers – 32 Comments| If you have ever wondered how to add beads to your crochet work, whether it is for jewelry or just to dress up a scarf, check out this tutorial. I will show you how to add beads with a single crochet stitch. Use this technique to create one of a kind jewelry with crochet thread. You can add beads to a lacy scarf for a feminine touch or even in fringe. Next week I will teach you how to do the double crochet stitch with beads. | 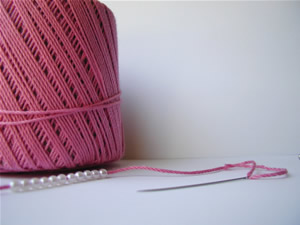 |
The materials you need are crochet thread or yarn, beads and a needle. One of the challenges is getting the correct size needle to make sure that you can thread your crochet thread and then be able to get it through the bead itself. I use the regular needles that are a bit larger so that the thread will make it through the eye. If you are using regular worsted weight yarn, you will need a tapestry needle and then make sure that your beads have a larger hole. Another trick is to use regular thread to string your beads and then work this thread along with your yarn. The possibilities are as endless as the amount of different kinds of beads there are. Visit your local craft store and you will be amazed at the variety!
Note: If you are left handed, just put your mouse over the photo for a left-handed view.
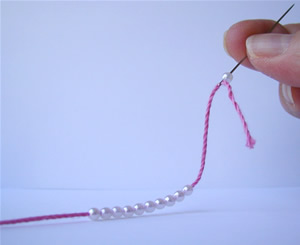
First string the beads onto your crochet thread or yarn. Remember to put enough beads on.
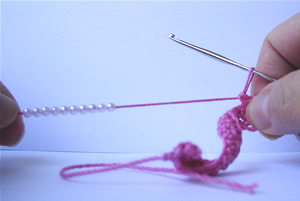
Then begin crocheting your work. I made 2 rows of single crochet here. As you go, you will just push the beads down out of your way.
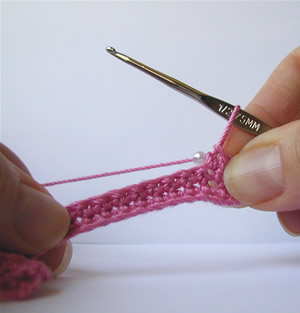
We will now add the beads on the wrong-side row. To add a bead, bring one bead close to the working area of your stitch.
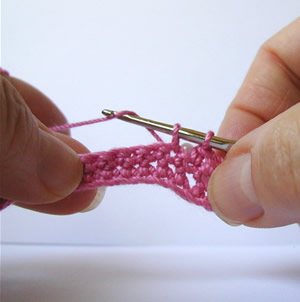
Make a single crochet with the crochet thread leaving the bead in place where it is.
Keep the stitch tight so that the bead sits snugly against the work when complete.
Â
 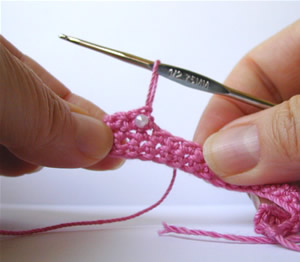
The single crochet stitch is complete. Now you will notice the bead is on the back of the work which is really on the right side !
Keep this in mind so that you will add your beads when you are on the wrong side.
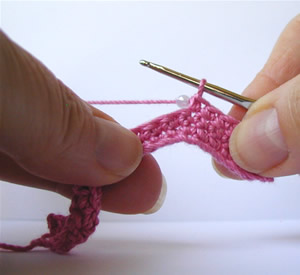
Next, make single crochets to make space between the beads. This will vary depending on your pattern.
Then bring the next bead close to the stitch and proceed to make a single crochet in the next stitch while holding the bead in place as before.
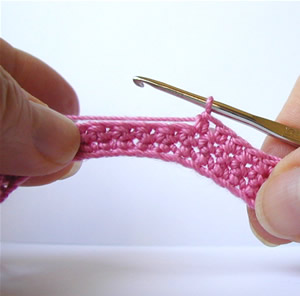
This photo shows the wrong side of the work after adding the bead.
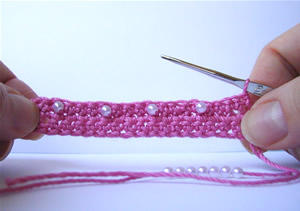
This is how you add beads to your single crochet work! It’s not as difficult as you thought!
If you have any questions, don’t hesitate to ask!


Yay! Finally…I’ve always wanted to learn how to do that. Thank you thank you thank you 🙂
I too have always wanted to learn how to do that! Thanks so much! I think it would make a great bracelet. 🙂
Robin, I can’t thank you enough for this simple tutorial. I took a (very expensive) crochet class a few years ago at a local university, and the instructor (who really was really good) couldn’t get me to do bead crochet AT ALL. And yet, after just a few tries, I CAN DO BEAD CROCHET! Thanks again, so very much. I’m really looking forward to the dc version.
Thank you so much for this, I have been looking around for tutorials and one pops up from you in my Google Reader, truly appreciated. I was trying to add beads to a doily. Didn’t work out as I thought it would. This should help me though
Hey, either Robin read my mind, or Rachel reeeeeally listens to her customers about what they’d like to see, or both. Beautifully executed, Robin. Complete and succinct, all in one. And what a lovely example you used. Thanks a bunch! Like Tina, I’m all eyes for the dc version.
Thanks! I made a bridal bag (an advanced pattern! Did NOT think I could do it, but I did!) that had beads all through it. I DID manage to make the bag, and it looked pretty good, but I NEVER really understood what I was doing! LOL! I haven’t made anything with beads since, and like others have looked for a SIMPLE explanation. YOU have provided it! Yay! Can’t wait for the DC one too!
WOW!! That is amazing!! Maybe I CAN learn to bead crochet!
I have to thank you bunches for this tutorial. Several years ago I designed and crocheted a purse for my daughter to carry down the aisle at her wedding. Because I didn’t know how to crochet the pearls into the purse, I individually sewed and knotted each one onto the purse when I was done crocheting it. She put that purse into one of those sealed memory boxes. Now, my granddaughter wants a purse for her wedding. This time I can crochet them right into the purse. Thank you so much!
**** BTW, could you do a tutorial on how to line a project with material? I had a terrible time judging how to measure the inside of the project (it was round and so didn’t have distinct edges) to get the lining to fit correctly.****
Love this tutorial, you have inspired me to try something new, looking forwa
rd to the dc too, and would also like to see tutorial on adding a liner to a bag.
I’m so glad that you are all enjoying this tutorial – and that it is helping you get into beading!
Ann and Tina – I will think about the liner tutorial and let you know. 🙂
[…] how to add beads to a double crochet stitch. For a quick refresher about how to add beads, click here. In this tutorial, I used larger beads made of wood. I found them at my local craft store. The […]
what I love about all the tutorials on this site is that you show what the work would look like while crocheting left handed and yes this does make a difference to me any ways because i always think that my work is wrong or I’m not doing it right so thanks you have helped me expand in my crocheting.
I remember my mother always had her beads on a spool of thread [very strong thread] the same colour she was working. She then loaded up the spool with beads and worked the thread with the crochet cotton at the same time. She said it was easier to thread.
I do that too sometimes with metallic thread if the beads are very small. Then I just work the thread with the beads along with the crochet thread.
I love how you make the pictures flip so we poor left-handers can get a clue as well. Seeing it in a picture from the same angle as our own, it really does make all the difference. Thanks for thinking of us 🙂
Ah, this makes SO much sense! Thanks for the tutorial
Thank you so much for your lovely tutorials. The addition of pictures is sooooooo helpful. You have a terrific site. Thank you, thank you.
[…] to Crochet: Tunisian Simple Stitch (TSS) How To Crochet: Single Crochet with Beads How to Crochet: Double Crochet with Beads Perfecting Your Craft: Finishing the Project How to Read […]
COOL! <3
Thank you,it certainly was a ,of course moment.
I am never quite sure which side is the wrong side and which is the right. Can you shed some light and make it easy for me? Thanks Rachel. Linda M.
Hi Linda, here’s a post about the right and wrong side, hopefully it’ll help: Right Side and Wrong Side in Crochet
Nice, clear tutorial. I love how I can see a lefty view. It made me laugh with delight. I am so used to doing this mentally so it was cool to see the reverse shot done for me.
What about if you’re working something in rounds, so that you’re always working the “right” side — is there a way to add beads and have them not all be on the “wrong” side? Thanks!
You are a very thoughtful person, thinking of us left handers. When I used to crochet doilies, & such with a steel hook, sometimes I’d have to hold up the illustration in a mirror! It was a challenge to understand sometime.
Now I’m trying my hand at putting beads on a triangle shawl, wooden beads, I think.
Thanks for this tutorial, just what I was looking for.
It was just by browsing that I found your lovely site.
I do have another way of adding beads to yarn – good when you can’t find a needle small enough,
I just put a dab of glue or fabric stiffener on the first inch or so of yarn. When it dries it’s stiff enough to thread beads..
Thanks again
I’m sure that you probably already know this, but here goes…
Another way to string beads onto almost any type of fiber, no matter how bulky, as long as the beads fit is to use GUM brand dental floss threaders.
The office mgr/wife of my daughter’s orthodontist was and I’m sure still is an avid crocheter and crafter.
She showed me how to use the same floss threaders, which the kids were supposed to use when flossing their teeth while they had braces on, to string beads onto almost all types of yarn.
They run about $2 to $3 and the package has 25 threaders in it, so you’ll have plenty.
I try to give outt this tip to anyone who likes to use beads in their fiber/yarn crafting.
🙂
Hi, I would love to have more patterns with beads on YARN, not thread. Any chance you designing some things?
I am learning to crochet with beads and am looking for a shiny, silky yarn to make my necklaces drape well. Do you know of a supplier?
Thanks, Lynte
Hi Lynette!
The patons silk bamboo yarn is what came to my mind after reading your description. It is shinier than what some pics are able to show online. You can also find it at almost any major craft store if you want to check it out in person. Good luck with your search!
Easier than I thought!
Thank you very much for sharing your expertise! This is exactly what I was looking for. 😉 Wish you a merry christmas
Best regards Melanie from Germany