
Crocheting with a Peruvian Loom (Wood Block)
By Caissa "Cami" McClinton – 30 CommentsIn my last post, Focus on Fiber: Silk, I mentioned recycled sari silk as a fiber that is fun to crochet with. This week I’d like to share a unique pattern that looks great with sari silk, but would also work with many different types of fiber. This pattern will use a technique that involves crocheting with a Peruvian loom, which I will demonstrate in this tutorial.
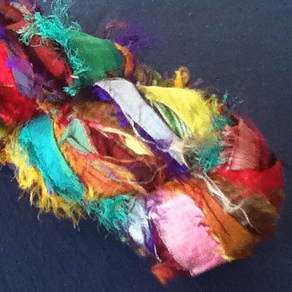
A skein of recycled sari silk
I first learned about Peruvian looms at a consumer trade show in Mexico City. While at first glance it’s hard to know what to do with them, the neat thing is that the technique is actually quite easy. Using a Peruvian loom is great when you really have a knockout yarn that you want to showcase. The resulting stitch displays the yarn beautifully.

A scarf crocheted of the above sari silk using the technique in this tutorial.
The loom I am working with is just a block of wood. The dimensions are approximately 8″ x 4 1/2″ x 3/8″. While I haven’t personally tried it, I am going to guess you could substitute almost anything similar that would retain its shape, like strong cardboard or even a hardcover story book. If there’s interest, I can do a future tutorial on how to make a Peruvian loom. Let me know in the comments if you are interested!
Once you get started with this technique, the possibilities are endless. For now, I am going to show you the very basic stitch. Anyone who has worked with broomstick lace will see this technique is familiar.
For the purpose of this tutorial I am using a basic yarn that is easy to see. My photo above shows the same pattern done in gorgeous sari silk!
You may mouse over images for left-handed views.
Materials
Yarn (any size)
Hook to correspond with yarn
Peruvian loom or substitute
Abbreviations
ch – chain
hdc – half double crochet
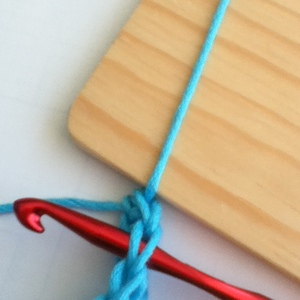
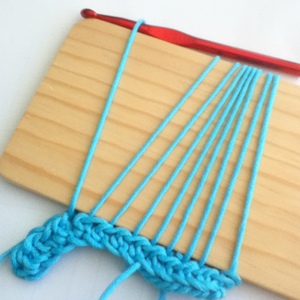
Foundation: ch 13
The photo below shows this in progress.
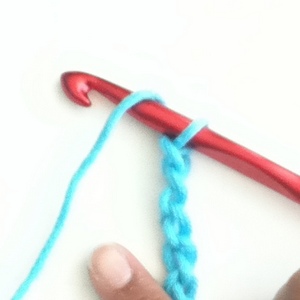
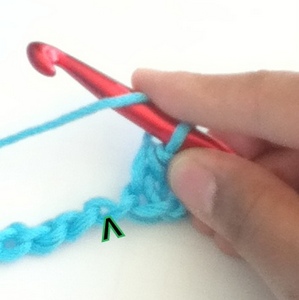
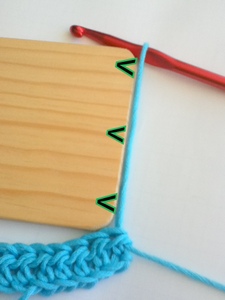
Row 1: Working into the back ridge only, hdc into third ch from hook (first 2 ch from hook count as 1 hdc), and in each ch across, turn: 12 hdc
The photo below shows this in progress. The arrow points to the back ridge.
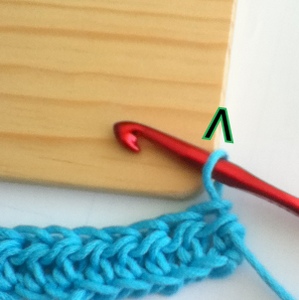
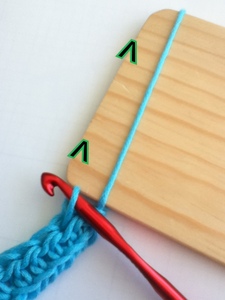
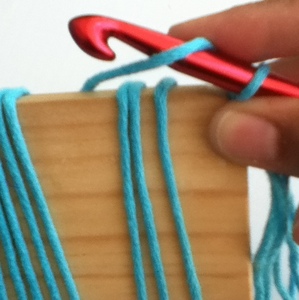
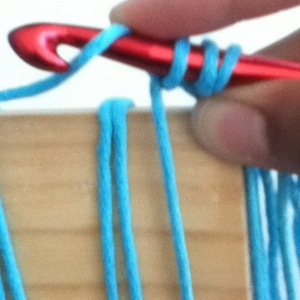
Row 2: extend loop on hook over Peruvian loom.
The photos below show this in progress.
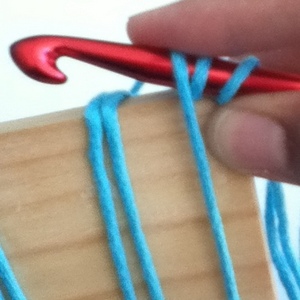
*remove hook from work, insert hook under both loops of next hdc,
The photo below shows this done.
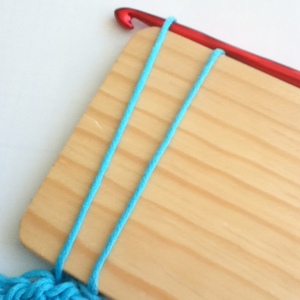
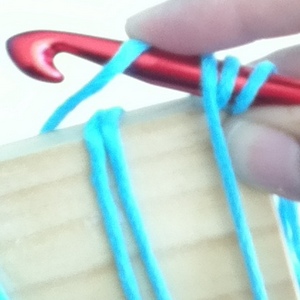
Pull up a loop and extend it over Peruvian loom, tighten the loop around the loom to secure it,
The photos below show this in progress and then done.
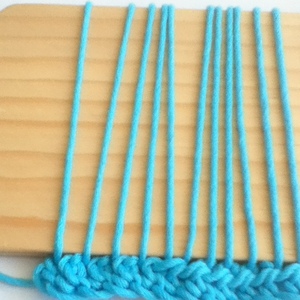
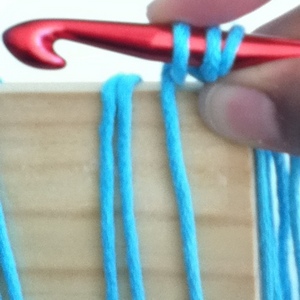
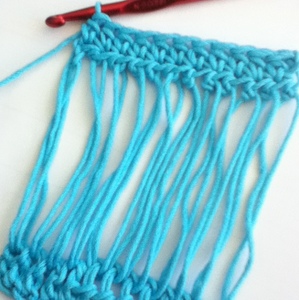
Repeat from * across 10 more times: 12 Peruvian Loops
The photos below show this in progress and then done.
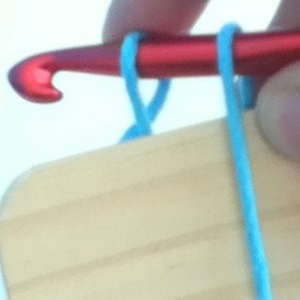
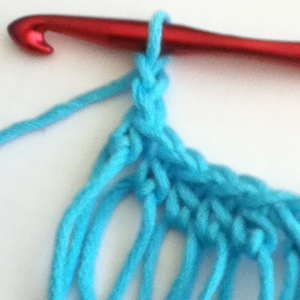
Row 3: With yarn behind work, and keeping Peruvian loops taught, ch 2 in the following manner: Insert hook through the top of first Peruvian loop. Extending yarn to the height of Peruvian loops, draw up loop. Yarn over hook.
The photo below shows this done.
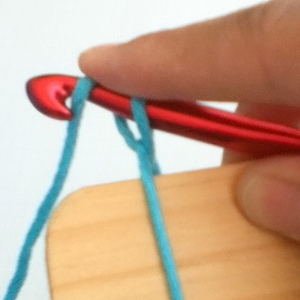
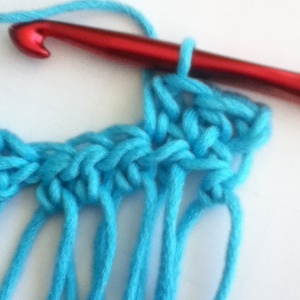
Pull through loop (chain 1 made).
The photo below shows this done and next ch 1 in progress.
Ch 1 again.
The photo below shows this completed.

Turn work, (ch 2 counts as first hdc), pull completed loop off of loom, *Hdc into next Peruvian loop in the following manner: yarn over hook.
The photo below shows this done.
Insert hook under next Peruvian loop,
The photo below shows this done
Draw up loop and pull through (three loops on hook),
The photos below show this in progress and then done.
Yarn over and pull through all three loops (hdc made)
The photo below shows this in progress.
Pull completed loop off of loom, repeat from * across: 12 hdc
The photo below shows this done.
Row 4: ch 2, turn work
The photo below shows this done.
hdc in each hdc across: 12 hdc
The photos below show this in progress and then done.
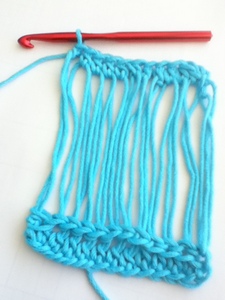
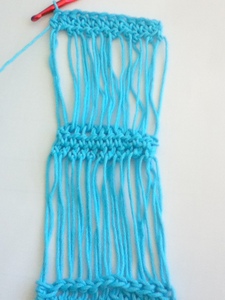
To finish project, repeat rows 2-4 until the project is the length you desire.
The photo below shows 2 repeats of pattern.
Add fringe if you desire!

Me wearing my sari silk scarf with fringe!
Have fun practicing with this tutorial! If you need help along the way, just let me know in the comments section below.

Thank you for such a good tutorial.. I would love to have a copy of this, if it is possible. I have some trellis ladder yarn that I would like to use for a small neck scarf for a friend of mine. It is hard to work with and I would have better luck with a pattern like this.
Thanks for your help, pat
Great tutorial!! Thank you 🙂
Amazing! I’ve never seen this technique before! Your silk scarf is beautiful! 🙂
Very similar to broomstick lace but I had never seen it done this way before. I especially liked the presentation technique of mousing over the photos to show a left-handed version of this. My friend who made the petal pullover with me is left-handed and she would appreciate your consideration for left-handed workers very much.
Thanks! I am glad that everyone likes the tutorial! 🙂
I would like to have instructions for the Peruvian Crochet Loom. Thank You. SS
LUV IT! this is very similar in appearance to a drop stitch in knitting. I would love to know how to make the loom…please.
thanks
sue
bad kitty knits
hi
would definitely like to know how to make the loom, looks easy..thanx
Id this different than Broomstick crochet?
It’s not that different from broomstick lace. Quite similar, actually. 🙂
Cami, leave it to you to find something new and interesting for us! I’m with Pat, looks like a great way to use trellis/ladder yarn and actually see the unique beauty of this specialty yarn. Many thanks!!
Aw! This and all of the comments are very sweet! THANK YOU!
this is awesome! thank you!
My daughter made a beautiful scarf with this technique using a piece of cardboard. Worked great. The flipped pictures for lefties are very much appreciated.
Interesting. In Spanish, broomstick lace is actually called punto peruano (Peruvian stitch). The funny thing is, I lived in Peru for three years, and I only met one person who even knew what this was. I also never saw a loom like this.
Elizabeth, I got the loom (and another that produces what is essentially broomstick lace) in Mexico. Both looms are called “telar peruano,” literally Peruvian loom. I got the loom and learned the technique at a trade show. Although crochet in general is wildly popular in Mexico, this particular technique is still pretty novel, I’d say.
This is so cool. I would love to have the instructions to make a loom. Thank you.
Hi, your technique is very great ,i have never seen ,I think ,it could be very hard but your explanation was very clear, thank you so much 😉
Great. I will work on a loom tutorial. 🙂
THANK YOU, THANK YOU for the reversible pictures. Being left handed, I usually have to mentally transpose the pictures!!!!!
🙂
Love this and I have learned so much from your tutorials.
Thank you
Teresa
This is awesome! So much potential. Can’t wait to get started. Just had some boards cut yesterday for shelving. There was a 1x10x4 left over. Going to sand it down and use it. Looking around my craft room I now see so much potential. Old VHS cases, pencils cases, DVD movie cases. lol Thanks for the idea!
OMG, a long time ago (aprx 7 yrs) my mom and I purchased the loom and were supposed to go back to learn how to do this particular scarf and we never did, since then I’ve been on the hunt for a tutorial and my friend found it in 5 min….this is so awesome I just hope I can make it as pretty as yours THANK YOU SO MUCH!!! =d
that was supposed to be a =D happy face lol
I seen one of the peruvian looms, didn’t know where to get one so I made my own out of wood. I didn’t have the dimensions but it works. It is like broomstick lace to make.
Perfect! Thanks for sharing.
Am I missing something?
This “loom” looks like a piece of wood with markings on it.
Nope! The loom is just as simple as that, hence the blog post title. I also have a tutorial on how to make one of these looms out of cardboard.
A lovely technique which I’ll be trying.
Just a quick point.
On row 3 you used the word “taught” but I’m sure you meant “taut”.