
Tips from the Doily Nerd: Crocheting Your First Doily!
By Molly Ferriter – 20 Comments| Hello, my name is Molly and I’m a doily nerd. Yes, that’s what I said, a doily nerd! I love doilies of all shapes, sizes, and types: ruffled doilies, vintage doilies, oblong, square, and rectangle doilies. Did you know there are doily patterns with 3D swans? Here’s my question for you- Why haven’t you started your first doily!? I remember your New Year’s resolution from 2012. You haven’t made one yet, have you? Well, here’s a few tips to get you started! | 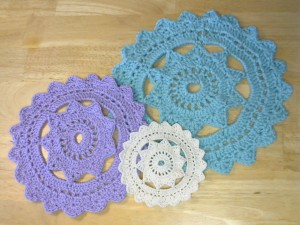
|
Many crocheters have a fear of the tiny, tiny crochet thread. But don’t worry, we can tackle that! There is nothing to be afraid of! It’s just like switching from bell bottoms to skinny jeans- a little tight at first, but then you get used to them!
Pick an appropriate, beginner’s doily pattern.
- Look for a free pattern (this is your first doily, we aren’t going to be making a family heirloom passed on to your children’s grandchildren and hung up over the fireplace in awe- not yet atleast). We are looking for a pattern that gives you some practice under your belt, some skills, some experience, so pick a simple, easy-to-understand pattern.
- Find a pattern that is clearly marked “beginner” or “easy”.
- Very important: The pattern should have a stitch count at the end of the rows.
Now that we’ve got a pattern, let’s get hooking! For this post, I used the Crochet Spot free pattern, awesomely entitled, Hipster Doily. With a name like that, I couldn’t resist crocheting it!
Doily Tips for Beginners:
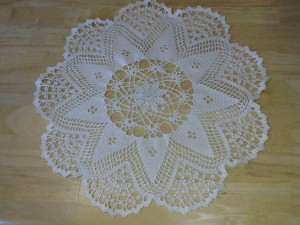
One of my favorite doilies!
2. COUNT! COUNT! COUNT! When we crochet doilies, each round builds upon the stitches from the previous round. You may complete the round and everything looks great. However, without counting the stitches in each round, you may not know that you have made a mistake until several rows later, and the only way to fix it is to rip up the stitches until you get to the mistake! So count the stitches in each round and make sure that your count matches the stitch count in the pattern.
Let’s Crochet!
 For your first doily, you want to get used to crocheting a doily pattern without the worry and strain of working with a smaller yarn or thread at the same time. You are going to crochet the doily in a regular-size yarn; pick your favorite yarn and hook. Don’t worry about crochet thread yet, first we want to get a feel for the pattern and practice the stitches. I crocheted mine with Red Heart Super Saver in Aruba sea with a size I (5.50 mm) hook.
A little smaller...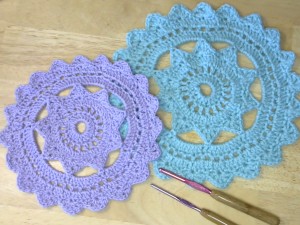
Next we are going to crochet the doily with a somewhat smaller yarn. We want to “ease” into the crochet thread, making the same doily a little smaller each time. I crocheted this one with Omega Sinfonia mercerized cotton yarn, which is a sportweight yarn, and a size H (4.00 mm).
Let’s try it with crochet thread. 
Now that you have made the same doily with yarn a couple times or more, you want to give it a go on crochet thread. You may find it beneficial to make more than two doilies in different sizes; repeat until you are comfortable with the pattern. The most common thread used today for doilies and other crochet thread projects is size 10, and it’s a great thread for beginners. For size 10 thread, the suggested hook is a size 7 (1.65 mm/ U.K. #4) or size 8 (1.5 mm/ U.K. #4 1/2). I would strongly suggest using a larger hook for your first try using thread, whatever you are comfortable using, maybe a 2.00 mm or even 2.25 mm.
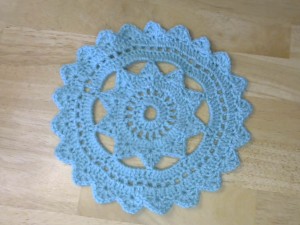
Here’s my finished Hipster Doily size 10 thread and a 1.50 mm hook.
It may take a few times to get your doily right. You may have to rip out rows (or the entire doily) a few times. Don’t give up! Repeat these steps until you have the pattern down. Then, you can move on to another fantastic doily. Each time you will build your doily repertoire. Soon you will be a doily maker! Doiliest? Doilier? Hmmm.
Okay, Crochetspotters! What tips do you have for beginner doily makers?

Love this! Doilies truly are a specialty of their own. Great advice.
A fellow doily lover!
my eyes can’t handle the small thread and no cordination, so i make my doilies with crochet cotton. oh man, easy to do up. easy to wash. no iron or starch. i just wash, dry and put back on table. they last forever. I learned my love of doilies and cotton yarn from our gal Molly here.
STANDING OVATION KIDDO!!!!!!!!!!
Thanks, Beverly! You are so sweet! A great thing about making doilies in crochet cotton is you can crochet different doilies for holidays/ seasons because it comes in such nice color variations.
what is the name of your favorite doily in the picture?
on this blog you have a picture of a doily you say is your favorite what is the name of it or is there a link where it can be found? TY
Sorry, Marie, I answered your question below instead of as a response to your comment. I’ll post the answer here again in case you didn’t see it below. This really is a beautiful doily to work, it’s one of my two favorites of all time. The pattern is from the book, “Lovely Heirloom Doilies” by Leisure Arts, written by C. Strohmeyer. Leaflet #2648. It is not in print anymore, but you can probably find it on ebay. I purchase many vintage/ out-of-print doily patterns and books from ebay for just a few dollars. I have a few of C. Strohmeyer’s pattern books. She is one of the best doily designer that I have seen!
This is wonderful to read. I got back into crocheting on this site a few years ago and loved to make the hipster and large hipster doily. I used bright colors in Schachenmayr Catania Fine which is about 50g/165m . And I used a 3mm-3.5mm hook. Then I hung them in my windows or on a white wall. Fun easy pattern with great results.
They would look lovely on a wall or window! Doilies look fantastic in bright colors!
I’m gearing up to make a Mandela doily. My grandmother crocheted doilies, tablecloths and bedspreads and dyed the white cotton with tea. I have a whole tub stored away and am ready to see if they are still useable after more than 70 years.
What a wonderful family heirloom to have! That is absolutely a cherished treasure for you!
Someone asked where to get the pattern for my favorite doily. The pattern is from the book, “Lovely Heirloom Doilies” by Leisure Arts, written by C. Strohmeyer. Leaflet #2648. It is not in print anymore, but you can probably find it on ebay. I purchase many vintage/ out-of-print doily patterns and books from ebay for just a few dollars. I have a few of C. Strohmeyer’s pattern books. She is one of the best doily designer that I have seen!
Learned to crochet at age 4 from my grandmother,and to this day, cannot do a doiley!
Tension is too tight or too loose: too tight makes a bowl and too loose makes a sombrero !
Practice, practice;blocking, starch,etc!
I will give this a try!
Great, Pat! Let me know how it goes! I, too, tend to crochet too tight. I think tight tension is easier to fix than too loose tension. I tend to crochet with a larger hook than suggested on the yarn. That can sometimes fix the problem of tension that is too tight. Try your doilies with a larger hook than is suggested and see how that goes! Let me know!
Had to stop by and check out your articles! Excellent work Molly! From, your fellow doily nerd!
Thanks, Yarnelf! Keep the doily love alive! Hee Hee!
I too have come to love doilies. The simple ones I don’t have a problem with, but as I am progressing to harder doilies I keep running into the same problem. As my doily gets larger I start to have waves or ripples so they won’t lay flat. I have one that I am on my third try and it’s beginning to ripple. I thought it was tension, but I have been careful to keep to a fairly loose stitch. Is there another reason for the ripples? If I get to the end will they block out and lay flat? I appreciate any help you can give me! Thanks
I have had several that rippled but ironed out at the end. I would finish and see if it irons out. I use spray starch and iron, though others use pins to block out the doily. If they just don’t block out, you may have to try the doily again. Rippling is caused because the outer rounds have too many stitches in comparison to the inner rounds. So, either the cause is the inner rounds were missing a few stitches or chains, or the outer has extra. I really think it will iron or block out, though! Wash and soak the doily then block it out
Okay, thanks for the advice, I will give it a try. I really want to finish this one, it has pineapples which I really like the look of.
Love pineapples! I am pineapple-crazy!